内存泄露排查OOM 导致被杀较为明显的内存泄漏不太明显的内存泄漏进程异常排查查看系统级别是否运行异常测试网络连通性查看进程级别是否运行异常进程后台运行删除 - 开头文件查看系统信息CPUTCP 协议TCP 连接建立TCP 连接释放HTTP 协议wrk: HTTP 压力测试wrk的全局属性wrk 的全局方法启动阶段运行阶段结束阶段wrk 使用手册示例 1示例 2示例 3检测服务器是否支持断点续传GDB 小技巧基本操作调试 coredumpVIM 小技巧Git 小技巧基本操作git stashgit tag合并分支到主干删除远程分支查看历史提交信息仓库迁移合并多次提交设置代理git pull/push 记住密码github 同步 fork 仓库github 提交 PRYUM 小技巧查询删除Docker 小技巧镜像标签由 Dockerfile 构建镜像容器由容器构建镜像将镜像推送到 DockerHub端口映射挂载目录解决无法运行 systemctl机器时间、硬件时钟网络测速SSH 机器互信(免密登陆)PSSH 批量操作SSH 禁用超时跳板机 Jumpserver 上传/下载文件上传文件 rz下载文件 szMySQL 小技巧MySQL 命令行模式显示查询记录MySQL 清理控制台MySQL 查看库、表结构MySQL 随机排序快捷选择 MySQL 实例条件插入timestamp 字段查询时间相关函数查询 utc 时间戳、utc 日期、utc 时间、now()now() 与 sysdate() 异同date_add 函数INSERT INTO SELECT 语句查看表创建时间三目表达式between ... and ...IFNULL条件更新查询显示行号删除重复记录替换字段数据备份与恢复Golang 小技巧判断 goproxy 是否缓存了某个 Go 模块的特定版本查看每个依赖项的完整 HTTP 请求路径Redis 小技巧批量删除 keyNGINX 基础配置配置静态资源使用 alias 重定义路径使用 root 指定前缀Location 匹配规则语法规则匹配过程示例详解location @name 使用URL 尾部的 /配置静态资源实践原则参考资料NGINX 性能优化高层的配置Events 模块NGINX 配置文件错误检查NGINX 实战同时代理前端和后台接口代理 websocketBash 共享屏幕/录制屏幕共享终端录制屏幕与回放java 反编译CFRbrew 安装指定版本的库C++调用 golang 动态库使用 frp 实现 Windows 远程桌面连接刷新 DNS 缓存解决 godaddy 根域名 @ 不支持 cnameCentOS 7 升级内核
内存泄露排查
OOM 导致被杀
利用 dmesg 查看
xxxxxxxxxxdmesg | grep a.out较为明显的内存泄漏
通过系统自带的命令持续地观察进程内存的占用情况,即可发现有明显内存泄漏的进程;更进一步,当进程运行一段时间导致系统内存耗尽,将会被操作系统杀掉。
利用
free查看系统内存利用
top/htop查看进程占用内存
xxxxxxxxxxtop -d 1 -p pid利用 ps 查看进程占用内存
xxxxxxxxxxwatch -n1 'ps -aux|grep -v grep|grep pid'不太明显的内存泄漏
利用
valgrind工具查看内存分配、释放、泄漏
xxxxxxxxxxvalgrind --log-file=valgrind.log --tool=memcheck --leak-check=full --show-reachable=no --workaround-gcc296-bugs=yes ./a.out进程异常排查
查看系统级别是否运行异常
利用
top/htop查看全局资源使用利用
free查看系统内存使用利用
iostat查看磁盘I/O是否异常利用
df -i查看系统inode使用是否异常;df -h查看系统磁盘使用是否异常利用
ss/netstat查看系统网络连接是否异常
xxxxxxxxxx# 查看网络统计信息root@:~# netstat -s|grep -E "rejects|overflowed|timeout|dropped"    6 dropped because of missing route    479629 times the listen queue of a socket overflowed    482420 SYNs to LISTEN sockets dropped    5 timeouts after SACK recovery    2 timeouts in loss state    12200 other TCP timeouts    582 connections aborted due to timeout
# 查看网络连接信息root@:~# netstat -napActive Internet connections (servers and established)Proto Recv-Q Send-Q Local Address           Foreign Address         State       PID/Program nametcp        0      0 0.0.0.0:4501            0.0.0.0:*               LISTEN      25511/coind     tcp        0      0 0.0.0.0:22              0.0.0.0:*               LISTEN      907/sshd        tcp        0      0 0.0.0.0:7901            0.0.0.0:*               LISTEN      25511/coind     tcp        0      0 127.0.0.1:32000         0.0.0.0:*               LISTEN      1688/java       tcp        0      0 172.18.219.68:7901      47.104.240.30:49308     ESTABLISHED 25511/coind     tcp        0      0 172.18.219.68:7901      39.104.158.97:54688     ESTABLISHED 25511/coind     tcp        0      0 172.18.219.68:7901      47.99.132.207:56138     ESTABLISHED 25511/coind     tcp        0      0 172.18.219.68:22        219.133.101.96:42080    ESTABLISHED 9831/0          tcp        0      0 172.18.219.68:58788     47.104.240.30:7901      ESTABLISHED 25511/coind     tcp        0      0 172.18.219.68:58600     47.99.132.207:7901      ESTABLISHED 25511/coind     tcp        0      0 172.18.219.68:7901      39.106.164.24:59070     ESTABLISHED 25511/coind     tcp        0      0 172.18.219.68:58122     106.11.248.209:80       ESTABLISHED 1287/AliYunDun  tcp       32      0 172.18.219.68:43932     100.100.0.13:3128       CLOSE_WAIT  1688/java       tcp        0      0 172.18.219.68:7901      47.104.229.53:46200     ESTABLISHED 25511/coind     tcp        0      0 127.0.0.1:32000         127.0.0.1:31000         ESTABLISHED 1686/wrapper    tcp        0      0 172.18.219.68:7901      116.62.67.116:59758     ESTABLISHED 25511/coind     tcp        0      0 172.18.219.68:58226     106.14.112.174:7901     ESTABLISHED 25511/coind
利用
ifstat查看系统网络流量是否异常
测试网络连通性
HTTP
xxxxxxxxxxroot@ubuntu:~# httpstat httpbin.org/getConnected to 52.6.34.179:80 from 172.18.118.11:52422
HTTP/1.1 200 OKDate: Thu, 19 Nov 2020 09:36:08 GMTContent-Type: application/jsonContent-Length: 255Connection: keep-aliveServer: gunicorn/19.9.0Access-Control-Allow-Origin: *Access-Control-Allow-Credentials: true
Body stored in: /tmp/tmpvrfwhh7m
  DNS Lookup   TCP Connection   Server Processing   Content Transfer[    509ms   |     2264ms     |       831ms       |        1ms       ]             |                |                   |                  |    namelookup:509ms          |                   |                  |                        connect:2773ms            |                  |                                      starttransfer:3605ms           |                                                                 total:3606ms
TCP
xxxxxxxxxxroot@ubuntu:~# nc -z -v 192.168.1.175 22Connection to 192.168.1.175 22 port [tcp/ssh] succeeded!xxxxxxxxxxroot@ubuntu:~# telnet 192.168.1.175 22Trying 192.168.1.175...Connected to 192.168.1.175.Escape character is '^]'.SSH-2.0-OpenSSH_6.6.1p1 Ubuntu-2ubuntu2.10UDP
xxxxxxxxxx# nc -z -v -u 192.168.10.12 123Connection to 192.118.20.95 123 port [udp/ntp] succeeded!查看进程级别是否运行异常
top/htop/iftop查看进程资源使用是否正常(特别注意,内存是否一致在增加)nethogs查看进程流量lsof查看进程打开的文件句柄数查看进程堆栈信息(2388 为进程号)
xxxxxxxxxx[root@www ~]# cat /proc/2388/stack[<ffffffff811f2bb5>] poll_schedule_timeout+0x55/0xb0[<ffffffff811f413d>] do_sys_poll+0x4cd/0x580[<ffffffff811f42f4>] SyS_poll+0x74/0x110[<ffffffff81645909>] system_call_fastpath+0x16/0x1b[<ffffffffffffffff>] 0xffffffffffffffffstrace查看系统调用和信号
xxxxxxxxxx[root@www ~]# strace -s 99 -ffp 3363Process 3363 attached with 2 threads[pid 3365] restart_syscall(<... resuming interrupted call ...> <unfinished ...>[pid 3363] select(18, [13 16 17], NULL, NULL, {29, 702368}) = 1 (in [16], left {23, 709762})[pid 3363] fcntl(16, F_GETFL) = 0x802 (flags O_RDWR|O_NONBLOCK)[pid 3363] accept4(16, 0, NULL, SOCK_CLOEXEC) = -1 EAGAIN (Resource temporarily unavailable)Process 3365 detachedgdb attach进程并获取堆栈信息
xxxxxxxxxx[root@www ~]# gdb attach 2388GNU gdb (GDB) Red Hat Enterprise Linux 7.6.1-80.el7Copyright (C) 2013 Free Software Foundation, Inc.License GPLv3+: GNU GPL version 3 or later <http://gnu.org/licenses/gpl.html>This is free software: you are free to change and redistribute it.There is NO WARRANTY, to the extent permitted by law.  Type "show copying"and "show warranty" for details.This GDB was configured as "x86_64-redhat-linux-gnu".For bug reporting instructions, please see:<http://www.gnu.org/software/gdb/bugs/>...Attaching to process 2388Reading symbols from /home/mysql/bin/mysqld...done.Reading symbols from /usr/lib64/libpthread.so.0...Reading symbols from /usr/lib/debug/usr/lib64/libpthread-2.17.so.debug...done.done.
(gdb) (gdb) bt#0  0x00007f88e3f4669d in poll () at ../sysdeps/unix/syscall-template.S:81#1  0x0000000000d2ae9d in Mysqld_socket_listener::listen_for_connection_event (this=0x5933700)    at /root/lnmp1.3-full/src/mysql-5.7.11/sql/conn_handler/socket_connection.cc:848#2  0x000000000077e069 in connection_event_loop (this=0x59a6050) at /root/lnmp1.3-full/src/mysql-5.7.11/sql/conn_handler/connection_acceptor.h:66#3  mysqld_main (argc=45, argv=0x3b56bd8) at /root/lnmp1.3-full/src/mysql-5.7.11/sql/mysqld.cc:4941#4  0x00007f88e3e7bb15 in __libc_start_main (main=0x756100 <main(int, char**)>, argc=10, ubp_av=0x7ffe5ab6c418, init=<optimized out>, fini=<optimized out>,     rtld_fini=<optimized out>, stack_end=0x7ffe5ab6c408) at libc-start.c:274#5  0x00000000007734dd in _start ()
java 程序,可以借助
jstack、jstat、jmap、jinfo等查看进程的运行信息
进程后台运行
代码层面,不同语言均可调用系统接口 daemon() 去实现
damon/damonlize 等小工具(不同系统名字略有不同)
screen/tmux
nohup
systemd/supervisor
删除 - 开头文件
加入当前目录前缀即可,例如
xxxxxxxxxxrm -rf ./-ef\ \|\ grep\ nginx查看系统信息
CPU
xxxxxxxxxx# 总核数 = 物理 CPU 个数 X 每颗物理 CPU 的核数 # 总逻辑 CPU 数 = 物理 CPU 个数 X 每颗物理 CPU 的核数 X 超线程数
# 查看物理 CPU 个数cat /proc/cpuinfo| grep "physical id"| sort| uniq| wc -l# 查看每个物理 CPU 中core 的个数(核数)cat /proc/cpuinfo| grep "cpu cores"| uniq# 查看逻辑 CPU 的个数cat /proc/cpuinfo| grep "processor"| wc -l# 查看 CPU 信息(型号)cat /proc/cpuinfo | grep name | cut -f2 -d: | uniq -c
# 查看 CPU 是否启用超线程。如果 cpu cores == siblings,表示不支持;否则支持root@ubuntu:~# cat /proc/cpuinfo | grep -e "cpu cores"  -e "siblings" | sort | uniqcpu cores       : 12siblings        : 24
TCP 协议
TCP 连接建立
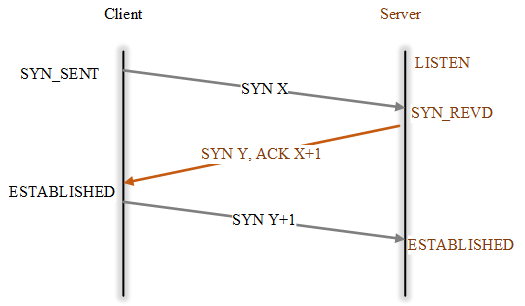
在 TCP/IP 协议中,TCP 协议提供可靠的连接服务,采用三次握手建立一个连接。
第一次握手:建立连接时,客户端发送
SYN到服务器,并进入SYN_SEND状态,等待服务器确认第二次握手:服务器收到
SYN,必须确认客户的SYN,同时自己也发送一个SYN,即SYN + ACK,此时服务器 进入SYN_RECV状态第三次握手:客户端收到服务器的
SYN+ACK,向服务器发送确认包ACK,此包发送完毕,客户端和服务器进入ESTABLISHED状态,完成三次握手。 完成三次握手,客户端与服务器开始传送数据。
为什么要三次握手?
防止失效的连接请求突然传到服务器端,让服务器端误认为要建立连接。
TCP 连接释放
在 TCP/IP 协议中,TCP 协议提供可靠的连接服务,采用四次挥手释放一个连接。
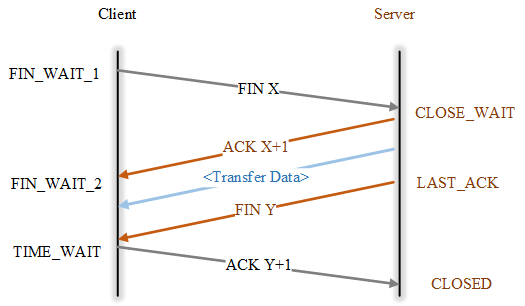
为什么 Client 进入 TIME-WAIT 后必须等待 2 MSL
报文段最大生存时间 MSL(Maximum Segment Lifetime),它是任何报文段被丢弃前在网络内的最长时间,实现中的常用值是 30秒,1 分钟,或 2 分钟
保证 Client 发送的最后一个 ACK 报文段能达到 Server
防止失效的报文段出现在连接中
HTTP 协议
wrk: HTTP 压力测试
wrk 是一款现代化的 http 压测工具,提供 lua 脚本的功能可以满足每个请求或部分请求的差异化
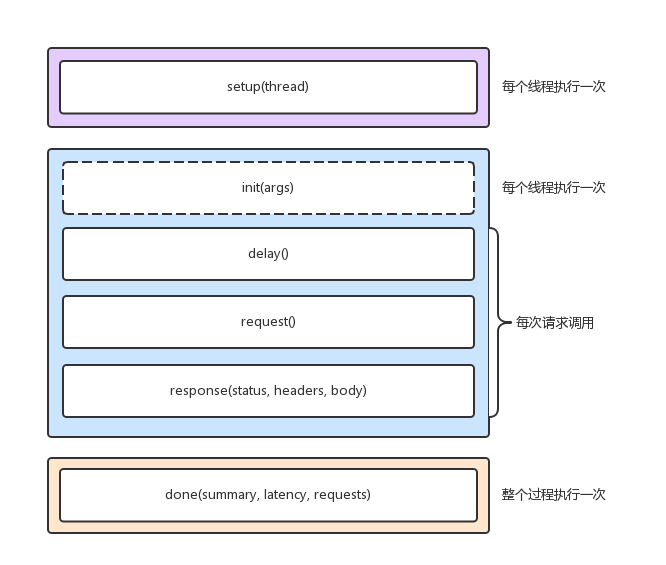
wrk 中执行 http 请求的时候,调用 lua 分为3个阶段,setup,running,done,每个 wrk 线程中都有独立的脚本环境
可以参考 wrk benchmark 项目包含的样例(目录 scripts)以及说明(SCRIPTING)
wrk的全局属性
xxxxxxxxxxwrk = { scheme = "http", host = "localhost", port = nil, method = "GET", path = "/", headers = {}, body = nil, thread = <userdata>,}wrk 的全局方法
xxxxxxxxxx-- 生成整个 request 的 string,与全局属性 wrk table 配合使用function wrk.format(method, path, headers, body)-- 获取域名的 IP 和端口,返回 tablefunction wrk.lookup(host, service)-- 判断 addr 是否能连接,例如:`127.0.0.1:80`,返回 true 或 falsefunction wrk.connect(addr)启动阶段
在脚本文件中实现 setup 方法,wrk 就会在测试线程已经初始化但还没有启动的时候调用该方法。wrk 会为每一个测试线程调用一次 setup 方法,并传入代表测试线程的对象 thread 作为参数。setup 方法中可操作该thread 对象,获取信息、存储信息、甚至关闭该线程。
thread提供了 1 个属性,3 个方法
thread.addr 设置请求需要打到的 ip
thread:get(name) 获取线程全局变量
thread:set(name, value) 设置线程全局变量
thread:stop() 终止线程
运行阶段
init 由测试线程调用,只会在进入运行阶段时,调用一次。支持从启动 wrk 的命令中,获取命令行参数; delay 在每次发送 request 之前调用,如果需要 delay,那么 delay 相应时间; request 用来生成请求;每一次请求都会调用该方法,所以注意不要在该方法中做耗时的操作; reponse 在每次收到一个响应时调用;为提升性能,如果没有定义该方法,那么 wrk 不会解析 headers 和 body。
function init(args) 每个线程仅调用 1 次,args 用于获取命令行中传入的参数, 例如 --env=pre
function delay() 每次请求调用 1 次,发送下一个请求之前的延迟, 单位为 ms
function request() 每次请求调用 1 次,返回 http 请求
function response(status, headers, body) 每次请求调用 1 次,返回 http 响应
结束阶段
该方法在整个测试过程中只会调用一次,可从参数给定的对象中,获取压测结果,生成定制化的测试报告。
xxxxxxxxxxfunction done(summary, latency, requests)

latency.min              -- minimum value seenlatency.max              -- maximum value seenlatency.mean             -- average value seenlatency.stdev            -- standard deviationlatency:percentile(99.0) -- 99th percentile valuelatency(i)               -- raw value and count
summary = {  duration = N,  -- run duration in microseconds  requests = N,  -- total completed requests  bytes    = N,  -- total bytes received  errors   = {    connect = N, -- total socket connection errors    read    = N, -- total socket read errors    write   = N, -- total socket write errors    status  = N, -- total HTTP status codes > 399    timeout = N  -- total request timeouts  }}
wrk 使用手册
xxxxxxxxxx使用方法: wrk <选项> <被测 HTTP 服务的 URL> Options: -c, --connections <N> 跟服务器建立并保持的 TCP 连接数量 -d, --duration <T> 压测时间 -t, --threads <N> 使用多少个线程进行压测 -s, --script <S> 指定 Lua 脚本路径 -H, --header <H> 为每一个 HTTP 请求添加 HTTP 头 --latency 在压测结束后,打印延迟统计信息 --timeout <T> 超时时间 -v, --version 打印正在使用的 wrk 的详细版本信息 <N>代表数字参数,支持国际单位 (1k, 1M, 1G) <T>代表时间参数,支持时间单位 (2s, 2m, 2h)示例 1
启动 4 个线程,创建 100 个连接,持续 10s,请求百度主页(支持 HTTP/HTTPS)
xxxxxxxxxxroot@ubuntu:~/wrk# wrk -t4 -c100 -d10s https://www.baidu.comRunning 10s test @ https://www.baidu.com 4 threads and 100 connections Thread Stats Avg Stdev Max +/- Stdev Latency 77.65ms 122.51ms 1.88s 88.42% Req/Sec 618.40 200.60 1.25k 77.58% 24500 requests in 10.04s, 360.47MB read Socket errors: connect 0, read 130, write 0, timeout 0Requests/sec: 2439.09Transfer/sec: 35.89MB结果分析:
avg/stddev/max平均值/标准差/最大值+/- stddev正负一个标准差,落在正负一个标准差的次数所占比重,值越大数据越稳定latency时延,对应响应时间Req/Sec单个线程每秒钟请求数,值越大性能越高Requests/sec所有线程总共平均每秒钟请求数
示例 2
每个线程要先进行认证,认证之后获取 token 以进行压测。在没有token的情况下,先访问 /authenticate 认证。认证成功后,读取 token 并替换 path 为 /resource。
xxxxxxxxxxtoken = nilpath  = "/authenticate"
request = function()   return wrk.format("GET", path)end
response = function(status, headers, body)   if not token and status == 200 then      token = headers["X-Token"]      path  = "/resource"      wrk.headers["X-Token"] = token   endend
示例 3
启动 4 个线程,创建 100 个连接,持续 10s,每个请求发送不同的数据
脚本内容如下所示
xxxxxxxxxxwrk.method = "POST"  wrk.body   = ""-- 可以根据实际接口请求路径修改wrk.path   = "/"wrk.headers["Content-Type"] = "text/plain"
-- 每次修改充值积分值,保证每次交易都能成功提交,否则,可能因为交易仍在内存池中,-- 判定为同一笔交易导致提交失败。当然,也可在脚本中每次选用不同的目标账户进行充值。local value = 1local a = '{\"jsonrpc\": \"1.0\", \"id\":\"curltest\", \"method\": \"creditrechargetx\", \"params\": [\"wWPAztEx3m5hArykWaH3qQZ13NtxaZXJts\", \"82908-1\", 0, 10000, 0, \"wNYc86E6JVvQfmgzQDESR81J7UuLtt9WDx\", 'local b = '] }'
request = function()
    local data = string.format("%s%d%s", a, value, b)    value = value + 1
    return wrk.format(nil, nil, nil, data)end
-- 请求之间设置 30~40 ms 的随机延迟--function delay()--   return math.random(30, 40)--end
-- 可打印响应内容--response = function(status, headers, body)--    print(string.format("status: %d", status))--    print(body)--end
执行压测用例
xxxxxxxxxxroot@ubuntu:~/wrk# wrk -t4 -c100 -d10s -s creditrecharge.lua http://192.168.1.213:6901Running 10s test @ http://192.168.1.213:6901 4 threads and 100 connections Thread Stats Avg Stdev Max +/- Stdev Latency 688.24ms 363.88ms 2.00s 84.39% Req/Sec 52.32 50.44 242.00 83.33% 1435 requests in 10.09s, 667.72KB read Socket errors: connect 0, read 0, write 0, timeout 15Requests/sec: 142.25Transfer/sec: 66.19KB检测服务器是否支持断点续传
利用 curl 发起请求,响应报文中包含 Content-Range,则表明服务器支持断点续传。
xxxxxxxxxx✗ curl -i --range 0-9 http://hello.com/1550d654e2b95b5a69bac14d36f25f04.png -IHTTP/1.1 206 Partial ContentServer: nginx/1.16.1Date: Mon, 30 Nov 2020 13:30:10 GMTContent-Type: image/pngContent-Length: 10Last-Modified: Fri, 30 Oct 2020 06:47:30 GMTConnection: keep-aliveVary: Accept-EncodingETag: "5f9bb702-c95"Content-Range: bytes 0-9/3221GDB 小技巧
基本操作
基础
xxxxxxxxxx# 列出源码的一部分list
# 单步调试,不进入函数next# 单步调试,进入函数step
# 运行加载了的程序run# 继续执行程序continue# 退出调试quit
# 输出特定变量的值print# 设置断点break# 查看所有断点信息info breakpoints# 删除所有断点delete# 删除某个断点delete breakpoint [n]# 禁用某个断点disable breakpoint [n]# 使能某个断点enable breakpoint [n]
# 查看本地变量info locals# 查看 goroutine 列表(GoLang 专用)info goroutines# 查看所有的线程info threads# 切换到某个线程thread <线程号># 查看当前变量的类型whatis <变量名>
# 监视一个变量的值,一旦发生变化,程序将会被暂停watch
# 改变运行过程中的变量值set variable <var>=<value>
# 打印所有线程堆栈thread apply all bt
# 打印堆栈(backtrace)bt# 可以通过 'frame' 命令中明确指定号码,或者使用 'up' 命令在堆栈中上移以及 'down' 命令在堆栈中下移来切换帧。要获取有关帧的进一步信息,如它的地址和程序语言,可以使用命令 'info frame'frame
调整堆栈层级
xxxxxxxxxx#0  __lll_lock_wait () at ../nptl/sysdeps/unix/sysv/linux/x86_64/lowlevellock.S:135135     in ../nptl/sysdeps/unix/sysv/linux/x86_64/lowlevellock.S
# 进入上一层堆栈(gdb) up#1  0x00007f23cb9d2664 in _L_lock_952 () from /lib/x86_64-linux-gnu/libpthread.so.0(gdb) up#2  0x00007f23cb9d24c6 in __GI___pthread_mutex_lock (mutex=0x60adf38388 <mempool+8>) at ../nptl/pthread_mutex_lock.c:114114     ../nptl/pthread_mutex_lock.c: No such file or directory.
# 进入下一层堆栈(gdb) down#1  0x00007f23cb9d2664 in _L_lock_952 () from /lib/x86_64-linux-gnu/libpthread.so.0
调试 coredump
生成 coredump 文件
xxxxxxxxxx# 方式一gcore -o xxx.core pid
# 方式二gdb attach pidgcore
调试 coredump 文件
xxxxxxxxxxgdb xxx -c xxx.coreVIM 小技巧
| 快捷键(命令) | 功能 |
|---|---|
| :%s/foo/bar/gc | 全文替换时带确认,即,对于任何一个匹配项,需要确认是否替换 |
| :%s/foo/bar/g | 全文替换时(不待确认) |
| :s/foo/bar/g | 当前行替换(不带确认) |
| :'<,'>s/foo/bar/g | 选定范围内替换(不带确认),在 Visual 模式下选择区域后输入 :,Vim 即可自动补全为 :'<,'>。例如,:2,10/foo/bar/g 替换第 2~10 行所有匹配项 |
| :.,+2s/foo/bar/g | 当前行和接下来的 2 行替换(不带确认) |
| ctrl+w s | 上下(垂直)分割当前打开的文件 |
| ctrl+w v | 左右(水平)分割当前打开的文件 |
| ctrl+w c | 关闭当前窗口,对应 :close。最后一个窗口不能使用 close 关闭,使用 close 只是暂时关闭窗口,其内容还在缓存中 |
| ctrl+w q | 关闭当前窗口,对应 :quit。与 close 不同之处在于永久关闭窗口,因此可关闭最后一个打开的窗口 |
| ctrl+w ctrl+w | 连续两次 ctrl+w,切换窗口 |
| ctrl+w h/j/k/l | ctrl+w 配合 h/j/k/l 或者上下左右方向键切换窗口 |
| :new filename | 横向切割窗口 |
| :split filename | 横向切割窗口,可简写 :sp filename |
| :vsplit filename | 纵向切割窗口,可简写为 :vsp filename |
| :set list | 进入 List Mode,显示 tab、空格。TAB 键显示为 ^I,$ 显示在每行的结尾,表示换行;空格仍然显示为空格 |
| :set nolist | 退出 List Mode |
| x, X | 在一行字当中,x 为向后删除一个字符,X 为向前删除一个字符 |
| nx | n 为数字,连续向后删除 n 个字符 |
| dd | 删除游标所在的那一整行 |
| ndd | n 为数字,连续删除游标所在的向下 n 行 |
| d1G | 删除从第一行到游标所在行 |
| dG | 删除游标到最后一行 |
| d0 | 删除第一个字符到游标处所有字符 |
| d$ | 删除游标到行末最后一个字符 |
| yy | 复制游标所在那一行。 同理,nyy,y1G,yG,y0,y$ 逻辑与删除一致 |
| p, P | 粘贴。p 为将已复制的内容粘贴到游标下一行,P 为将已复制的内容粘贴到游标上一行 |
| J | 将游标所在行与下一行的内容结合成同一行 |
| u | 复原(undo)前一个动作 |
| ctrl+r | 重做(redo)上一个动作 |
| gg | 跳转到第一行 |
| G | 跳转到最后一行 |
| nG | n 位数字,跳转到第 n 行 |
Git 小技巧
基本操作
xxxxxxxxxx# 克隆远程仓库到本地git clone https://github.com/dudebing99/Blog.git# 指定分支git clone -b master https://github.com/dudebing99/Blog.git# 只克隆最近一次提交,用于快速克隆(网络不好、仓库太大等)git clone --depth -1 https://github.com/dudebing99/Blog.git
# 查看配置git config --list# 禁用 ssl 认证git config --global http.sslVerify false
# 查看本地变更信息git status# 查看本地当前目录变更信息git status .
# 添加提交信息(交互式编辑)git commit# 添加提交信息(非交互式)git commit -m "fix(module): free memory"# 追加新的变更到上次提交(即,commit id 不变,多次修改的内容合并到一次提交)git commit --amend
# 修改本次提交的作者信息git commit --amend --author="kevin <dudebing99@gmail.com>" -C HEAD
# 修改本次提交的时间信息git commit --amend --date="2017-10-08T09:51:07"
# 查看当前所在分支git branch# 查看远程分支git branch -r
# 查看远程仓库地址git remote -v
# 以远程分支或 tag 创建本地分支git checkout -b <local branch> <remote branch OR tag>
# 以某个分支强制覆盖本地分支并推送git reset --hard <remote_branch>git push -f
# 切换 HEAD 指向的默认分支git remote set-head origin <target_branch>
# 设置当前分支的默认远程分支,git push 即可缺省推到远程分支git push --set-upstream origin <target_branch>
git stash
默认情况下,git stash 缓存文件的策略如下:
会缓存下列文件
添加到暂存区的修改(
staged changes)Git 跟踪的但并未添加到暂存区的修改(
unstaged changes)
不会缓存以下文件
在工作目录中新的文件(
untracked files)被忽略的文件(
ignored files)
使用 -u 或者 --include-untracked 可以 stash untracked 的文件
使用 -a 或者 --all 命令可以 stash 当前目录下的所有修改
xxxxxxxxxx# 保存未提交的变更(建议通过 sava "fix(xxx): xxx)" 备注变更说明)git stash save "fix(xxx): xxx"# 可在 git stash 之后拉取远程最新代码git pull# 然后,pop 之前保存的未提交的更新,做修改、合并,最后再提交git stash pop
# pop 指定栈层次, git stash pop stash@{0} 命令等同于 git stash popgit stash pop stash@{id}
# 查看所有的 stashgit stash list
# 移除某个 stashgit stash drop stash@{id}# 移除所有的 stashgit stash clear
git tag
xxxxxxxxxx# 创建本地 taggit tag <tag># 推送到远程仓库git push origin <tag># 查看本地 taggit tag -l# 查看远程 taggit show-ref --tag# 删除本地 taggit tag -d <tag># 删除远程 taggit push origin :refs/tags/<tag>合并分支到主干
xxxxxxxxxx# 假设在 dev 分支开发完git add .git commit -m "feat: ..."git push -u origin dev
# 切换到(本地)mastergit checkout master# 拉取最新git pull
# 将 dev 合并到(本地)mastergit merge dev
# 可能需要解决冲突,然后 add,commit
# 推送到远程 mastergit push origin master
删除远程分支
xxxxxxxxxxgit push origin --delete dev推送一个空分支到远程分支,其实就相当于删除远程分支:
xxxxxxxxxx$ git push origin :dev
查看历史提交信息
xxxxxxxxxx# 查看所有提交日志git log
# 查看某次 commit 涉及的修改内容git show <commit-id>
# 查看某次 commit 涉及的修改文件git show <commit-id> --stat
# 查看某个文件的所有的修改内容git log -p <filename>
# 查看某个文件的最近 2 次的更新内容git log -p -2 <filename>
# 查看最近一次所有的更新内容(如下两种方法)git log -p -1git diff HEAD^git diff HEAD^ --stat
# 查看某个文件的最后一次更新内容由谁提交(对应到每一行)git blame <filename>
仓库迁移
xxxxxxxxxx# 1. 本地有仓库 project1# 2. 在 github 新建仓库 project2# 3. 以镜像推送到 project2 上,可以保留 project1 的所有提交记录git push --mirror git@github.com:dudebing99/project2.git合并多次提交
将头部指针指向要合并的第一个提交的前一个提交
xxxxxxxxxxgit reset --soft <commit id>重新提交
xxxxxxxxxxgit commit -m "New Commit Message"设置代理
设置代理
xxxxxxxxxxgit config --global http.proxy http://127.0.0.1:1080git config --global https.proxy http://127.0.0.1:1080取消代理
xxxxxxxxxxgit config --global unset http.proxygit config --global unset https.proxygit pull/push 记住密码
cache 是存储在内存中,可以设定有效时间但是时间过去后,将会失效;store 是存储在磁盘上,不过用户名和密码是明文存储的
xxxxxxxxxxgit config credential.helper store
# 删除密码git config --unset credential.helper store
github 同步 fork 仓库
以同步
master分支为例,其他分支同理
克隆已
fork的项目到本地
xxxxxxxxxxgit clone git@github.com:YOUR-USERNAME/YOUR-FORKED-REPO.git添加远程原始仓库
查看远程仓库信息
git remote -v
移除远程仓库
git remote remove upstream
xxxxxxxxxxcd into/cloned/fork-repogit remote add upstream git://github.com/ORIGINAL-DEV-USERNAME/REPO-YOU-FORKED-FROM.gitgit fetch upstream同远程原始仓库同步
git pull与git pull upstream master的区别,前者表示拉取自己远程仓库(默认为master分支),后者表示拉取外部的上游分支
xxxxxxxxxxgit pull upstream master同步之后推送到
github已fork的项目
xxxxxxxxxxgit push
# 推送本地指定分支到远程指定分支git push upstream <local_branch>:<remote_branch>
github 提交 PR
一般地,为每一个
PR创建一个分支
将远程分支(待提交
PR的目标仓库的目标分支)检出作为本地分支<local branch>
xxxxxxxxxxgit checkout -b <local branch> upstream/master将某次(或多次)提交
cherry-pick到本地分支<local branch>
xxxxxxxxxx# 一次提交git cherry-pick 30cd5a3
# 多次提交 (commit from, commit to]git cherry-pick <commit from>..<commit to>
将本地分支推到自己的远程仓库
xxxxxxxxxxgit push origin <remote branch>在
github上面基于<remote branch>与upstream/master提交PR
YUM 小技巧
查询
xxxxxxxxxx[root@localhost ~]# yum list installed | grep mysqlmysql.x86_64 5.1.73-8.el6_8 @base mysql-devel.x86_64 5.1.73-8.el6_8 @base mysql-libs.x86_64 5.1.73-8.el6_8 @anaconda-CentOS-201806291108.x86_64/6.10删除
xxxxxxxxxx[root@localhost ~]# yum -y remove mysql57-community-release.noarchDocker 小技巧
镜像
xxxxxxxxxx# 查看镜像docker images# 删除镜像docker rmi <image-id># 查找镜像docker search <TERM># 拉取镜像docker pull centos:7.6.1810# 删除无标签且无容器引用的镜像docker image prune# 删除所有无容器引用的镜像docker image prune -a标签
xxxxxxxxxx# 打标签(tag 不指定默认为 latest)docker tag <existing-image> <hub-user>/<repo-name>[:<tag>]# 修改标签docker tag <image-id> <repo-name>:<tag>由 Dockerfile 构建镜像
xxxxxxxxxx➜ docker cat DockerfileFROM centosMAINTAINER Kevin c.r2009@163.comCMD echo "hello world"➜ docker docker build -t dudebing99/helloworld:v1 .Sending build context to Docker daemon 2.048kBStep 1/3 : FROM centos ---> 0f3e07c0138fStep 2/3 : MAINTAINER Kevin c.r2009@163.com ---> Running in ea81ae3c56caRemoving intermediate container ea81ae3c56ca ---> c18b5478dad1Step 3/3 : CMD echo "hello world" ---> Running in e46edded6caeRemoving intermediate container e46edded6cae ---> 37f31a68491bSuccessfully built 37f31a68491bSuccessfully tagged dudebing99/helloworld:v1➜ docker docker imagesREPOSITORY TAG IMAGE ID CREATED SIZEdudebing99/helloworld v1 37f31a68491b 10 seconds ago 220MBdudebing99/u18 v1 a51369e90faf 42 hours ago 745MBubuntu 16.04 56bab49eef2e 2 months ago 123MBubuntu 18.04 775349758637 3 months ago 64.2MBcentos latest 0f3e07c0138f 4 months ago 220MBubuntu 14.04 2c5e00d77a67 8 months ago 188MBmysql 5.7.21 5195076672a7 22 months ago 371MB容器
通过
inspect查看容器挂载目录、启动命令等
xxxxxxxxxx# 查看正在运行的容器docker ps# 查看所有容器(包括已停止的)docker ps -a# 删除容器docker rm <container-id># 查看容器详细信息docker inspect <container-id>由容器构建镜像
xxxxxxxxxx➜ ~ docker commit 512411c00fb4 dudebing99/u18:v1sha256:a51369e90faf0ff8be95942e6999613ba8e3081f9ad66e7e1ae092a75b46aa29将镜像推送到 DockerHub
xxxxxxxxxxdocker push <hub-user>/<repo-name>:<tag>端口映射
查看端口映射
xxxxxxxxxxdocker port <container-id>外部访问容器
-P 随机映射一个端口到内部容器开放的端口
xxxxxxxxxxdocker run -it -d -P centos-p 使用 IP:HostPort:ContainerPort 格式指定映射使用一个特定的地址
xxxxxxxxxxdocker run -it -d -p 127.0.0.1:2000:2000 centosdocker run -it -d -p 3000:4000 centos挂载目录
格式:
-v <host-dir>:<container-dir>
xxxxxxxxxxdocker run -it -v /test:/soft centos /bin/bash容器目录必须使用绝对路径,目录不存在则自动创建
宿主机目录建议使用绝对路径,相对路径并非相对当前目录而言,而是相对
/var/lib/docker/volumes/
xxxxxxxxxx➜ Blog git:(master) ✗ docker run -it -v relative_dir:/opt centos bash➜ Blog git:(master) ✗ docker inspect 1c|grep -i -A 10 mounts "Mounts": [ { "Type": "volume", "Name": "relative_dir", "Source": "/var/lib/docker/volumes/relative_dir/_data", "Destination": "/opt", "Driver": "local", "Mode": "z", "RW": true, "Propagation": "" }解决无法运行 systemctl
构建容器,使用如下指令即可
--privileged参数必须加使用
/usr/sbin/init作为容器的启动命令
xxxxxxxxxxdocker run --privileged -it -d centos:7.6.1810 /usr/sbin/init机器时间、硬件时钟
xxxxxxxxxxyum install rdate -y# 设置时区timedatectl set-timezone Asia/Shanghai# 同步机器时间、硬件时钟rdate -t 30 -s time.nist.gov && hwclock -w 网络测速
安装 speedtest
xxxxxxxxxxpip install speedtest-cli测速
使用 speedtest 或者 speedtest-cli 命令测试,更精确测速,可以选择指定服务器
xxxxxxxxxxroot@iZwz978rorvlg75nct99l1Z:~# speedtest-cliRetrieving speedtest.net configuration...Testing from Aliyun Computing Co. (120.79.48.91)...Retrieving speedtest.net server list...Selecting best server based on ping...Hosted by China Telecom Xiangyang Branch (XiangYang) [340.23 km]: 24.964 msTesting download speed................................................................................Download: 494.36 Mbit/sTesting upload speed................................................................................................Upload: 201.21 Mbit/sSSH 机器互信(免密登陆)
目标:client 被 server 信任,即,client 可以通过免密 ssh 登陆 server。
client 产生公钥
xxxxxxxxxxssh-keygen -t rsa# 后续回车即可将步骤 1 中产生的 id_rsa.pub 拷贝并追加到 server 已授权 key 文件中
xxxxxxxxxxcat id_rsa.pub >> root/.ssh/authorized_keys重启 server 端 ssh 服务
xxxxxxxxxx# Ubuntu,service ssh restart 即可service sshd restartPSSH 批量操作
目标机器均已经对操作机器做互信
通过 PSSH 批量操作,如下所示
xxxxxxxxxxroot@iZwz9b1eyn1aqqy0s3qbadZ:~/pssh-tool# cat hosts 120.76.61.90:2247.99.204.62:22116.62.234.240:2247.99.178.161:2247.98.49.93:2247.99.194.5:2247.52.193.118:2247.105.140.237:2247.105.65.96:22root@iZwz9b1eyn1aqqy0s3qbadZ:~/pssh-tool# pssh -h hosts -l root -P date120.76.61.90: Thu Dec 13 17:16:43 CST 2018[1] 17:16:43 [SUCCESS] 120.76.61.90:2247.52.193.118: Thu Dec 13 17:16:43 CST 2018[2] 17:16:43 [SUCCESS] 47.52.193.118:2247.99.204.62: Thu Dec 13 17:16:43 CST 2018[3] 17:16:43 [SUCCESS] 47.99.204.62:2247.98.49.93: Thu Dec 13 17:16:43 CST 2018[4] 17:16:43 [SUCCESS] 47.98.49.93:2247.99.178.161: Thu Dec 13 17:16:43 CST 2018[5] 17:16:43 [SUCCESS] 47.99.178.161:22116.62.234.240: Thu Dec 13 17:16:43 CST 2018[6] 17:16:43 [SUCCESS] 116.62.234.240:2247.99.194.5: Thu Dec 13 17:16:43 CST 2018[7] 17:16:43 [SUCCESS] 47.99.194.5:2247.105.65.96: Thu Dec 13 17:16:43 CST 2018[8] 17:16:43 [SUCCESS] 47.105.65.96:2247.105.140.237: Thu Dec 13 17:16:44 CST 2018[9] 17:16:44 [SUCCESS] 47.105.140.237:22SSH 禁用超时
目标:SSH 空闲之后,默认断掉,每次需要重连太过麻烦,可以修改 SSH 服务端设置禁用超时;也可以客户端定时发送心跳包保活。
SSH 服务器
在 /etc/ssh/sshd_config 添加/修改如下配置项
xxxxxxxxxxTCPKeepAlive yesClientAliveInterval 30ClientAliveCountMax 999999重启 server 端 ssh 服务
xxxxxxxxxx# Ubuntu,service ssh restart 即可service sshd restartSSH 客户端
在 /etc/ssh/ssh_config 添加/修改如下配置项
ServerAliveInterval 30
在客户端配置后,就会有反空闲设置,即每 30s 会自动和服务端做一次确认。如果在 Windows 下使用 SecureCRT,如下操作即可
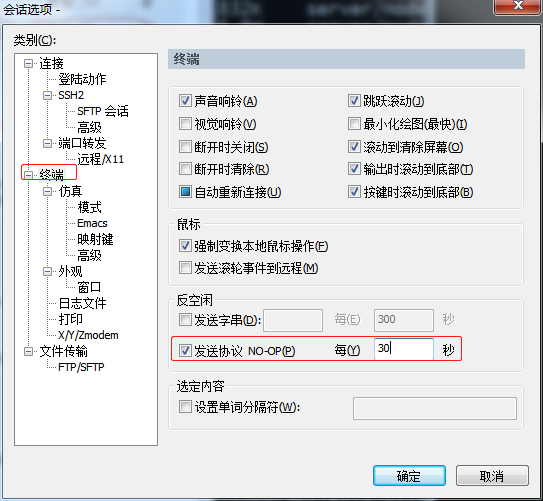
如果在 Windows 下使用 Putty,putty -> Connection -> Seconds between keepalives ( 0 to turn off ),默认为 0,改为30
跳板机 Jumpserver 上传/下载文件
需求:linux 服务器大多是通过 ssh 客户端来进行远程的登陆和管理,使用跳板机 Jumpserver,传输文件是个基础需求,可以借助 rz/sz 实现
限制:rz/sz 只支持对文件(不支持文件夹)操作
上传文件 rz
xxxxxxxxxxrz -bye下载文件 sz
xxxxxxxxxx[xbuser@push4 push_server]$ sz ce.shrzStarting zmodem transfer. Press Ctrl+C to cancel. 100% 1 KB 0 KB/s 00:00:25 0 ErrorsMySQL 小技巧
MySQL 命令行模式显示查询记录
xxxxxxxxxxmysql> select * from tbl limit 1\Gmysql> select * from tbl limit 10\GMySQL 清理控制台
xxxxxxxxxxsystem clearMySQL 查看库、表结构
xxxxxxxxxxmysql> show create database db;mysql> show create table tbl\GMySQL 随机排序
xxxxxxxxxxselect * from tbl order by rand() limit 3;快捷选择 MySQL 实例
创建脚本 xdb.sh
xxxxxxxxxx
db=""case $1 in"log") db="mysql -uroot -p123456 -h log.lsb.com -Dlog" ;;"reclog") db="mysql -uroot -p123456 -h 10.10.10.10 -Dservice" ;;"push") db="mysql -uroot -p123456 -h 10.10.10.10 -Dpush" ;;*) echo "no param set"esac
echo "Attention: connect to database: $1"$dbchmod +x xdb.sh
使用
./xdb.sh log即可快捷登陆 log.lsb.com 的数据库 log
条件插入
场景:先根据条件判断某条记录是否存在,不存在则插入;存在即跳过。
语法:insert into table(column1, column2, ..., columnN) select value1, value2, value3, ..., valueN from dual where not exists (condition clause)
xxxxxxxxxxinsert into tbl(guid, origin_url, new_url, beg_ts) select '1111', '', '', sysdate() from dual where not exists (select guid from tbl where guid='1111');timestamp 字段查询
场景一:查询某个时间范围的数据
xxxxxxxxxxSELECT `id`, `create_time` FROM `tbl` WHERE (create_time >= '2011-05-27 11:27:00') ORDER BY id DESC LIMIT 0, 20场景二:查询某一天数据
xxxxxxxxxxselect guid, content_id, title, long_text, new_url, ttl, icon, picture, push_enum from tbl where date_format(create_time,'%Y-%m-%d')='2011-05-27' order by create_time asc时间相关函数
查询 utc 时间戳、utc 日期、utc 时间、now()
xxxxxxxxxxmysql> select utc_timestamp(), utc_date(), utc_time(), now();+---------------------+------------+------------+---------------------+| utc_timestamp() | utc_date() | utc_time() | now() |+---------------------+------------+------------+---------------------+| 2018-05-26 08:27:00 | 2018-05-26 | 08:27:00 | 2018-05-26 16:27:00 |+---------------------+------------+------------+---------------------+now() 与 sysdate() 异同
xxxxxxxxxxmysql> select now(), sleep(3), now();+---------------------+----------+---------------------+| now() | sleep(3) | now() |+---------------------+----------+---------------------+| 2018-05-26 16:25:29 | 0 | 2018-05-26 16:25:29 |+---------------------+----------+---------------------+xxxxxxxxxxmysql> select sysdate(), sleep(3), sysdate();+---------------------+----------+---------------------+| sysdate() | sleep(3) | sysdate() |+---------------------+----------+---------------------+| 2018-05-26 16:24:56 | 0 | 2018-05-26 16:24:59 |+---------------------+----------+---------------------+date_add 函数
xxxxxxxxxxmysql> select date_add(now(), interval -1 day) as t1, date_add(now(), interval 8 hour) as t2, now();+---------------------+---------------------+---------------------+| t1 | t2 | now() |+---------------------+---------------------+---------------------+| 2018-05-25 16:39:34 | 2018-05-27 00:39:34 | 2018-05-26 16:39:34 |+---------------------+---------------------+---------------------+INSERT INTO SELECT 语句
xxxxxxxxxxINSERT INTO tbl2 SELECT * FROM tbl;xxxxxxxxxxINSERT INTO table2 (column_name(s));SELECT column_name(s) FROM table1;查看表创建时间
xxxxxxxxxxshow table statusxxxxxxxxxxselect CREATE_TIME from INFORMATION_SCHEMA.TABLES where TABLE_NAME='tbl';三目表达式
xxxxxxxxxxselect name,if(sex=0,'女','男') as sex from student;between ... and ...
SQL 中使用 between ... and ...,查询条件是闭区间,且上下限调换不等价,如下所示
between a and b => x ∈ [a, b] => x ≥ a && x ≤ b
where id between a and b => where id >= a and id <= b
查询 id ≥ 1 且 id ≤ 3 的记录
xxxxxxxxxxselect * from tbl where id between 1 and 3;查询 id ≥ 3 且 id ≤ 1 的记录
xxxxxxxxxxselect * from tbl where id between 3 and 1;所以,在处理起始终止范围查询业务逻辑时,SQL 中使用 between ... and ... 一定需要处理好上下限。即,前端、后端都应该确保上下限 a ≤ b。
IFNULL
IFNULL() 函数用于判断第一个表达式是否为 NULL,如果为 NULL 则返回第二个参数的值,如果不为 NULL 则返回第一个参数的值。
xxxxxxxxxxselect IFNULL(name, "Hello");select IFNULL(score, 0);条件更新
xxxxxxxxxxCREATE TABLE `test` (  `id` int(11) unsigned NOT NULL AUTO_INCREMENT COMMENT '自增 ID',  `updatetime` datetime DEFAULT CURRENT_TIMESTAMP COMMENT '创建时间',  PRIMARY KEY (`id`),  KEY `idx_id` (`id`)) ENGINE=InnoDB AUTO_INCREMENT=1 DEFAULT CHARSET=utf8;
INSERT INTO test VALUES ('1', '2018-12-13 21:45:38');
UPDATE test SET updatetime=CASE WHEN updatetime < '2018-12-13 22:23:23' THEN '2018-12-13 22:23:23' ELSE updatetime END where id = 1;
查询显示行号
xxxxxxxxxxSELECT ( @rownum := @rownum + 1 ) AS rank, a.idFROM user_tbl a, ( SELECT @rownum := 0 ) b WHERE a.id > 20 LIMIT 10;删除重复记录
删除重复记录,只保留 ID 最小的那条记录
xxxxxxxxxxDELETE FROM test WHERE id NOT IN ( SELECT id FROM ( SELECT min( id ) AS id FROM test GROUP BY number ) AS t)删除重复记录,只保留最后一条
只保留第一条 t1.id > t2.id
xxxxxxxxxxDELETE t1 FROM test t1 INNER JOIN test t2 WHERE t1.id < t2.id AND t1.number = t2.number 替换字段
UPDATE 表名 SET 字段名=replace(字段名, ‘被替换字符串’, ‘用来替换的字符串’) ;
xxxxxxxxxxUPDATE t1 SET name=replace(name, 'old', 'new') ;数据备份与恢复
xxxxxxxxxx# 备份操作mysqldump -uroot -p'123456' mytest > mytest.sql# 恢复操作(先创建数据库 mytest2)mysql -uroot -p'123456' -e "create database mytest2 CHARSET=UTF8;"mysql -uroot -p'123456' mytest2 < mysql.sql Golang 小技巧
判断 goproxy 是否缓存了某个 Go 模块的特定版本
xxxxxxxxxx# 格式 <GOPROXY_URL>/<module>/@v/<version>.infocurl https://proxy.golang.org/github.com/gin-gonic/gin/@v/v1.8.1.info如果缓存中存在该模块版本,会返回模块的元信息(JSON 格式)
xxxxxxxxxx{ "Version": "v1.8.1", "Time": "2022-04-29T16:02:13Z"}如果缓存中不存在该模块版本,会返回 HTTP 404 错误
查看每个依赖项的完整 HTTP 请求路径
x
GODEBUG=http2debug=2 go get github.com/gin-gonic/gin@v1.8.1
# 指定代理GODEBUG=http2debug=2 GOPROXY=https://proxy.golang.org go get github.com/gin-gonic/gin@v1.8.1参数说明:
GODEBUG=http2debug=2:启用 HTTP/2 的调试日志,会显示完整的 HTTP 请求和响应路径。
GOPROXY:指定 goproxy URL,可以是官方的或自定义的代理服务。
输出结果:
xxxxxxxxxxhttp2: Transport creating client conn to proxy.golang.orghttp2: Transport creating HTTP/2 streamhttp2: sending request: POST /github.com/gin-gonic/gin/@v/v1.8.1.infoRedis 小技巧
批量删除 key
xxxxxxxxxx[root@iZwz929qlep1i7nh1ogn0iZ ~]# redis-cli -h 127.0.0.1 -p 16379 -a 'password' -n 11 KEYS "GAME_SURPLUS_LOCK_NUMBER*" |xargs redis-cli -h 127.0.0.1 -p 16379 -a 'password' -n 11 DELNGINX 基础配置
配置静态资源
使用 alias 重定义路径
静态资源如下所示
xxxxxxxxxx[kevin@iZwz9cynwitmm46uagetmvZ opt]$ tree -L 3 static*static1└── json    └── dummy.jsonstatic2└── index.html
1 directory, 2 files
Nginx 配置如下
xxxxxxxxxxserver { listen 443 ssl http2 default_server; listen [::]:443 ssl http2 default_server; server_name bigsillybear.com; ssl_certificate /etc/letsencrypt/live/api.bigsillybear.com/fullchain.pem; # managed by Certbot ssl_certificate_key /etc/letsencrypt/live/api.bigsillybear.com/privkey.pem; # managed by Certbot ssl_session_cache shared:SSL:1m; ssl_session_timeout 10m; ssl_ciphers HIGH:!aNULL:!MD5; ssl_prefer_server_ciphers on; # Load configuration files for the default server block. include /etc/nginx/default.d/*.conf; # 使用正则表达式 location ~ ^/hello1/(\w+).(\w+)$ { alias /opt/static1/$2/$1.$2; } # 不使用正则表达式 location /hello2/ { alias /opt/static2/; index index.html index.htm; }}测试结果
xxxxxxxxxx[kevin@iZwz9cynwitmm46uagetmvZ opt]$ curl https://bigsillybear.com/hello1/dummy.json{ "id": 99, "msg": "hello world"}[kevin@iZwz9cynwitmm46uagetmvZ opt]$ curl https://bigsillybear.com/hello2/<html> <body> <h1>Hello World</h1> <p>Hello World</p> </body></html>使用 root 指定前缀
静态资源如下所示
xxxxxxxxxx[kevin@iZwz9cynwitmm46uagetmvZ opt]$ tree -L 3 static3/static3/└── index.html
0 directories, 1 file
Nginx 配置如下
xxxxxxxxxxserver { listen 443 ssl http2 default_server; listen [::]:443 ssl http2 default_server; server_name bigsillybear.com; ssl_certificate /etc/letsencrypt/live/api.bigsillybear.com/fullchain.pem; # managed by Certbot ssl_certificate_key /etc/letsencrypt/live/api.bigsillybear.com/privkey.pem; # managed by Certbot ssl_session_cache shared:SSL:1m; ssl_session_timeout 10m; ssl_ciphers HIGH:!aNULL:!MD5; ssl_prefer_server_ciphers on; # Load configuration files for the default server block. include /etc/nginx/default.d/*.conf; location /static3/ { root /opt; index index.html index.htm; }}测试结果
xxxxxxxxxx[kevin@iZwz9cynwitmm46uagetmvZ opt]$ curl https://bigsillybear.com/static3/<html> <body> <h1>Hello World</h1> <p>Hello World</p> </body></html>Location 匹配规则
语法规则
xxxxxxxxxxlocation [ = | ~ | ~* | ^~ ] uri { ... }location @name { ... }location 为关键字,后面跟着可选的修饰符,后面是要匹配的字符,花括号中是要执行的操作
=表示精确匹配。只有请求的uri路径与后面的字符串完全相等时,才会命中~表示该规则是使用正则定义的,区分大小写~*表示该规则是使用正则定义的,不区分大小写^~表示如果该符号后面的字符是最佳匹配,采用该规则,不再进行后续的查找
匹配过程
匹配开始前,对请求的
url序列化。例如,对%xx等字符进行解码,去除url中多个相连的/,解析url中.,..
location有两种表示形式,一种是使用前缀字符,一种是使用正则。如果是正则的话,前面有~或~*修饰符
具体的匹配过程如下:
首先先检查使用前缀字符定义的
location,选择最长匹配的项并记录下来如果找到了精确匹配的
location,也就是使用了=修饰符的location,结束查找,使用它的配置按顺序查找使用正则定义的
location,如果匹配则停止查找,使用它定义的配置如果没有匹配的正则
location,则使用前面记录的最长匹配前缀字符location
示例详解
假设有如下配置文件
xxxxxxxxxxlocation = / {    [ configuration A ]}
location / {    [ configuration B ]}
location /user/ {    [ configuration C ]}
location ^~ /images/ {    [ configuration D ]}
location ~* \.(gif|jpg|jpeg)$ {    [ configuration E ]}
请求 / 精准匹配 A,不再往下查找
请求 /index.html 匹配 B。首先查找匹配的前缀字符,找到最长匹配是配置 B,接着又按照顺序查找匹配的正则。结果没有找到,因此使用先前标记的最长匹配,即配置 B
请求 /user/index.html 匹配 C。首先找到最长匹配 C,由于后面没有匹配的正则,所以使用最长匹配 C
请求 /user/1.jpg 匹配E。首先进行前缀字符的查找,找到最长匹配项 C,继续进行正则查找,找到匹配项 E。因此使用 E
请求 /images/1.jpg匹配 D。首先进行前缀字符的查找,找到最长匹配 D。但是,特殊的是它使用了 ^~ 修饰符,不再进行接下来的正则的匹配查找,因此使用 D。这里,如果没有前面的修饰符,其实最终的匹配是 E
请求 /documents/about.html 匹配 B。因为 B 表示任何以/开头的 URL 都匹配。在上面的配置中,只有 B 能满足,所以匹配 B
location @name 使用
@用来定义一个命名 location。主要用于内部重定向,不能用来处理正常的请求(该块不能被外部 Client 所访问,只能被内部配置指令所访问,比如 try_files、error_page)
命名 location 中不能再嵌套其它的命名 location
xxxxxxxxxxlocation / { try_files $uri $uri/ @custom}location @custom { # do something}上例中,当尝试访问 uri 找不到对应的文件就重定向到我们自定义的命名 location(此处为custom)
URL 尾部的 /
如果 URL 结构是
https://domain.com/的形式,尾部有没有/都不会造成重定向。因为浏览器在发起请求的时候,默认加上了/,即使浏览器在地址栏里也不会显示/如果 URL 的结构是
https://domain.com/some-dir/。尾部如果缺少/将导致重定向。因为根据约定,URL 尾部的/表示目录,没有/表示文件。所以访问/some-dir/时,服务器会自动去该目录下找对应的默认文件。如果访问/some-dir的话,服务器会先去找some-dir文件,找不到的话会将some-dir当成目录,重定向到/some-dir/,去该目录下找默认文件
配置静态资源
静态资源有两种配置模式,目录匹配或后缀匹配,任选其一或搭配使用
xxxxxxxxxxlocation ^~ /static/ { root /webroot/static/;}xxxxxxxxxxlocation ~* \.(gif|jpg|jpeg|png|css|js|ico)$ { root /webroot/res/;}实践原则
location 配置有两种形式,前缀字符和正则。查找匹配的时候,先查找前缀字符,选择最长匹配项,再查找正则。正则的优先级高于前缀字符
使用正则定义的
location在配置文件中出现的顺序很重要。正则的查找是按照在配置文件中的顺序进行的。因此正则的顺序很重要,建议越精细的放的越靠前,因为找到第一个匹配的正则后,查找就停止了,后面定义的正则就是再匹配也没有机会使用精确匹配可以提高查找的速度。如果根域名经常被访问的话建议使用
=
参考资料
NGINX 性能优化
nginx 默认的配置
/etc/nginx/nginx.conf,当然,一般nginx.conf会引用其他目录的配置文件,例如目录conf.d,如下讨论主要基于nginx.conf全局配置。
NGINX 官方配置说明:http://nginx.org/en/docs/ngx_core_module.html
高层的配置
nginx.conf文件中,nginx 中有少数的几个高级配置在模块部分之上。
xxxxxxxxxxuser www-data;pid /var/run/nginx.pid;
worker_processes auto;worker_rlimit_nofile 100000;user配置 nginx 启动用户,默认即可pid配置 nginx 进程号存放文件,默认即可worker_process定义 nginx 对外提供 web 服务是的工作进程数量。最优值取决于诸多因素,包括但不限于 CPU 核心数量。一般配置为机器 CPU 核心数量即可(auto将尝试自动检测机器 CPU 核心数量)worker_rlimit_nofile更改工作进程的最大打开文件数限制。如果没设置的话,这个值为操作系统的限制。设置后你的操作系统和 nginx 可以处理比ulimit -a更多的文件,所以把这个值设高,这样 nginx 就不会出现too many open files的问题
Events 模块
events 模块中包含 nginx 中所有处理连接的设置。
xxxxxxxxxxevents { worker_connections 2048; multi_accept on; use epoll;}worker_connections设置单个工作进程同时打开的连接数限制,如高层配置中worker_rlimit_nofile设置了较高的值,可以适当地提高这个值
工作进程同时打开的连接数限制也由系统的可用 socket 连接数限制,所以设置不切实际的高没什么好处。
multi_accept设置 nginx 收到一个新连接通知后接受尽可能多的连接
xxxxxxxxxxSyntax: multi_accept on | off;Default:  multi_accept off;Context:  events    If `multi_accept` is disabled, a worker process will accept one new connection at a time. Otherwise, a worker process will accept all new connections at a time.  - `use` 设置用于复用客户端线程的轮询方法。如果你使用 `Linux 2.6+`,你应该使用 `epoll`。如果你使用 `BSD`,你应该使用 `kqueue`
> 如果你不知道 nginx 该使用哪种轮询方法的话,不配置该选项即可,它会选择一个最适合你操作系统的。
## LINUX 内核调优参数
> 通过 `sysctl -a` 查看系统内核参数
### 网络
> Setting tcp_tw_recycle to 1 makes a Linux host drop TIME_WAIT connections much faster.  Instead of a predefined 2*MSL period of 60s, the host will use a timeout based on RTT estimate.  For LANs, it is usually several milliseconds.
> Setting tcp_tw_reuse to 1 will make a host reuse the same connection quickly for outgoing connections.
> Many WEB sites say that setting the following tunable will change the 2*MSL (TIME_WAIT) period:>> \# echo 30 > /proc/sys/net/ipv4/tcp_fin_timeout >> Is this correct? >> Answer:  No.  The tcp(7) manpage states correctly that this tunable does something different: >> • tcp_fin_timeout (integer; default: 60) >> • This  specifies  how many seconds to wait for a final FIN packet before the socket is forcibly closed. >> There is a hardwired constant, TCP_TIMEWAIT_LEN (defined to 60s), which is used in a number of places.  There is no way to change it without recompilation.
•```bash######################## cat /proc/sys/net/ipv4/tcp_syncookies# 默认值:1# 作用:是否打开 SYN Cookie 功能,该功能可以防止部分 SYN 攻击net.ipv4.tcp_syncookies = 1
######################## cat /proc/sys/net/ipv4/ip_local_port_range# 默认值:32768   61000# 作用:可用端口的范围net.ipv4.ip_local_port_range = 1024  65535
######################## cat /proc/sys/net/ipv4/tcp_timestamps # 默认值:1# 作用:TCP 时间戳net.ipv4.tcp_timestamps = 1
######################## cat /proc/sys/net/ipv4/tcp_tw_recycle# 默认值:0# 作用:针对 TIME-WAIT,不要开启net.ipv4.tcp_tw_recycle = 0
######################## cat /proc/sys/net/ipv4/tcp_tw_reuse# 默认值:0# 作用:针对 TIME-WAIT,做为客户端可以启用net.ipv4.tcp_tw_reuse = 1
######################## cat /proc/sys/net/ipv4/tcp_max_tw_buckets # 默认值:262144# 作用:针对 TIME-WAIT,配置其上限。如果降低这个值,可以显著的发现 TIME-WAIT 的数量减少,但系统日志中可能出现如下记录:# kernel: TCP: time wait bucket table overflow# 对应的,如果升高这个值,可以显著的发现 TIME-WAIT 的数量增加。# 综合考虑,保持默认值。net.ipv4.tcp_max_tw_buckets = 262144
######################## cat /proc/sys/net/ipv4/tcp_max_orphans # 默认值:16384# 作用:orphans 的最大值net.ipv4.tcp_max_orphans = 3276800
######################## cat /proc/sys/net/ipv4/tcp_keepalive_intvl # 默认值:75# 作用:探测失败后,间隔几秒后重新探测net.ipv4.tcp_keepalive_intvl = 30
######################## cat /proc/sys/net/ipv4/tcp_keepalive_probes # 默认值:9# 作用:探测失败后,最多尝试探测几次net.ipv4.tcp_keepalive_probes = 3
######################## cat /proc/sys/net/ipv4/tcp_keepalive_time # 默认值:7200# 作用:间隔多久发送1次 keepalive 探测包net.ipv4.tcp_keepalive_time = 1200
######################## cat /proc/sys/net/ipv4/tcp_max_syn_backlog# 默认值:128# 作用:增大 SYN 队列的长度,容纳更多连接net.ipv4.tcp_max_syn_backlog = 819200
######################## cat /proc/sys/net/core/somaxconn# 默认值:128# 作用:已经成功建立连接的套接字将要进入队列的长度net.core.somaxconn = 65536
NGINX 配置文件错误检查
使用
-t检测配置文件无误,然后重启服务即可nginx -s reload
xxxxxxxxxx[kevin@iZwz9cynwitmm46uagetmvZ opt]$ sudo nginx -tnginx: the configuration file /etc/nginx/nginx.conf syntax is oknginx: configuration file /etc/nginx/nginx.conf test is successfulNGINX 实战
同时代理前端和后台接口
/拦截所有请求,首先定位到前端页面,如果前端页面不存在,则跳转至@routerback路由@routerback路由反向代理至后台服务接口
后台服务监听 8080 端口
xxxxxxxxxxserver {    listen       80 default_server;    listen       [::]:80 default_server;    server_name  _;    #root         /usr/share/nginx/html;
    # Load configuration files for the default server block.    include /etc/nginx/default.d/*.conf;
    location @routerback {        proxy_set_header    host $host;        proxy_set_header    X-forwarded-for $proxy_add_x_forwarded_for;        proxy_set_header    X-Real-IP $remote_addr;        proxy_pass          http://127.0.0.1:8080/$request_uri;    }
    location /endpointWisely {        proxy_http_version  1.1;        proxy_set_header    Upgrade $http_upgrade;        proxy_set_header    Connection "Upgrade";        proxy_set_header    X-Real-IP $remote_addr;        proxy_pass          http://127.0.0.1:8080/endpointWisely;    }
    location / {        root /opt/exchange_web;        index index.htm index.html;        try_files $uri $uri/ @routerback;    }
    error_page 404 /404.html;        location = /40x.html {    }
    error_page 500 502 503 504 /50x.html;        location = /50x.html {    }}
代理 websocket
服务端使用 https,则 websocket 使用 wss
xxxxxxxxxxupstream websocket {    server 127.0.0.1:8001;}server {    listen 80;    server_name  www.test.com;    location /wss {       proxy_pass http://websocket;       proxy_http_version 1.1;       proxy_set_header Upgrade $http_upgrade;       proxy_set_header Connection "upgrade";    }}
server {    listen 443;    server_name www.test.com;    # ssl related
    location /wss {       proxy_pass http://websocket;       proxy_http_version 1.1;       proxy_set_header Upgrade $http_upgrade;       proxy_set_header Connection "upgrade";    }}
客户端使用 ws 或者 wss 访问即可
xxxxxxxxxxlet s1 = new WebSocket('ws://test.com/wss')// 或者let s2 = new WebSocket('wss://test.com/wss')Bash 共享屏幕/录制屏幕
共享终端
借助管道实现,共享者在终端进行如下操作
xxxxxxxxxx$ mkfifo share.fifo$ script -f share.fifo观看者在终端进行如下操作
xxxxxxxxxx$ cat share.fifo录制屏幕与回放
录制
xxxxxxxxxx$ script -t 2> timing.log -a output.session回放(单纯回放,不会有实际操作)
xxxxxxxxxx$ scriptreplay timing.log output.sessionjava 反编译
CFR
xxxxxxxxxxwget https://www.benf.org/other/cfr/cfr-0.150.jarjava -jar cfr-0.150.jar your-target.jar --outputdir .brew 安装指定版本的库
xxxxxxxxxxbrew uninstall boostbrew install boost@1.57brew link boost@1.57 --force --overwriteC++调用 golang 动态库
待生成动态库的 .go
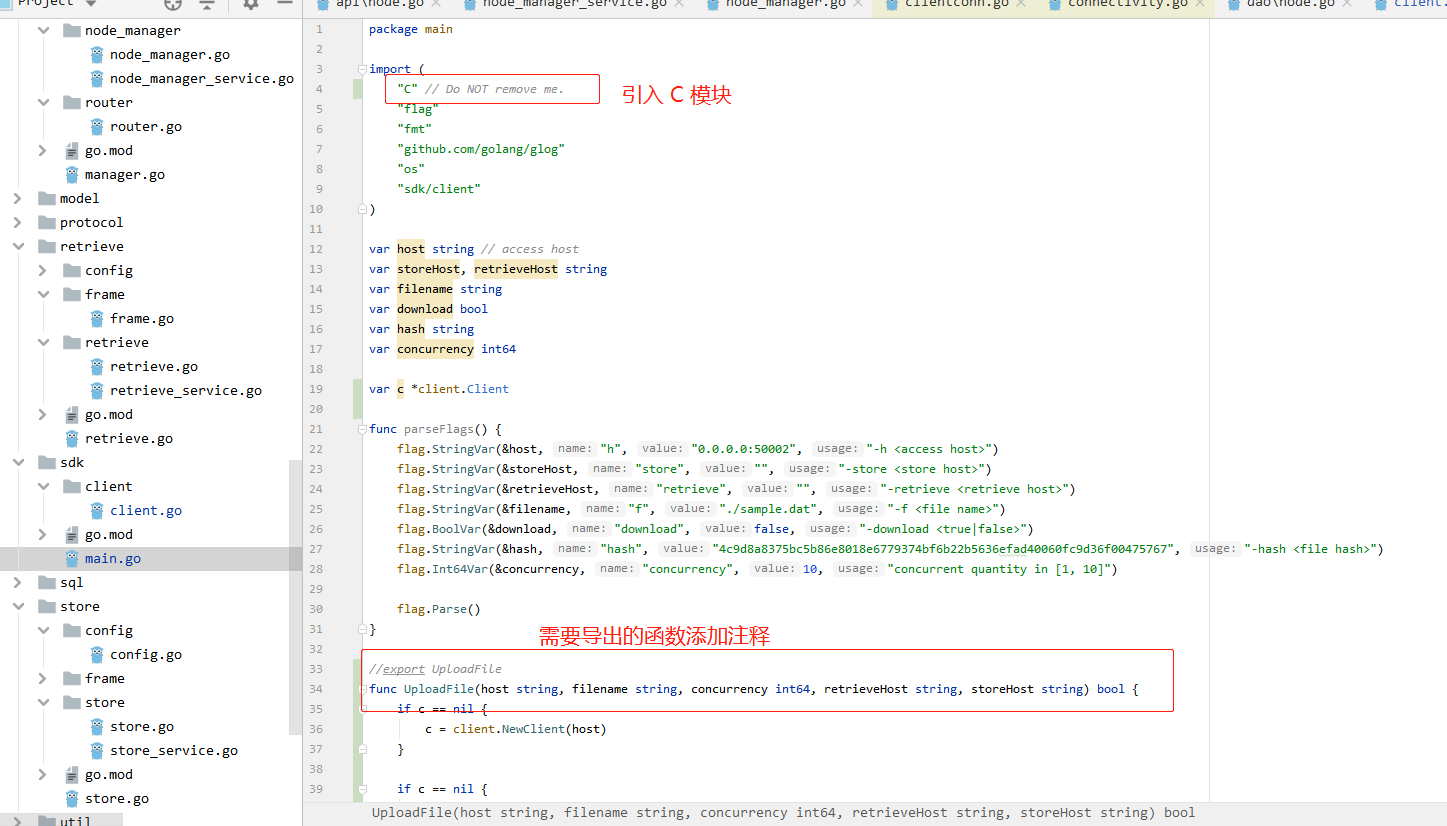
编译生成动态库
xxxxxxxxxxCC=/c/TDM-GCC-64/bin/gcc.exe && GXX=/c/TDM-GCC-64/bin/g++.exe && go build -x -v -ldflags "-s -w" -buildmode=c-shared -o sdk.dll main.go生成 sdk.dll 和头文件 sdk.h
C++ 调用动态库
xxxxxxxxxx
using namespace std;
int main() { GoString host = {"127.0.0.1:50002", 15}; GoString filename = {"a.go", 4}; GoString retrieveHost = {"", 0}; GoString storeHost = {"", 0}; UploadFile(host, filename, 10, retrieveHost, storeHost);
return 0;}编译生成可执行程序
xxxxxxxxxx/c/TDM-GCC-64/bin/x86_64-w64-mingw32-g++.exe a.cpp -I=./ -L=./ -lsdk生成可执行程序 a.exe
使用 frp 实现 Windows 远程桌面连接
前置条件:
需要一台具备公网 IP 的服务器
frp 服务端(frps)、客户端(frpc)下载地址:https://github.com/fatedier/frp/releases
安装 frps
frp 服务器端搭建
xxxxxxxxxxwget https://github.com/fatedier/frp/releases/download/v0.36.2/frp_0.36.2_linux_amd64.tar.gztar -zxvf frp_0.36.2_linux_amd64.tar.gzcd frp_0.36.2_linux_amd64作为服务器端,你只需要关心 2 个文件:
frps
frps.ini
其中 frps 是服务端运行程序,frps.ini 是配置文件。frps.ini 配置如下
xxxxxxxxxxroot@ubuntu:/opt# cat frp/frp_0.36.2_linux_amd64/frps.ini [common]bind_port = 17000dashboard_port = 17500token = laowangdashboard_user = laowangdashboard_pwd = laowang_pwd这里主要是配置了绑定的端口(17000),控制面板的端口(17500),token(会在客户端用到),控制面板的 user 用户名和 pwd 密码。
运行 frps
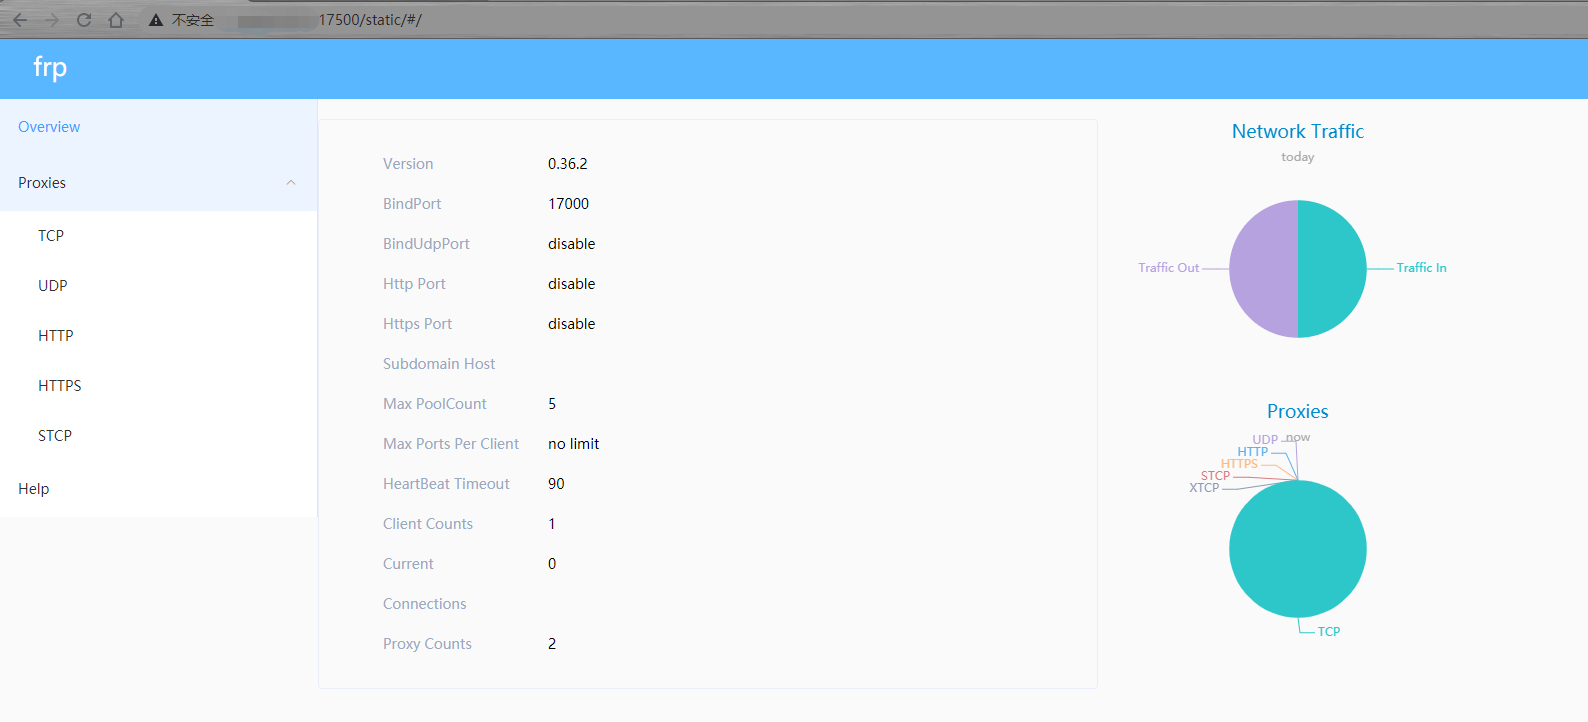
xxxxxxxxxxroot@ubuntu:/opt/frp/frp_0.36.2_linux_amd64# ./frps -c frps.ini2021/05/11 07:30:25 [I] [root.go:200] frps uses config file: frps.ini2021/05/11 07:30:25 [I] [service.go:192] frps tcp listen on 0.0.0.0:170002021/05/11 07:30:25 [I] [service.go:294] Dashboard listen on 0.0.0.0:175002021/05/11 07:30:25 [I] [root.go:209] frps started successfully
访问控制面板,如下
安装 frpc
作为客户端端,你只需要关心 2 个文件:
frpc
frpc.ini
其中 frpc 是客户端运行程序,frpc.ini 是配置文件。frpc.ini 配置如下
xxxxxxxxxx$ cat frpc.ini[common]server_addr = 183.61.252.7server_port = 17000token = laowang[rdp]type = tcplocal_ip = 127.0.0.1local_port = 3389remote_port = 17001[smb]type = tcplocal_ip = 127.0.0.1local_port = 445remote_port = 17002“server_addr” 是服务端 IP 地址,填入即可,“server_port” 为服务器端口,即 bind_port 的值,“token” 是你在服务器上设置的连接口令。
这里用到了 2 个自定义规则,一个是 rdp,一个是 smb:
RDP,即 Remote Desktop 远程桌面,Windows 的 RDP 默认端口是 3389,协议为 TCP,本条规则可以实现远程桌面连接
SMB,即 Windows 文件共享所使用的协议,默认端口号 445,协议 TCP,本条规则可实现远程文件访问。
其中,remote_port 对应该客户端某项服务通过服务端暴露到公网的端口。例如,上述配置中 RDP 服务,本地端口 3389,暴露在外网的端口为 17001,即,最终远程桌面连接地址为:<服务端 IP>:<17001>
运行 frpc
xxxxxxxxxx$ ./frpc -c frpc.ini2021/05/11 15:40:26 [I] [service.go:304] [2c2711f8fd2144c8] login to server success, get run id [2c2711f8fd2144c8], server udp port [0]2021/05/11 15:40:26 [I] [proxy_manager.go:144] [2c2711f8fd2144c8] proxy added: [rdp smb]2021/05/11 15:40:26 [I] [control.go:180] [2c2711f8fd2144c8] [smb] start proxy success2021/05/11 15:40:26 [I] [control.go:180] [2c2711f8fd2144c8] [rdp] start proxy success同时,服务端也可以看到对应的连接信息
xxxxxxxxxxroot@ubuntu:/opt/frp/frp_0.36.2_linux_amd64# ./frps -c frps.ini2021/05/11 07:40:57 [I] [root.go:200] frps uses config file: frps.ini2021/05/11 07:40:57 [I] [service.go:192] frps tcp listen on 0.0.0.0:170002021/05/11 07:40:58 [I] [service.go:294] Dashboard listen on 0.0.0.0:175002021/05/11 07:40:58 [I] [root.go:209] frps started successfully2021/05/11 07:40:58 [I] [service.go:449] [2c2711f8fd2144c8] client login info: ip [119.139.196.114:65158] version [0.36.2] hostname [] os [windows] arch [amd64]2021/05/11 07:40:58 [I] [tcp.go:63] [2c2711f8fd2144c8] [smb] tcp proxy listen port [17002]2021/05/11 07:40:58 [I] [control.go:446] [2c2711f8fd2144c8] new proxy [smb] success2021/05/11 07:40:58 [I] [tcp.go:63] [2c2711f8fd2144c8] [rdp] tcp proxy listen port [17001]2021/05/11 07:40:58 [I] [control.go:446] [2c2711f8fd2144c8] new proxy [rdp] success同时,控制面板也可以看到对应的连接信息
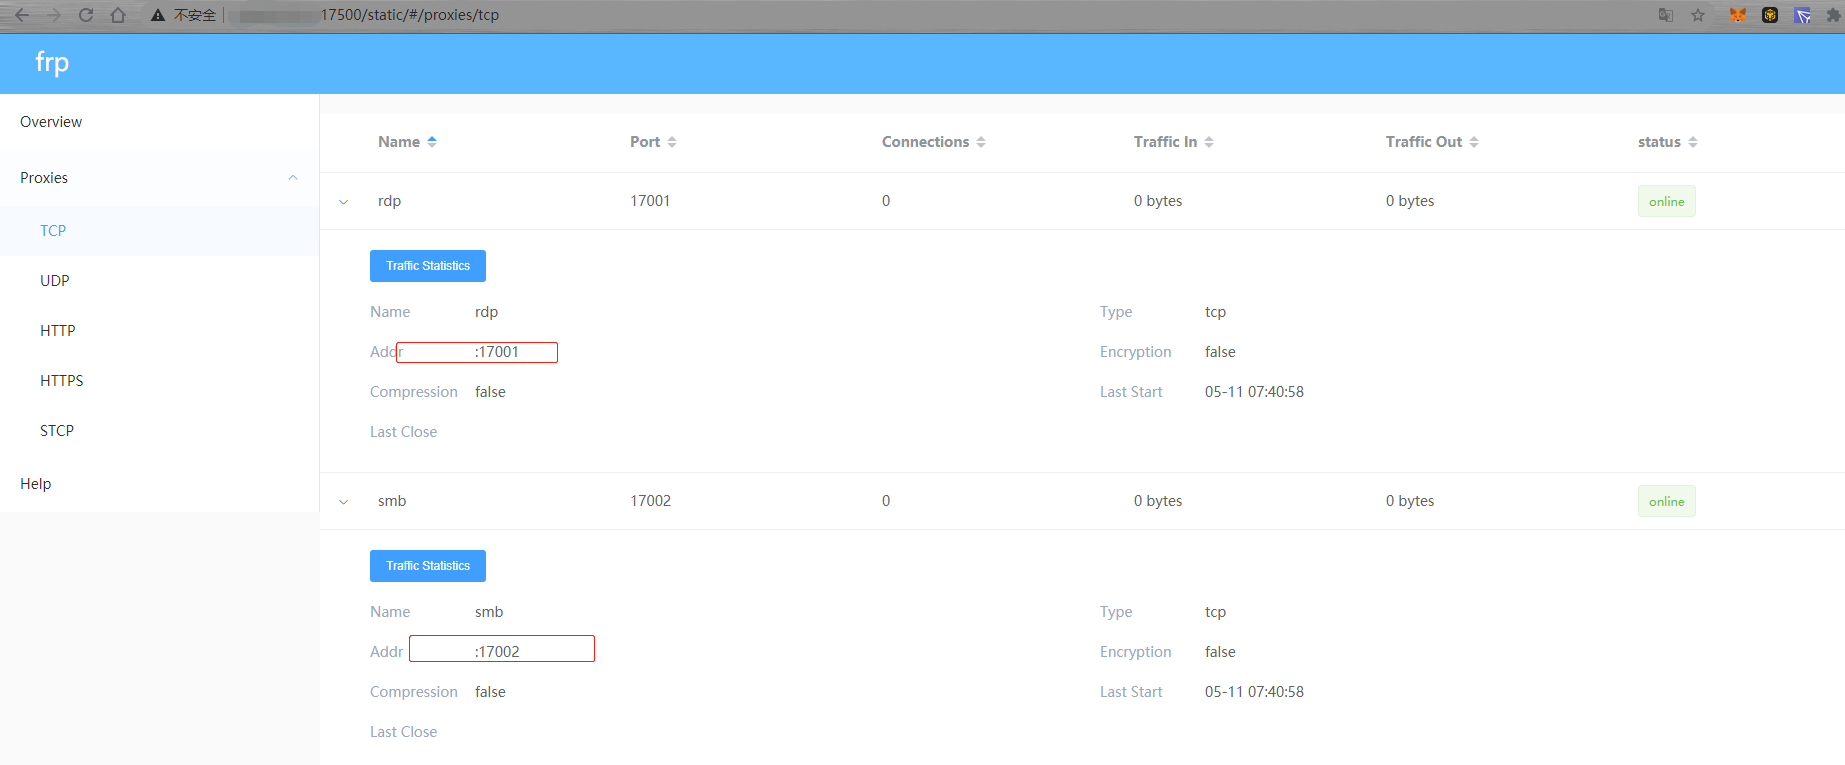
确保目标机器开启 Windows 远程桌面连接
使用者从自己电脑运行远程桌面连接客户端,即可通过 <服务端 IP>:<17001> 连接目标机器
刷新 DNS 缓存
macOS 刷新 DNS 缓存
xxxxxxxxxxsudo killall -HUP mDNSRespondersudo dscacheutil -flushcacheWindows 刷新 DNS 缓存
xxxxxxxxxxipconfig /flushdns解决 godaddy 根域名 @ 不支持 cname
背景:aws lb 使用动态 ip,无法在 godaddy 中配置根域名的 @ 解析,godaddy 根域名 @ 解析只支持 ip 不支持 cname,可以借助 aws route 53 进行托管解决。
创建托管区域
进到 route 53 的菜单,创建托管区域
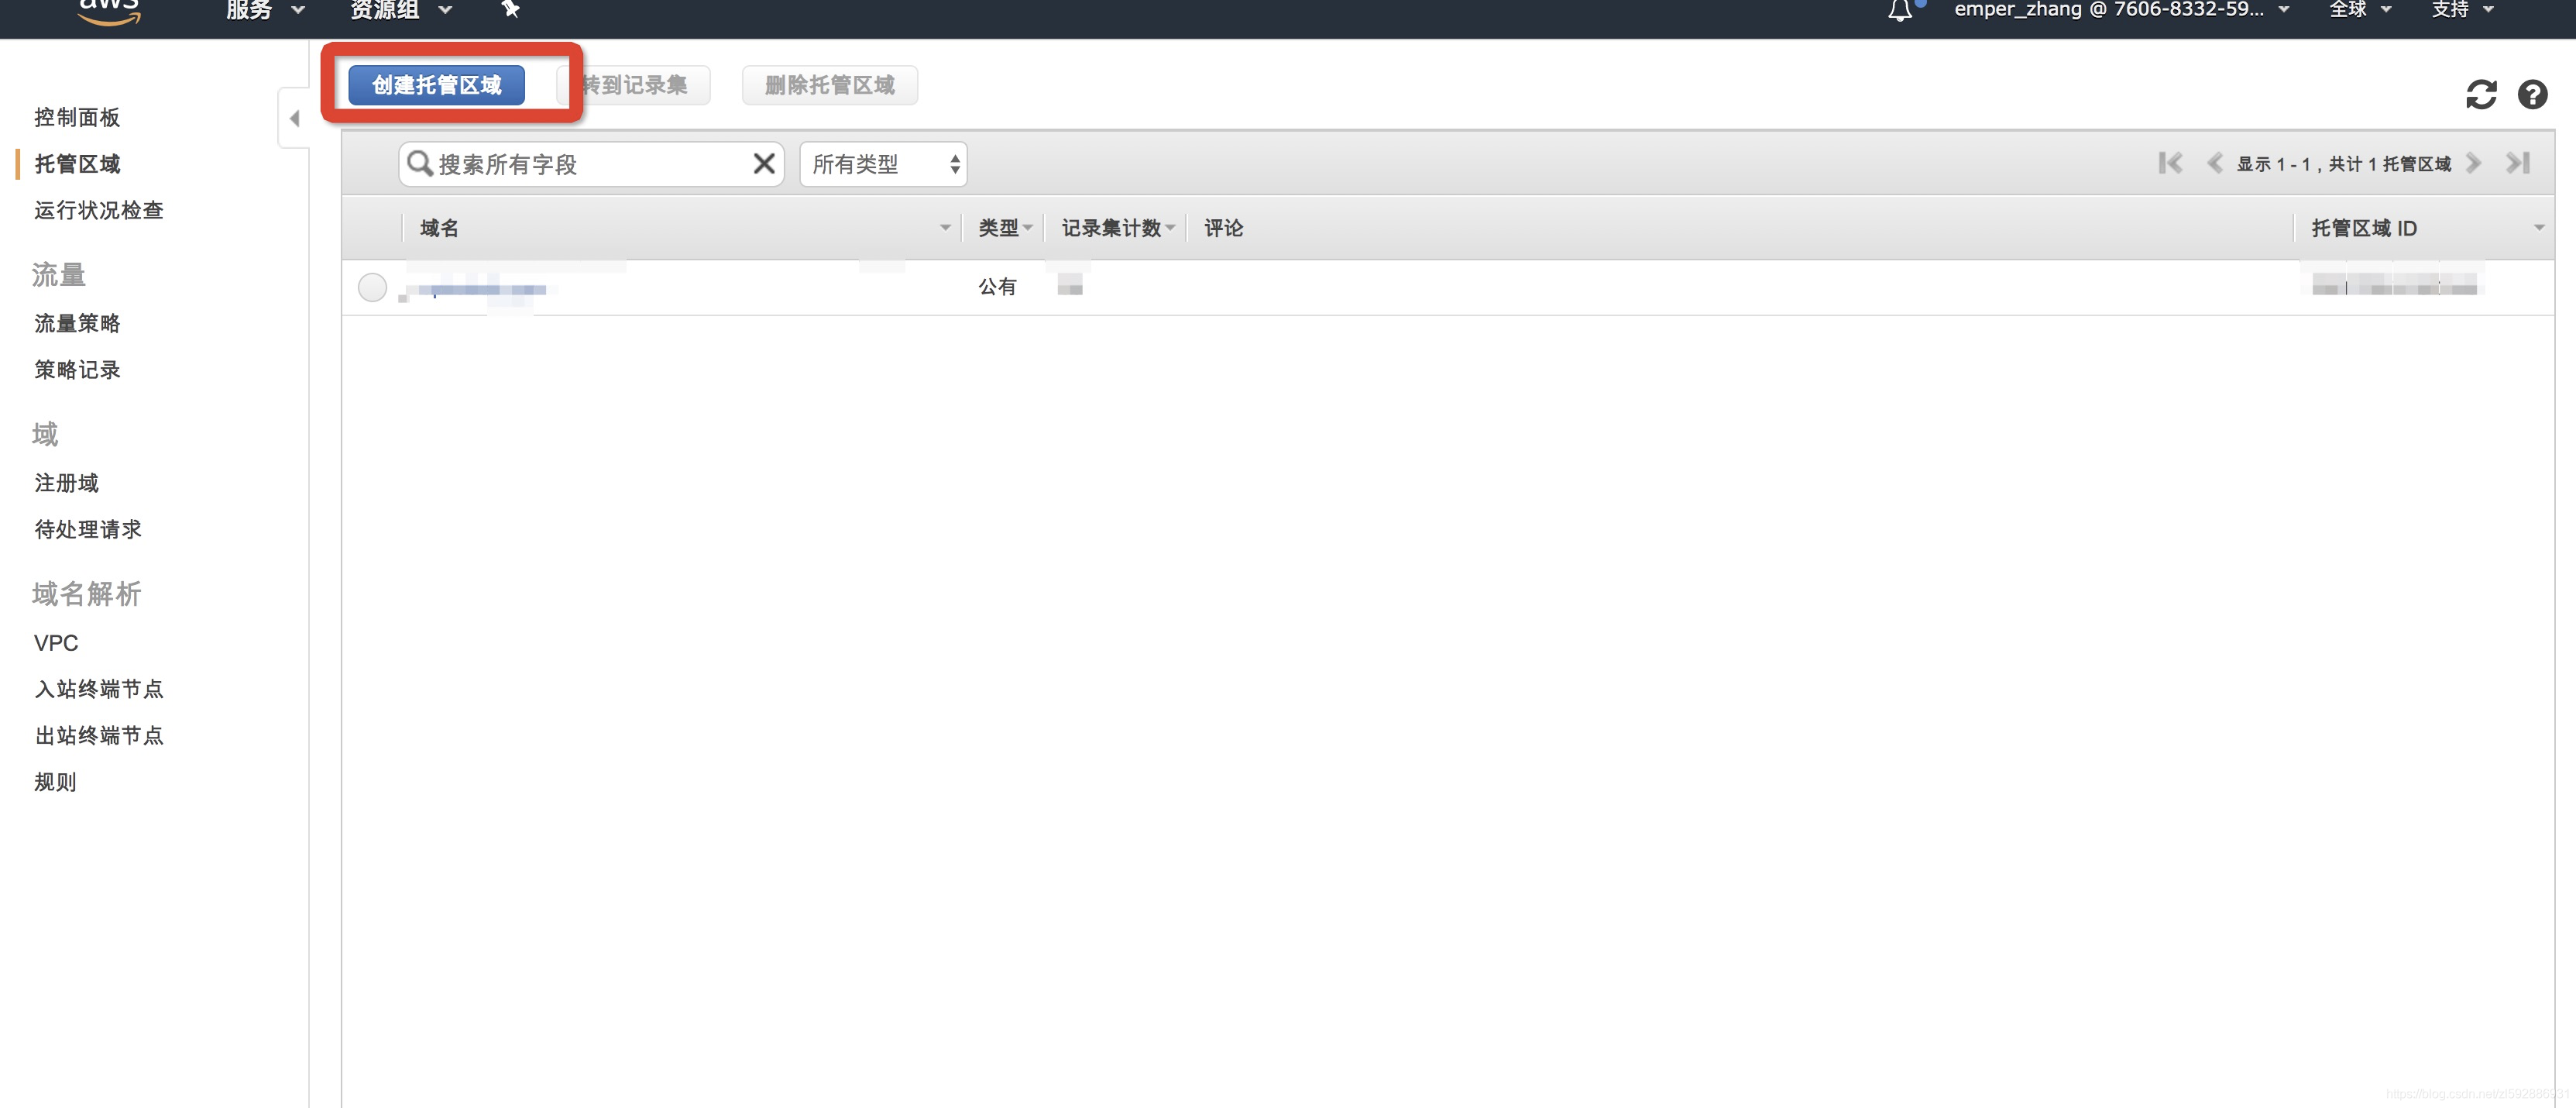
创建的时候选择公有(因为是外部开放的域名)
创建完毕之后会有下面截图的四个 NS 值
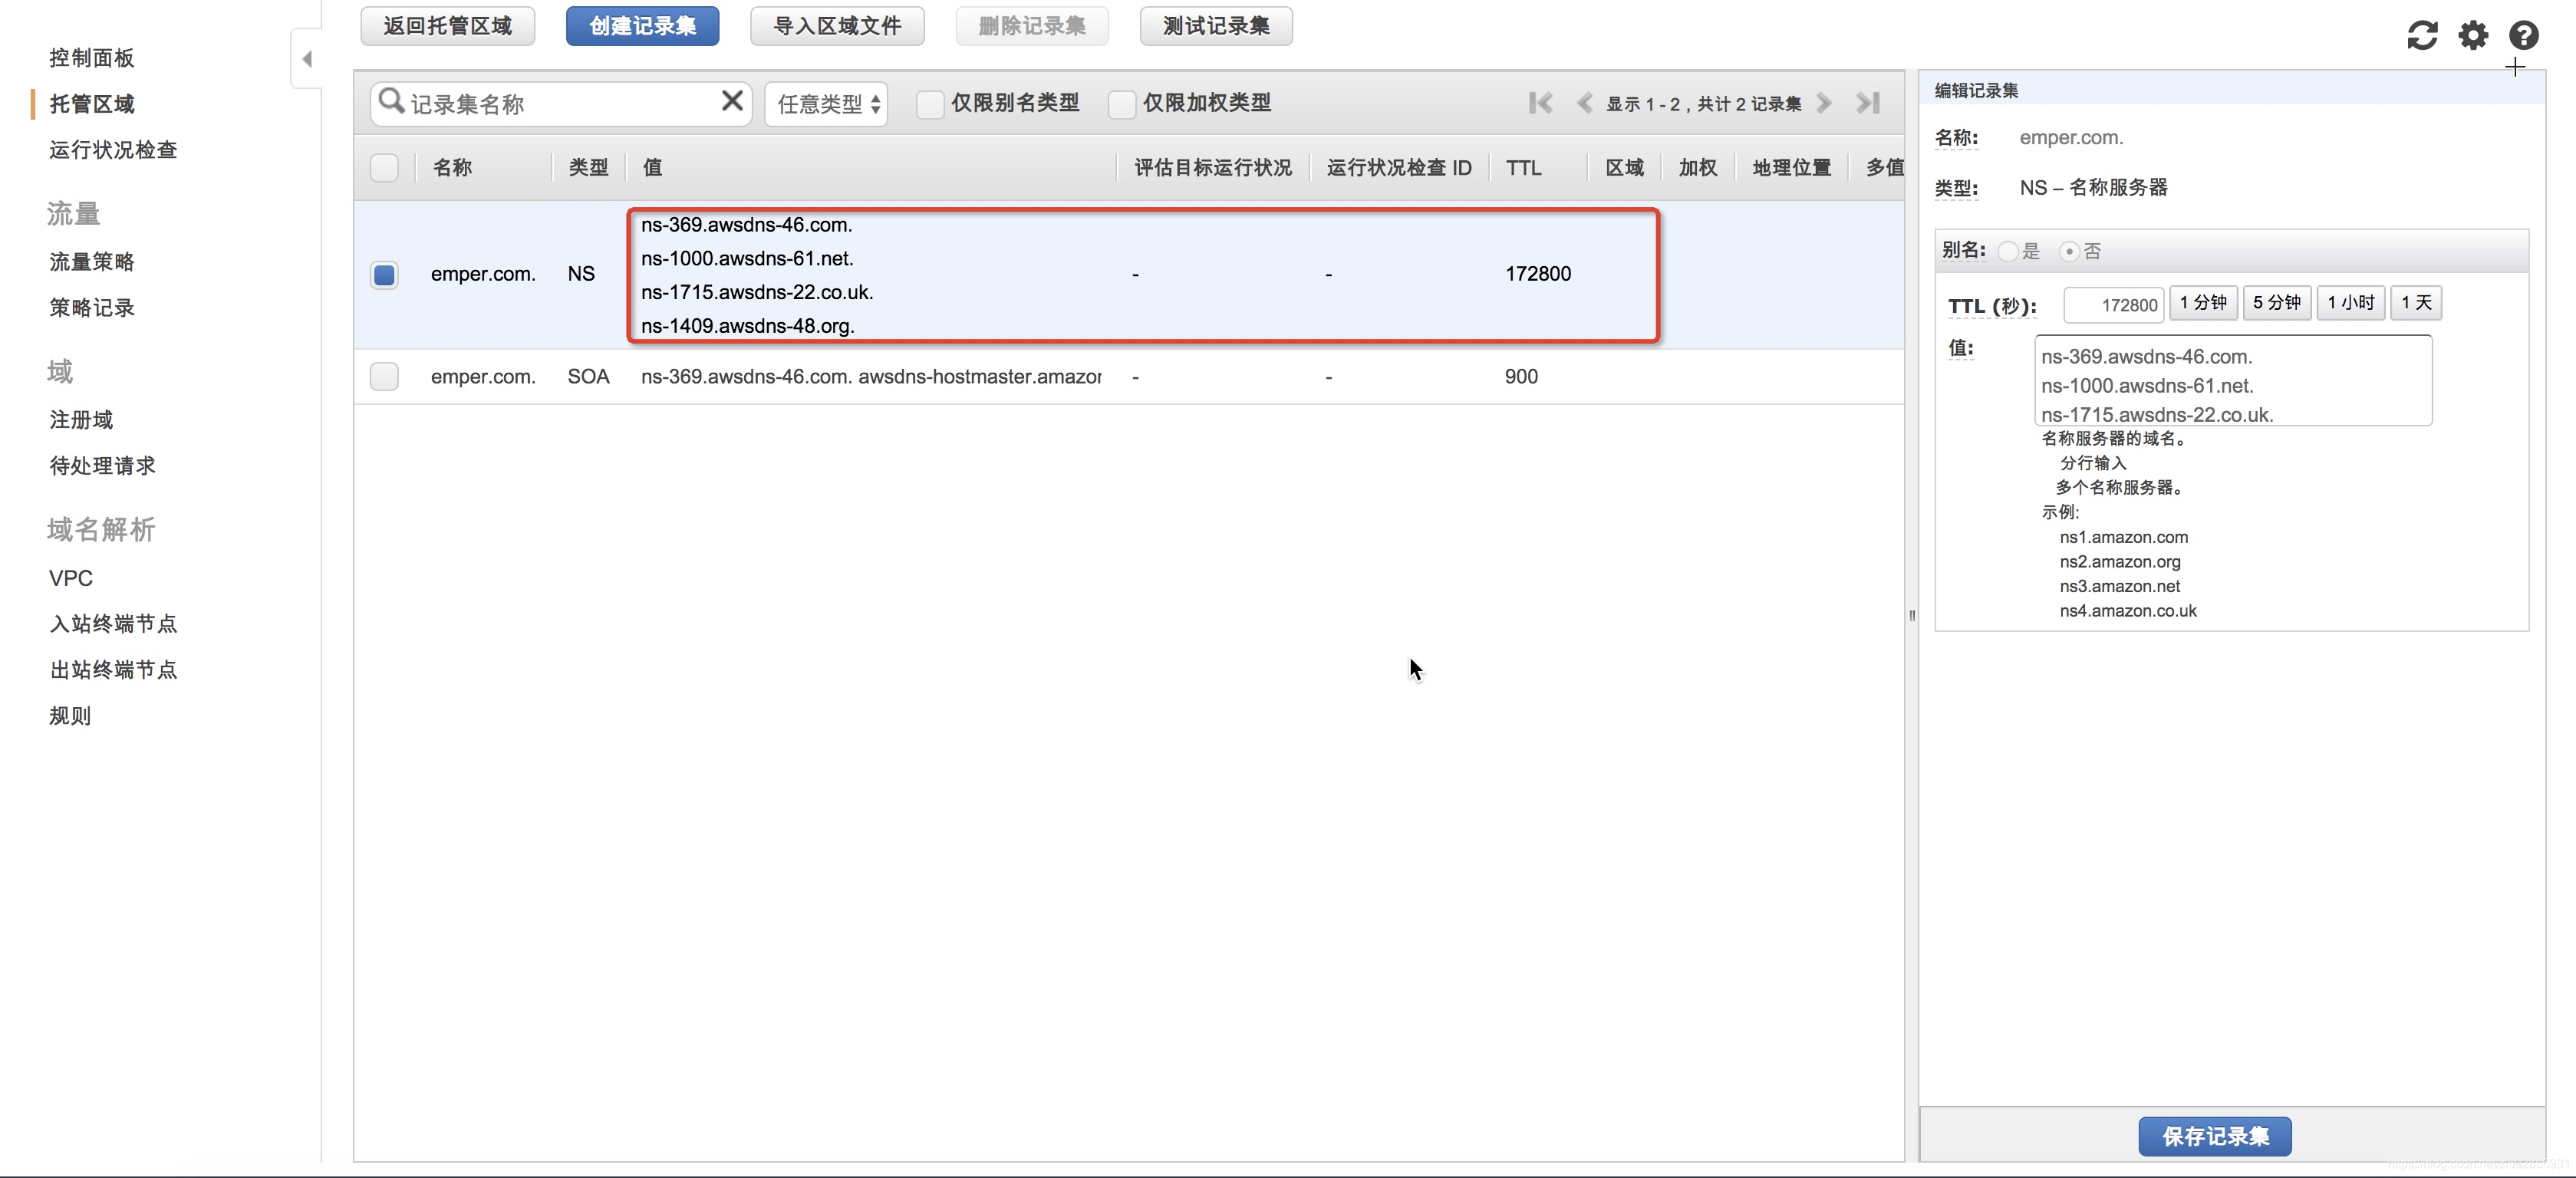
将其保存下来,后续填写到 godaddy
godaddy 进行托管
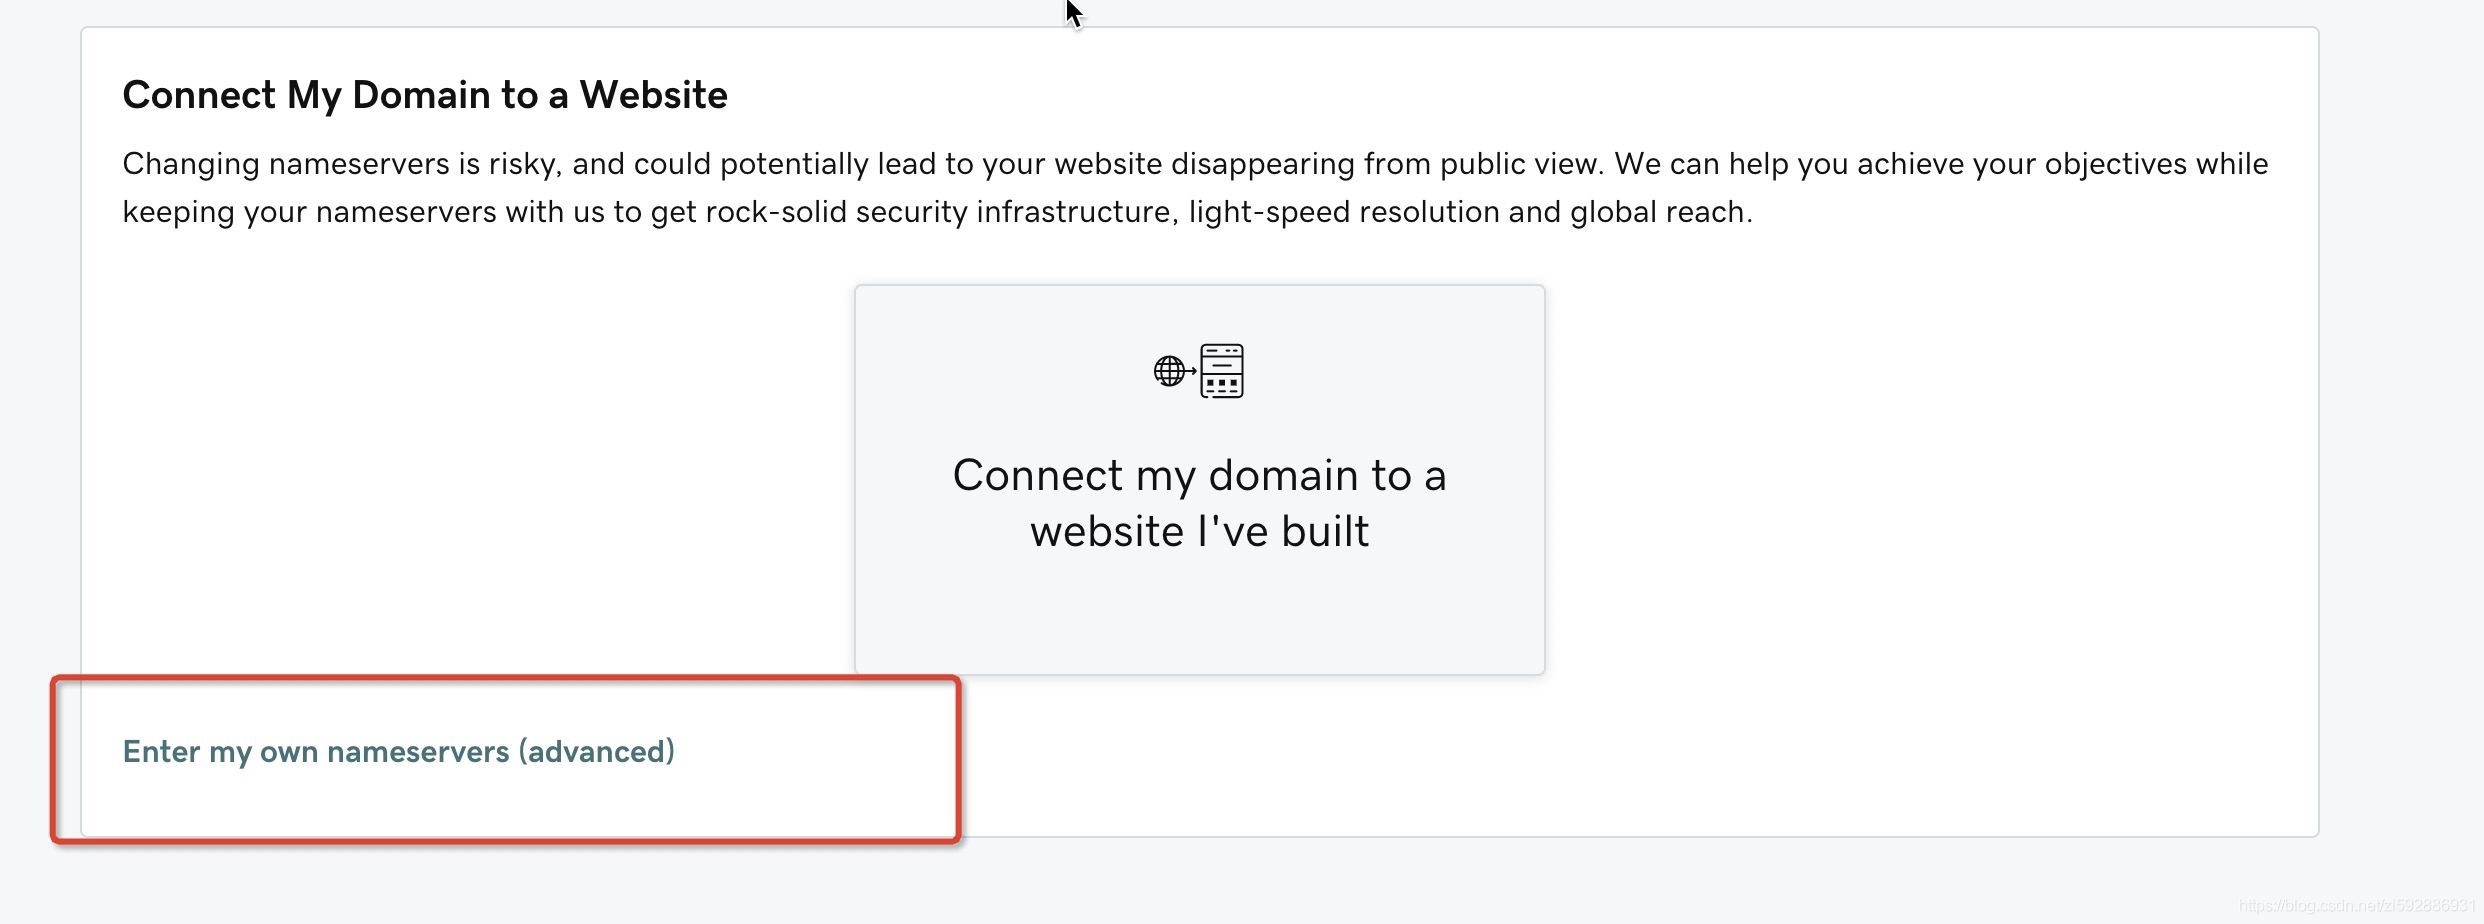
进入到 godaddy 管理控制台,然后进入 Domain 中,选择需要托管的域名。点击进入后,选择 Manage DNS 开始设置

可以看到,上面红色标记是你域名解析记录,下面红色标记是可以更改解析服务,选择点击 change:选择使用自己的解析服务
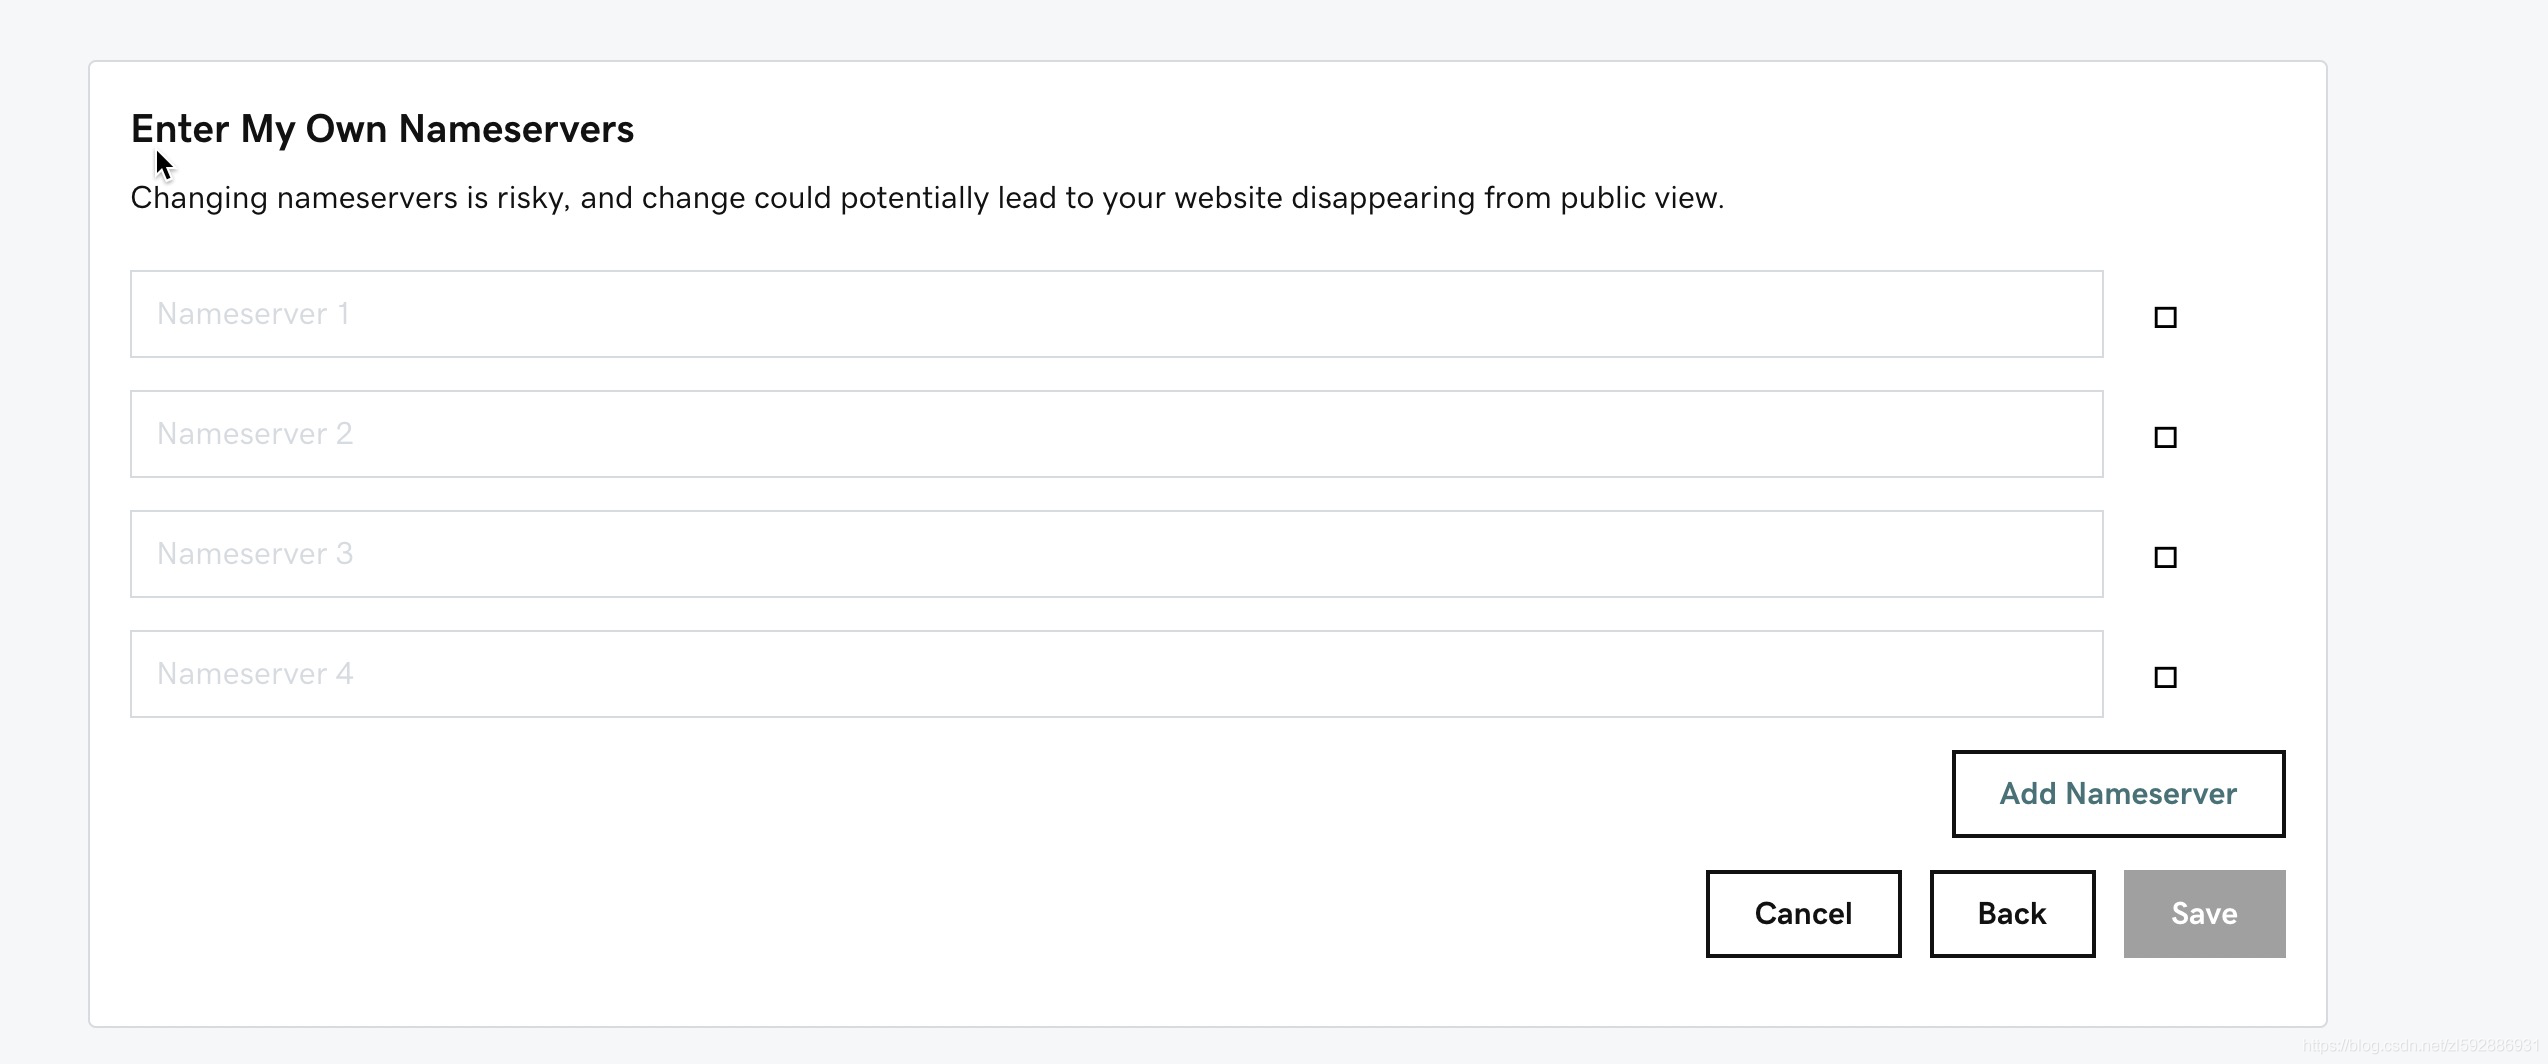
这里将刚才 aws 生成的 NS 的四个记录给填上,保存,等 DNS 解析生效即可。
CentOS 7 升级内核
查看当前内核版本
xxxxxxxxxx$ uname -r3.10.0-514.el7.x86_64
$ uname -aLinux k8s-master 3.10.0-514.el7.x86_64 #1 SMP Tue Nov 22 16:42:41 UTC 2016 x86_64 x86_64 x86_64 GNU/Linux
$ cat /etc/redhat-release CentOS Linux release 7.3.1611 (Core)
安装 yum 源
更新yum源仓库
xxxxxxxxxx$ yum -y update启用 ELRepo 仓库
ELRepo 仓库是基于社区的用于企业级 Linux 仓库,提供对 RedHat Enterprise (RHEL) 和 其他基于 RHEL的 Linux 发行版(CentOS、Scientific、Fedora 等)的支持。 ELRepo 聚焦于和硬件相关的软件包,包括文件系统驱动、显卡驱动、网络驱动、声卡驱动和摄像头驱动等。
导入ELRepo仓库的公共密钥
xxxxxxxxxxrpm --import https://www.elrepo.org/RPM-GPG-KEY-elrepo.org安装ELRepo仓库的yum源
xxxxxxxxxxrpm -Uvh http://www.elrepo.org/elrepo-release-7.0-3.el7.elrepo.noarch.rpm查看可用的系统内核包
可以看到 4.4 和 4.18 两个版本
xxxxxxxxxxyum --disablerepo="*" --enablerepo="elrepo-kernel" list availableLoaded plugins: fastestmirrorLoading mirror speeds from cached hostfile * elrepo-kernel: mirrors.tuna.tsinghua.edu.cnelrepo-kernel | 2.9 kB 00:00:00 elrepo-kernel/primary_db | 1.8 MB 00:00:03 Available Packageskernel-lt.x86_64 4.4.155-1.el7.elrepo elrepo-kernelkernel-lt-devel.x86_64 4.4.155-1.el7.elrepo elrepo-kernelkernel-lt-doc.noarch 4.4.155-1.el7.elrepo elrepo-kernelkernel-lt-headers.x86_64 4.4.155-1.el7.elrepo elrepo-kernelkernel-lt-tools.x86_64 4.4.155-1.el7.elrepo elrepo-kernelkernel-lt-tools-libs.x86_64 4.4.155-1.el7.elrepo elrepo-kernelkernel-lt-tools-libs-devel.x86_64 4.4.155-1.el7.elrepo elrepo-kernelkernel-ml.x86_64 4.18.7-1.el7.elrepo elrepo-kernelkernel-ml-devel.x86_64 4.18.7-1.el7.elrepo elrepo-kernelkernel-ml-doc.noarch 4.18.7-1.el7.elrepo elrepo-kernelkernel-ml-headers.x86_64 4.18.7-1.el7.elrepo elrepo-kernelkernel-ml-tools.x86_64 4.18.7-1.el7.elrepo elrepo-kernelkernel-ml-tools-libs.x86_64 4.18.7-1.el7.elrepo elrepo-kernelkernel-ml-tools-libs-devel.x86_64 4.18.7-1.el7.elrepo elrepo-kernelperf.x86_64 4.18.7-1.el7.elrepo elrepo-kernelpython-perf.x86_64 4.18.7-1.el7.elrepo elrepo-安装最新版本内核
xxxxxxxxxx$ yum --enablerepo=elrepo-kernel install kernel-ml--enablerepo 选项开启 CentOS 系统上的指定仓库。默认开启的是 elrepo,这里用 elrepo-kernel 替换。
设置 grub2
内核安装好后,需要设置为默认启动选项并重启后才会生效
查看系统上的所有可用内核
xxxxxxxxxx$ sudo awk -F\' '$1=="menuentry " {print i++ " : " $2}' /etc/grub2.cfg0 : CentOS Linux (4.18.7-1.el7.elrepo.x86_64) 7 (Core)1 : CentOS Linux (3.10.0-862.11.6.el7.x86_64) 7 (Core)2 : CentOS Linux (3.10.0-514.el7.x86_64) 7 (Core)3 : CentOS Linux (0-rescue-063ec330caa04d4baae54c6902c62e54) 7 (Core)设置新的内核为grub2的默认版本
服务器上存在4 个内核,我们要使用 4.18 这个版本,可以通过 grub2-set-default 0 命令或编辑 /etc/default/grub 文件来设置
方法1:通过 grub2-set-default 0 命令设置
其中 0 是上面查询出来的可用内核
xxxxxxxxxxgrub2-set-default 0方法二:编辑 /etc/default/grub 文件
设置 GRUB_DEFAULT=0,通过上面查询显示的编号为 0 的内核作为默认内核
xxxxxxxxxx$ vim /etc/default/grubGRUB_TIMEOUT=5GRUB_DISTRIBUTOR="$(sed 's, release .*$,,g' /etc/system-release)"GRUB_DEFAULT=0GRUB_DISABLE_SUBMENU=trueGRUB_TERMINAL_OUTPUT="console"GRUB_CMDLINE_LINUX="crashkernel=auto rd.lvm.lv=cl/root rhgb quiet"GRUB_DISABLE_RECOVERY="true"生成 grub 配置文件并重启
xxxxxxxxxx$ grub2-mkconfig -o /boot/grub2/grub.cfgGenerating grub configuration file ...Found linux image: /boot/vmlinuz-4.18.7-1.el7.elrepo.x86_64Found initrd image: /boot/initramfs-4.18.7-1.el7.elrepo.x86_64.imgFound linux image: /boot/vmlinuz-3.10.0-862.11.6.el7.x86_64Found initrd image: /boot/initramfs-3.10.0-862.11.6.el7.x86_64.imgFound linux image: /boot/vmlinuz-3.10.0-514.el7.x86_64Found initrd image: /boot/initramfs-3.10.0-514.el7.x86_64.imgFound linux image: /boot/vmlinuz-0-rescue-063ec330caa04d4baae54c6902c62e54Found initrd image: /boot/initramfs-0-rescue-063ec330caa04d4baae54c6902c62e54.imgdone
$ reboot
验证
xxxxxxxxxx$ uname -r4.18.7-1.el7.elrepo.x86_64删除旧内核(可选)
查看系统中全部的内核
xxxxxxxxxx$ rpm -qa | grep kernelkernel-3.10.0-514.el7.x86_64kernel-ml-4.18.7-1.el7.elrepo.x86_64kernel-tools-libs-3.10.0-862.11.6.el7.x86_64kernel-tools-3.10.0-862.11.6.el7.x86_64kernel-3.10.0-862.11.6.el7.x86_64方法一:yum remove 删除旧内核的 RPM 包
xxxxxxxxxx$ yum remove kernel-3.10.0-514.el7.x86_64 \kernel-tools-libs-3.10.0-862.11.6.el7.x86_64 \kernel-tools-3.10.0-862.11.6.el7.x86_64 \kernel-3.10.0-862.11.6.el7.x86_64方法二:yum-utils` 工具
如果安装的内核不多于 3 个,yum-utils 工具不会删除任何一个。只有在安装的内核大于 3 个时,才会自动删除旧内核。
安装 yum-utils
xxxxxxxxxx$ yum install yum-utils删除旧版本
xxxxxxxxxxpackage-cleanup --oldkernels