[VMWare] Host SMbus controller not enabled[VMWare] intel_rapl: no valid rapl domains found in package 0[VMWare] sd 0:0:0:0: [sda] Assuming drive cache: write through[VMWare] 虚拟机磁盘空间不足[VMWare] output error file to the following location A:\GHOSTERR.TXT[VMWare] 设备"Kingston DataTraveler 3.0"无法连接到理想的主机控制器。将尝试将该设备连接到可用的最佳主机控制器。这可能会导致该设备出现未定义的行为[MySQL] 插入关键字导致 SQL 执行失败[MySQL] 字段包含单引号、双引号导致 SQL 语法错误[MySQL] 重置密码[MySQL] Your password does not satisfy the current policy requirements [MySQL] ORDER BY clause is not in GROUP BY clause[MySQL] ERROR 1820 (HY000): You must reset your password using ALTER USER statement before executing this statement.[MySQL] Specified key was too long; max key length is 767 bytes[MySQL] Table performance_schema.session_variables doesn’t exist[MySQL] ERROR! The server quit without updating PID file (/application/mysql-5.7.20/data/localhost.localdomain.pid).[MySQL] ERROR 2002 (HY000): Can't connect to local MySQL server through socket '/var/run/mysqld/mysqld.sock'[SecureFX] 中文文件名乱码[SecureCRT] 冻结终端/解除冻结/全屏/清屏[SourceInSight] 支持 .cc 文件[CentOS] 设置网卡自启动[CentOS] 图形、多用户(命令行)模式切换[CentOS] 解决 root 分区空间不足的问题[CentOS] Centos warning: setlocale: LC_CTYPE: cannot change locale (UTF-8): No such file or directory[CentOS] libaio.so.1()(64bit) is needed by mysql-community-server-5.7.24-1.el7.x86_64[CentOS] libnuma.so.1()(64bit) is needed by mysql-community-server-5.7.9-1.el6.x86_64[CentOS] cannot find -static-libstdc++[CentOS] PHP 加载 MySQL 失败:缺失 libmysqlclient.so.18[Ubuntu] 图形、命令行模式切换[Ubuntu] the listen queue of a socket overflowed[Ubuntu] 域名解析未生效[IceGrid] 应用进程权限[VSCode] Failed to continue: "Cannot find Delve debugger. Ensure it is in your `GOPATH/bin` or `PATH`."[vs2017] 编译错误:未将对象引用设置到对象的实例[Django] Signal only works in main thread[Django] memory leak with gunicorn[Python] MySQL 结果集返回字典格式[Python] module not found error 可能原因[Python] ImportError: No module named flask_restful[Python] TypeError: 'frozenset' object is not callable[Flask] request.remote_addr 无法获取用户真实 IP[Flask] view[write_offset:write_offset+buffer_size][Pip] str(c.version) for c in all_candidates SyntaxError: invalid syntax[Ubuntu] libssl-dev : Depends: libssl1.0.0 (= 1.0.1f-1ubuntu2) but 1.0.1f-1ubuntu2.19 is to be installed[Ubuntu] [: 1: unexpected operator[Ubuntu] lua.c:80:31: fatal error: readline/readline.h: No such file or directory[Ubuntu] ssh root 登陆 Permission denied[Ubuntu] 重置 root 密码[Ubuntu] protobuf 冲突导致编译失败[Ubuntu] error: C++ preprocessor "/lib/cpp" fails sanity check[Ubuntu] Package libdb4.8++-dev is not available, but is referred to by another package.[Ubuntu] E: Unable to correct problems, you have held broken packages.[Ubuntu] shell 命令无法自动补全[Ubuntu] "No package 'libffi' found"[Ubuntu] RuntimeError: cryptography requires setuptools 18.5 or newer[Ubuntu] /usr/lib/x86_64-linux-gnu/libstdc++.so.6: version `GLIBCXX_3.4.21' not found [Ubuntu] files list file for package 'xxx' missing; assuming package has no files currently installed[Ubuntu] Errors were encountered while processing[Linux] Failed to set locale, defaulting to C[Linux] sudo command not found[Linux] sed: 1: extra characters at the end of p command[Golang] package xxx: cannot download, $GOPATH not set. For more details see: go help gopath[Golang] go-get=1: dial tcp i/o timeout)[Golang] GOPATH 环境变量被覆盖[geth] unexpected directory layout[geth] Block sealing failed err="waiting for transactions"[geth] Please enable network time synchronisation in system settings[geth] Cannot start mining without etherbase err="etherbase must be explicitly specified"[geth] first argument must be the account to unlock[geth] remove the blockchain and state databases[geth] account unlock with HTTP access is forbidden[npm] sh: 1: node: not found npm WARN This failure might be due to the use of legacy binary [npm] npm WARN enoent ENOENT: no such file or directory[npm] You must install peer dependencies yourself.[npm] TypeError: this.getResolve is not a function[npm] const wslToWindowsPath = async path[npm] Node Sass could not find a binding for your current environment[npm] Ineffective mark-compacts near heap limit Allocation failed - JavaScript heap out of memory[vue] App.vue{ parser: "babylon" } is deprecated; we now treat it as { parser: "babel" }. [vue] http://eslint.org/docs/rules 错误[vue] !!vue-style-loader!css-loader?{“sourceMap”:true}![vue] router 嵌套路由在 history 模式下刷新无法渲染页面[vue] Cannot read property 'commit' of undefined[vue] Error: Avoided redundant navigation to current location[vue] error: Unexpected console statement (no-console)[web3.js] Error: Error: Method eth_compileSolidity not supported.[web3.js] 监听合约事件失败[remix-ide] 通过 Web3 Provider 连接本地节点失败[julia] ERROR: UndefVarError: Pkg not defined[julia] ERROR: LoadError: LoadError: LoadError: UndefVarError: @printf not defined[solidity] Internal compiler error: Stack too deep, try removing local variables.[remix-ide] Error: exceeds block gas limit[nginx] "POST / HTTP/1.1" 499 0 "-" "-"[nginx] 13: Permission denied) while connecting to upstream[bitcoin] non-mandatory-script-verify-flag (Signature must be zero for failed CHECK(MULTI)SIG operation) (code 64)[eos] block_log_exception: Block log exception Block log was not setup properly.[eos] unable to find plugin: eosio::wallet_api_plugin[eos] snapshot_exception: Snapshot exception Binary snapshot has unexpected magic number![eos] db storage not configured to have enough storage for the provided snapshot, please increase and retry snapshot[bash] 运行脚本报错 terminated[vim] can not open file for writing[git] 拉取 github 仓库特别慢[git] gpg failed to sign the data fatal: failed to write commit object[git/github] ssh: connect to host github.com port 22: Connection timed out[swagger] 使用 NGINX 做反向代理调试 swagger,出现端口丢失[gcc] passing const this argument discards qualifiers [-fpermissive][gcc] undefined reference to `pthread_create'[gcc] undefined reference to `std::ios_base::Init::Init()'[gin] logged twice each request[gin] [GIN-debug] [WARNING] Headers were already written. Wanted to override status code 400 with 200[python] SyntaxError: Non-ASCII character '\xe8' in file[eth] 交易被回滚 Dropped & Replaced[net/http] panic: http: invalid pattern[lets encrypt] This site is not secure[https] block:mixed-content[protobuf] dealing with json omitempty tags in proto3[golang] flag provided but not defined: -xxxxx[golang] WARNING: Missing 'go_package' option in "xxx.proto"[redis] listening socket 127.0.0.1:6379: bind: No error[web] was loaded over https, but requested an insecure xmlhttprequest[aws/rds] Cannot modify a default parameter group. (Service: AmazonRDS; Status Code: 400; Error Code: InvalidParameterValue[docker] Error response from daemon: missing signature key
[VMWare] Host SMbus controller not enabled
系统环境
CentOS/VMware® Workstation 12 Pro
问题描述
在 VMWare 虚拟机启动 CentOS 时,出现如上警告信息
解决方式
在 /etc/modprobe.d/blacklist.conf 文件里添加如下内容:
xxxxxxxxxxblacklist i2c_piix4[VMWare] intel_rapl: no valid rapl domains found in package 0
系统环境
CentOS/VMware® Workstation 12 Pro
问题描述
在 VMWare 虚拟机启动 CentOS 时,出现如上警告信息
解决方式
在 /etc/modprobe.d/blacklist.conf 文件里添加如下内容: blacklist intel_rapl
[VMWare] sd 0:0:0:0: [sda] Assuming drive cache: write through
系统环境
CentOS/VMware® Workstation 12 Pro
问题描述
在 VMWare 虚拟机启动 CentOS 时,出现如上警告信息
解决方式
"rhgb" 表示 "redhat graphics boot",就是图形进度条模式
在 /etc/default/grub 文件里去掉 rhgb 参数
执行 grub2-mkconfig -o /boot/grub2/grub.cfg
reboot
[VMWare] 虚拟机磁盘空间不足
系统环境
Ubuntu 14.04.5 LTS/VMware® Workstation 12 Pro
问题描述
虚拟机 Ubuntu 磁盘空间不足,导致无法使用,需要扩容
解决方式
删除虚拟机的所有快照
虚拟机设置 -> 硬件 -> 磁盘 -> 扩展,设置一个足够的空间,例如 200G
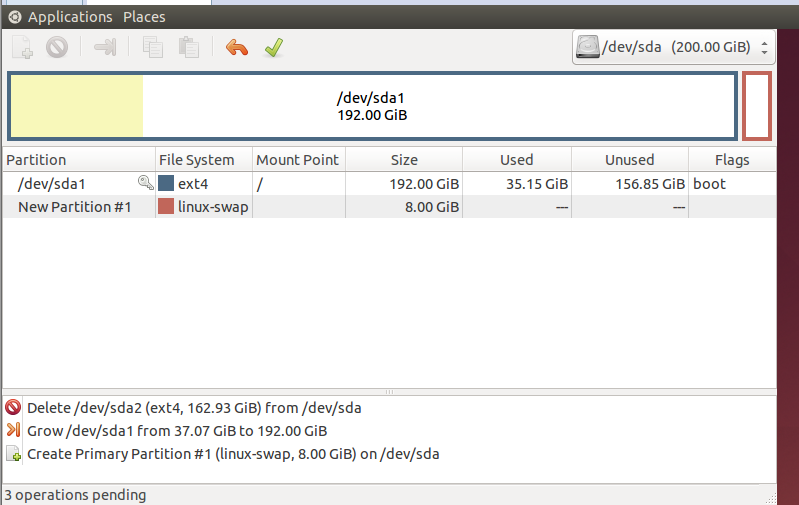
通过
apt-get install gparted -y安装gparted图形界面模式下,运行
gparted,扩展分区即可
扩展前,
/dev/sda1实际 40G,使用将近 40G。首先,将/dev/sda1之外的分区(虚拟机安装 Ubuntu 系统时默认处理,所以关键分区是 sda1,此分区不能删除)全部删除;然后,扩展/dev/sda1分区,并重新建立交换分区。
[VMWare] output error file to the following location A:\GHOSTERR.TXT
系统环境
宿主机 Windows 7/虚拟机 Windows XP
问题描述
VMWare 安装 Windows XP 虚拟机时报错,错误信息如下:output error file to the following location A:\GHOSTERR.TXT
解决方式
因为虚拟机磁盘没有分区,所以Ghost版系统找不到安装系统的主分区。先执行自带的分区工具对磁盘进行分区,然后安装操作系统即可。
[VMWare] 设备"Kingston DataTraveler 3.0"无法连接到理想的主机控制器。将尝试将该设备连接到可用的最佳主机控制器。这可能会导致该设备出现未定义的行为
系统环境
宿主机 MacOS/虚拟机 Windows 7
问题描述
将 U 盘插入虚拟机时,发生错误:“设备"Kingston DataTraveler 3.0"无法连接到理想的主机控制器。将尝试将该设备连接到可用的最佳主机控制器。这可能会导致该设备出现未定义的行为。
解决方式
虚拟机设置 -> 硬件 -> USB 控制器 -> USB 兼容性改为 3.0 即可
[MySQL] 插入关键字导致 SQL 执行失败
系统环境
MySQL 5.6.x
问题描述
在 MySQL 表中某字段包含关键字 key,导致 SQL 语句执行报错,数据无法正常插入表中。错误信息大致如下:
You have an error in your SQL syntax; check the manual that corresponds to your MySQL server version for the right syntax to use near ...
解决方式
执行如下 SQL 报错:INSERT into tb_map(key, value) VALUES('a',' 123');
key 是 MySQL 关键字之一
正确写法:INSERT into tb_map(`key`, value) VALUES('a',' 123');
使用 转义符号:`关键字`
[MySQL] 字段包含单引号、双引号导致 SQL 语法错误
系统环境
CentOS 6.8 x64/MySQL 5.6.35
问题描述
略
解决方式
SQL 中利用 \ 转义即可,如下两种方式均可
xxxxxxxxxx-- 单引号转义insert into blog_info_tbl (title, url) values ('kevin\'s blog', 'https://dudebing99.github.io/Blog/');
-- 双引号转义insert into blog_info_tbl (title, url) values ('\"kevin\" blog', 'https://dudebing99.github.io/Blog/');
[MySQL] 重置密码
系统环境
CentOS 6.8 x64/MySQL 5.6.35
问题描述
MySQL 用户密码丢失,重置用户密码
解决方式
高版本 MySQL 中没有 mysqld_safe,可以在配置文件 my.conf 添加
skip-grant-tables达到同样效果
高版本 MySQL user 表列名
password变成了authentication_string
xxxxxxxxxxservice mysqld stop
mysqld_safe --skip-grant-tables &
mysql -uroot> use mysql;> update user set authentication_string=PASSWORD('123456') where user='root';# MySQL 5.7 及以上 update user set authentication_string=PASSWORD('123456') where user='root';> flush privileges;
pkill mysqld_safe
service mysql start
[MySQL] Your password does not satisfy the current policy requirements
系统环境
CentOS 7.2/mysql Ver 14.14 Distrib 5.7.28, for Linux (x86_64) using EditLine wrapper
问题描述
MySQL 修改密码提示如上错误
原因分析
密码强度不满足默认级别,需要增加密码强度或者降低密码级别
解决方式
查看默认密码策略
xxxxxxxxxxSHOW VARIABLES LIKE 'validate_password%'; 如果降低密码级别
可以降低级别,可以设置密码长度
xxxxxxxxxxset global validate_password_policy=LOW;set global validate_password_length=6; 修改密码
xxxxxxxxxxALTER USER 'root'@'localhost' IDENTIFIED BY '123456';[MySQL] ORDER BY clause is not in GROUP BY clause
系统环境
CentOS 6.8 x64/5.7.18 MySQL Community Server
问题描述
xxxxxxxxxxmysql> select org_user_id, uniq_user_id from (select * from multi_app_user_tbl) as tmp group by uniq_user_id;ERROR 1055 (42000): Expression #1 of SELECT list is not in GROUP BY clause and contains nonaggregated column 'tmp.org_user_id' which is not functionally dependent on columns in GROUP BY clause; this is incompatible with sql_mode=only_full_group_by原因分析
Select 语句选择的列与 Group by 包含的列不一致,MySQL 默认有此限制。
解决方式
可以修改业务的 SQL,遵循此限制
可以取消 MySQL 此限制,如下所示
xxxxxxxxxxmysql> select @@sql_mode\G*************************** 1. row ***************************@@sql_mode: ONLY_FULL_GROUP_BY,STRICT_TRANS_TABLES,NO_ZERO_IN_DATE,NO_ZERO_DATE,ERROR_FOR_DIVISION_BY_ZERO,NO_AUTO_CREATE_USER,NO_ENGINE_SUBSTITUTION1 row in set (0.00 sec)mysql> set global sql_mode='STRICT_TRANS_TABLES,NO_ZERO_IN_DATE,NO_ZERO_DATE,ERROR_FOR_DIVISION_BY_ZERO,NO_AUTO_CREATE_USER,NO_ENGINE_SUBSTITUTION';或修改 MySQL 配置文件 my.ini,添加或修改如下配置项
xxxxxxxxxxsql_mode=STRICT_TRANS_TABLES,NO_ZERO_IN_DATE,NO_ZERO_DATE,ERROR_FOR_DIVISION_BY_ZERO,NO_AUTO_CREATE_USER,NO_ENGINE_SUBSTITUTION[MySQL] ERROR 1820 (HY000): You must reset your password using ALTER USER statement before executing this statement.
系统环境
CentOS 7.6/MySQL 5.7.29
问题描述
略
解决方式
xxxxxxxxxxmysql> alter user 'root'@'localhost' identified by '123456';[MySQL] Specified key was too long; max key length is 767 bytes
系统环境
CentOS 7.6/MySQL 5.5.60
问题描述
MySQL 建表 SQL 中,表中某些字段属性为 varchar(256),并且,该列上建立了索引,执行 SQL 时报错,如上所示
问题原因
767 bytes is the stated prefix limitation for InnoDB tables in MySQL version 5.6 (and prior versions). It's 1,000 bytes long for MyISAM tables. In MySQL version 5.7 and upwards this limit has been increased to 3072 bytes.
5.6 及其之前版本,InnoDB 引擎限制索引前缀长度为 767 字节,例如,utf8 编码下,一个 varchar 编码占用 3 个字节
INNODB
utf8VARCHAR(255)INNODB
utf8mb4VARCHAR(191)
解决方式
升级 MySQL 到 5.7 版本及其以上
修改列长度
varchar(256) -> varchar(255)
[MySQL] Table performance_schema.session_variables doesn’t exist
系统环境
CentOS 7.2/MySQL 5.7
问题描述
MySQL 由 5.6 升级到 5.7 之后,执行 SQL 报错,信息如上。
问题原因
略。
解决方式
xxxxxxxxxxmysql_upgrade -u root -p --forcesystemctl restart mysqld[MySQL] ERROR! The server quit without updating PID file (/application/mysql-5.7.20/data/localhost.localdomain.pid).
系统环境
CentOS 6.1/MySQL 5.7.20
问题描述
启动服务报上述错误
问题原因
xxxxxxxxxx[root@localhost modules]# cat /etc/my.cnf[mysqld]port=3306datadir=/application/mysql-5.7.20/datasocket=/application/mysql-5.7.20/mysql/tmp/mysql.socklog_error=/var/mysql/log/error.logbasedir=/application/mysql-5.7.20根据配置文件指定的日志文件,查看日志信息如下
实际原因可能是其他,思路都是先查看此日志文件定位错误原因
xxxxxxxxxx2020-03-06T17:27:51.108248Z 0 [Note] IPv6 is available.2020-03-06T17:27:51.108258Z 0 [Note] - '::' resolves to '::';2020-03-06T17:27:51.108269Z 0 [Note] Server socket created on IP: '::'.2020-03-06T17:27:51.108296Z 0 [ERROR] Could not create unix socket lock file /application/mysql-5.7.20/mysql/tmp/mysql.sock.lock.2020-03-06T17:27:51.108301Z 0 [ERROR] Unable to setup unix socket lock file.2020-03-06T17:27:51.108306Z 0 [ERROR] Aborting关键信息,无法创建锁文件,由于使用用户 mysql 运行 MySQL 服务,而目录 /application/mysql-5.7.20/mysql/tmp/ 使用 root 创建,所以 mysql 无权限写入锁文件
解决方案
由于目录权限问题,加上权限即可
xxxxxxxxxx[root@localhost data]# chown -R mysql:mysql /application/mysql-5.7.20/[MySQL] ERROR 2002 (HY000): Can't connect to local MySQL server through socket '/var/run/mysqld/mysqld.sock'
系统环境
CentOS 6.1/MySQL 5.7.20
问题描述
本机使用命令 mysql -uroot -p 连接服务端,报如上错误
问题原因
默认情况下,MySQL 客户端会认为连接本机,所以会尝试以 socket 文件方式进行连接这时根据配置文件 /etc/my.cnf 去查找 socket 文件路径,由于未配置导致错误
解决方案
指定 socket 文件路径,如下所示
xxxxxxxxxx[client]default-character-set=utf8socket=/application/mysql-5.7.20/mysql/tmp/mysql.sock不使用 socket 文件通信,使用网络通信
xxxxxxxxxx[root@localhost ~]# mysql -h 127.0.0.1 -u root -p[SecureFX] 中文文件名乱码
系统环境
SecureFx Version 7.0.3 (build 480)
问题描述
SecretFx 显示中文文件名时出现乱码
解决方式
打开安装目录,进入子目录:SecureCRT7\App\VanDyke Clients\CONFIG\Sessions
找到 D:"Filenames Always Use UTF8"=00000000 改成 00000001,如下所示
xxxxxxxxxxD:"Restart Data Size"=00000000S:"Restart Datafile Path"=D:"Max Transfer Buffers"=00000004D:"Filenames Always Use UTF8"=00000001D:"Use Multiple SFTP Channels"=00000000D:"Suppress Stat On CWD"=00000000[SecureCRT] 冻结终端/解除冻结/全屏/清屏
系统环境
SecureCRT Version 7.0.3 (build 480)
问题描述
略。
解决方式
Ctrl + s:冻结终端
Ctrl + q:解除冻结
Alt + Enter:全屏/退出全屏
Ctrl + L:清屏 clear
[SourceInSight] 支持 .cc 文件
系统环境
Windows 7 Ultimate/SourceInSight 4.0
问题描述
略。
解决方式
Options -> Document Options,Document Type 下拉选 C++ Source File, File Filter 中加入 *.cc
[CentOS] 设置网卡自启动
系统环境
CentOS
问题描述
略。
解决方式
将 /etc/sysconfig/network-scripts/ifctg-xxx 中如下内容修改
ONBOOT=no 修改为 ONBOOT=yes
备注:重启网卡或系统生效。
[CentOS] 图形、多用户(命令行)模式切换
系统环境
CentOS 7.x
问题描述
CentOS 7.x 不在使用 init 托管服务,systemd 取而代之。
解决方式
命令(多用户)模式
xxxxxxxxxxsystemctl set-default multi-user.target图形模式
xxxxxxxxxxsystemctl set-default graphical.target[CentOS] 解决 root 分区空间不足的问题
系统环境
CentOS release 6.8 (Final)
问题描述
在安装操作系统时采取默认分区策略或者当初分配的策略与后面实际使用差异,导致某些分区仍然有大量的可用空间,但是 root 分区空间不够。
解决方式
xxxxxxxxxx# 前提:home 分区仍有大量空间,root 分区空间不够# 查看分区df -h
# 取消挂载umount /home
# 分区检测e2fsck -f /dev/mapper/VolGroup-lv_home
# 将 lv_home 虚拟分区设为 100Gresize2fs -p /dev/mapper/VolGroup-lv_home 100G
# 挂载mount /home
# 释放空间lvreduce -L 100G /dev/mapper/VolGroup-lv_home
# 查看可用空间大小vgdisplay
# 根据上述命令的提示,假设可用空间为 300G,扩展 lv_root 虚拟分区lvextend -L +300G /dev/mapper/VolGroup-lv_root
# 重设分区大小resize2fs -p /dev/mapper/VolGroup-lv_root
[CentOS] Centos warning: setlocale: LC_CTYPE: cannot change locale (UTF-8): No such file or directory
系统环境
CentOS 7.6
问题描述
shell 登陆系统,弹出如下警告信息
xxxxxxxxxxLast login: Sun Apr 21 15:52:04 2019 from 223.104.63.174
Welcome to Alibaba Cloud Elastic Compute Service !
-bash: warning: setlocale: LC_CTYPE: cannot change locale (UTF-8): No such file or directory
原因分析
语言环境设置错误
解决方式
设置语言环境变量,内容如下
xxxxxxxxxx[root@wwhs-i-deer ~]# cat /etc/environmentLANG=en_US.utf-8LC_ALL=en_US.utf-8[CentOS] libaio.so.1()(64bit) is needed by mysql-community-server-5.7.24-1.el7.x86_64
系统环境
CentOS 7.2
问题描述
安装 MySQL 出错,提示缺少如上依赖
解决方式
xxxxxxxxxxyum install -y libaio[CentOS] libnuma.so.1()(64bit) is needed by mysql-community-server-5.7.9-1.el6.x86_64
系统环境
CentOS 7.2
问题描述
安装 MySQL 出错,提示缺少如上依赖
解决方式
xxxxxxxxxxyum install libnuma* -y[CentOS] cannot find -static-libstdc++
系统环境
CentOS 7.8/GCC 4.8.5
问题描述
使用 GCC 编译程序报错,提示缺少如上依赖
解决方式
xxxxxxxxxxyum install -y epel-releaseyum install -y glibc-static libstdc++-static[CentOS] PHP 加载 MySQL 失败:缺失 libmysqlclient.so.18
系统环境
CentOS 7.8/MySQL 5.7.30
问题描述
PHP 运行加载 MySQL 失败,系统中确实 libmysqlclient.so.18
解决方式
xxxxxxxxxxwget -O /usr/lib/libmysqlclient.so.18 http://files.directadmin.com/services/es_7.0_64/libmysqlclient.so.18[Ubuntu] 图形、命令行模式切换
系统环境
Ubuntu 14.04
问题描述
略。
解决方式
修改 /etc/default/grub
xxxxxxxxxx# 图形模式GRUB_CMDLINE_LINUX_DEFAULT="quiet splash"# 命令行模式GRUB_CMDLINE_LINUX_DEFAULT="quiet splash text"执行 update-grub
reboot
[Ubuntu] the listen queue of a socket overflowed
系统环境
Ubuntu 14.04
问题描述
客户端连接服务端失败,利用 ss/netstat 查看网络的统计数据,发现异常 the listen queue of a socket overflowed
xxxxxxxxxxroot@iZwz9iz7dge6lus7u0uvuzZ:~# netstat -s|grep -E "overflowed" 470847 times the listen queue of a socket overflowed原因分析
在使用 wrk 作为客户端对服务端进行压力测试时偶尔出现连接无响应,进而查看到网络统计信息中有如上错误。
查看系统支持的最大全连接数 128
xxxxxxxxxxroot@:~# cat /proc/sys/net/core/somaxconn 128而使用 wrk 并发的连接数设置超过了该限制,例如,设置 wrk 并发连接 200。此时,服务端的全连接一定会溢出,查看系统溢出之后如何处理
xxxxxxxxxxroot@:~# cat /proc/sys/net/ipv4/tcp_abort_on_overflow0tcp_abort_on_overflow 为 0 表示三次握手第三步的时候,如果全连接队列满了,那么服务端扔掉客户端发过来的ack
tcp_abort_on_overflow设置成 1,表示三次握手第三步的时候,如果全连接队列满了,服务端发送一个reset包给客户端,表示废掉连接
解决方式
在配置文件
/etc/sysconf.conf添加(或修改)该设置
xxxxxxxxxxnet.core.somaxconn=32768运行
sysctl -p使配置生效
[Ubuntu] 域名解析未生效
系统环境
Ubuntu 14.04
问题描述
在 /etc/resolv.conf 配置域名解析如下所示
xxxxxxxxxxroot@ubuntu:~# cat /etc/resolv.conf # Dynamic resolv.conf(5) file for glibc resolver(3) generated by resolvconf(8)# DO NOT EDIT THIS FILE BY HAND -- YOUR CHANGES WILL BE OVERWRITTENnameserver 114.114.114.114nameserver 8.8.8.8重启电脑域名解析未生效(该文件为空)
原因分析
如上注释说明,不要试图修改该文件,系统重启内容将被覆盖
解决方式
在 /etc/resolvconf/resolv.conf.d/base 配置即可解决
xxxxxxxxxxroot@ubuntu:~# cat /etc/resolvconf/resolv.conf.d/base nameserver 114.114.114.114nameserver 8.8.8.8[IceGrid] 应用进程权限
系统环境
CentOS 7.x/Ice 3.6.1
问题描述
IceGrid Node 节点部署的应用进程无法创建日志目录
原因分析
IceGrid Node 节点应用进程默认以 everyone 用户启动,进程需要在运行目录写日志文件,而 everyone 用户不具备该目录的写权限,导致无法创建日志目录。
解决方式
方法 1:将应用写日志文件的目录赋予 everyone 用户权限。
方法 2:IceGrid 机制允许修改用户进程启动默认启动的用户,详见 ICE 官方文档。
[VSCode] Failed to continue: "Cannot find Delve debugger. Ensure it is in your `GOPATH/bin` or `PATH`."
系统环境
Windows 7 x64 Ultimate/VS Code v1.23.0
问题描述
略。
解决方式
确认已经正确设置 GOPATH 环境变量,并将 %GOPATH%\bin 追加到 PATH 环境变量
打开 Git Bash,运行 go get github.com/derekparker/delve/cmd/dlv
[vs2017] 编译错误:未将对象引用设置到对象的实例
系统环境
Windows 10/VS2017 社区版
问题描述
编译时控制台报错,错误:未将对象引用设置到对象的实例
解决方式
将 C:\Users\用户名\AppData\Local\Microsoft\VisualStudio 目录删除,即,恢复 vs2017 默认配置,重新打开项目编译即可。
[Django] Signal only works in main thread
系统环境
CentOS 7.x/Python 2.7.x/django 1.11.7
问题描述
运行报错
解决方式
运行时加入追加如下参数 --nothreading --noreload
[Django] memory leak with gunicorn
系统环境
CentOS 7.x/Python 2.7.x/django 1.11.7
问题描述
Django 项目运行时内存泄漏,正常情况下,应当找出内存泄漏的地方并且修复,但是如果是引入的第三方库引入的(或者团队的其他成员的代码引入),无法迅速地正面解决(find it and fix it)
解决方式
运行时添加如下参数 --max-requests 1000,该参数指定当工作线程(gunicorn workers)在处理完 1000 个请求时,主进程将其杀掉并释放这些工作线程占用(存在内存泄漏)的内存,然后重新分配新的工作线程。
实际上,主进程杀掉并重新拉起新的子进程时,不会影响对客户端的请求的处理。例如,nginx 代理 Django 后端服务,客户端的请求不会受到影响。
[Python] MySQL 结果集返回字典格式
系统环境
CentOS 7.x/Python 2.7.4
问题描述
Python 的 MySQLdb 模块访问 MySQL 的一个模块,默认查询结果是 tuple 类型,使用只能根据字段的位置作为下标去访问,使用不方便且容易出错
解决方式
初始化 MySQL 连接时,显示指定结果集为字典类型 cursorclass=MySQLdb.cursors.DictCursor,如下所示
xxxxxxxxxximport MySQLdbimport MySQLdb.cursors
def get_db_conn(mysql_config):    db = MySQLdb.connect(host=mysql_config['host'],                         port=mysql_config['port'],                         user=mysql_config['user'],                         passwd=mysql_config['passwd'],                         db=mysql_config['db'],                         cursorclass=MySQLdb.cursors.DictCursor)    db.set_character_set('utf8mb4')    cursor = db.cursor()    cursor.execute('SET NAMES utf8mb4;')
    return db, cursor
[Python] module not found error 可能原因
系统环境
CentOS 7.x/Python 2.7.4
问题描述
导入 Python 模块,提示找不到模块
解决方式
如果引用的模块包含多级目录,需要在每一级目录添加一个
__init__.py文件(内容为空即可)子目录中的文件引用父目录的模块,可将父目录的路径添加进来,举例如下
xxxxxxxxxxsys.path.insert(0, os.path.abspath(os.path.join(os.path.dirname(__file__), "..")))[Python] ImportError: No module named flask_restful
系统环境
CentOS 7.x/Python 2.7.5
问题描述
使用 flask_restful,提示如上错误
解决方式
flask_restful 独立于 flask,需要单独安装。
首先查看已安装模块,发现只包含 flask,未包含 flask-restful
xxxxxxxxxx[kevin@iZwz9cynwitmm46uagetmvZ nginx]$ pip freeze|grep -i flaskYou are using pip version 8.1.2, however version 18.1 is available.You should consider upgrading via the 'pip install --upgrade pip' command.Flask==1.0.2通过 pip 安装 flask_restful 即可
xxxxxxxxxxpip install flask-restful确认 flask_restful 已安装
xxxxxxxxxx[kevin@iZwz9cynwitmm46uagetmvZ nginx]$ pip freeze|grep -i flaskYou are using pip version 8.1.2, however version 18.1 is available.You should consider upgrading via the 'pip install --upgrade pip' command.Flask==1.0.2Flask-RESTful==0.3.6[Python] TypeError: 'frozenset' object is not callable
系统环境
CentOS 7.6/Python 2.7.5
问题描述
pip install hashlib 出错,如上所示
解决方式
xxxxxxxxxxwget https://files.pythonhosted.org/packages/74/bb/9003d081345e9f0451884146e9ea2cff6e4cc4deac9ffd4a9ee98b318a49/hashlib-20081119.zipunzip -u hashlib-20081119.zipcd hashlib-20081119python setup.py install[Flask] request.remote_addr 无法获取用户真实 IP
系统环境
CentOS 7.4/Python 2.7.5
问题描述
Flask 中使用 request.remote.addr 无法获取用户真实 IP,均为 127.0.0.1
原因分析
服务经过了 Nginx 反向代理,直接使用 request.remote.addr 获取的 IP 为 Nginx 的地址,对应的 Nginx 代理配置如下所示:
xxxxxxxxxxlocation / { proxy_redirect off; proxy_set_header Host $host; proxy_set_header X-Real-IP $remote_addr; proxy_set_header X-Forwarded-For $proxy_add_x_forwarded_for; proxy_pass http://api_server;}解决方式
正确处理后端服务经过 Nginx 代理这种情况即可,代码如下所示:
xxxxxxxxxxclient_ip = request.headers.getlist("X-Forwarded-For")[0] if request.headers.getlist("X-Forwarded-For") else request.remote.addr[Flask] view[write_offset:write_offset+buffer_size]
系统环境
CentOS 7.4/Flask 1.0.2/Python 2.7.5
问题描述
app.py 运行过程中报如下错误
xxxxxxxxxxException happened during processing of request from ('172.16.80.1', 52437)Traceback (most recent call last):File "/usr/lib/python2.7/SocketServer.py", line 593, in process_request_threadself.finish_request(request, client_address)File "/usr/lib/python2.7/SocketServer.py", line 334, in finish_requestself.RequestHandlerClass(request, client_address, self)File "/usr/lib/python2.7/SocketServer.py", line 651, in initself.finish()File "/usr/lib/python2.7/SocketServer.py", line 710, in finishself.wfile.close()File "/usr/lib/python2.7/socket.py", line 279, in closeself.flush()File "/usr/lib/python2.7/socket.py", line 303, in flushself._sock.sendall(view[write_offset:write_offset+buffer_size])问题分析
服务器在接受一个请求,如果处理时间较长,当服务器还没有处理完而客户端中断了连接时(比如关闭了浏览器),由于flask server 在发送数据时没有确认连接状态而直接进行 flush,就会导致发生这个错误。这个异常只会影响服务端的单个请求,不会影响并行的其它请求。
解决方式
暂无。
[Pip] str(c.version) for c in all_candidates SyntaxError: invalid syntax
系统环境
CentOS 6.x/Python 2.6.6
问题描述
执行 pip install --upgrade pip 报错,如上所示
解决方式
python 版本过低,安装 python 2.7.x 或以上版本
[Ubuntu] libssl-dev : Depends: libssl1.0.0 (= 1.0.1f-1ubuntu2) but 1.0.1f-1ubuntu2.19 is to be installed
类似问题:software-properties-common : Depends: python3-software-properties (= 0.92.37.8) but it is not going to be installed
系统环境
Ubuntu 14.04
问题描述
执行 apt-get install libssl-dev 安装 libssl-dev 出错,具体信息如下所示
xxxxxxxxxxThe following packages have unmet dependencies: software-properties-common : Depends: python3-software-properties (= 0.92.37.8) but it is not going to be installedE: Unable to correct problems, you have held broken packages.解决方式
xxxxxxxxxxroot@datachain-test002:~# aptitude install libssl-devThe following NEW packages will be installed:  libssl-dev{b} libssl-doc{a} zlib1g-dev{ab} 0 packages upgraded, 3 newly installed, 0 to remove and 1 not upgraded.Need to get 2,209 kB of archives. After unpacking 8,290 kB will be used.The following packages have unmet dependencies: zlib1g-dev : Depends: zlib1g (= 1:1.2.8.dfsg-1ubuntu1.1) but 1:1.2.8.dfsg-2ubuntu4.1 is installed. libssl-dev : Depends: libssl1.0.0 (= 1.0.1f-1ubuntu2.26) but 1.0.2g-1ubuntu4.11 is installed.The following actions will resolve these dependencies:
     Keep the following packages at their current version:1)     libssl-dev [Not Installed]                         2)     zlib1g-dev [Not Installed]
Accept this solution? [Y/n/q/?] nAccept this solution? [Y/n/q/?] Y
[Ubuntu] [: 1: unexpected operator
系统环境
Ubuntu 14.04
问题描述
执行 shell 脚本,报错 [: 1: unexpected operator
原因分析
Ubuntu shell 下默认的脚本解析器是 dash,会使一些 bash 脚本执行失败。
解决方式
sudo dpkg-reconfigure dash 选择 NO
[Ubuntu] lua.c:80:31: fatal error: readline/readline.h: No such file or directory
系统环境
Ubuntu 14.04
问题描述
源码编译 lua 5.3 时,报错 lua.c:80:31: fatal error: readline/readline.h: No such file or directory
原因分析
缺少 libreadline-dev 依赖包
解决方式
执行 apt-get install libreadline-dev
[Ubuntu] ssh root 登陆 Permission denied
系统环境
Ubuntu 14.04
问题描述
安装 ssh 服务之后,root 账户无法 ssh 登陆,提示权限不足
解决方式
修改 /etc/ssh/sshd_config
xxxxxxxxxx#PermitRootLogin without-passwordPermitRootLogin yes重启服务生效
xxxxxxxxxxservice ssh restart[Ubuntu] 重置 root 密码
系统环境
Ubuntu 14.04
问题描述
忘记 root 登陆密码
解决方式
开机引导界面,选择“Ubuntu 高级选项”,回车
选择“Ubuntu <省略> recovery mode”,按 “e" 键进行编辑
在界面中找到 “recovery nomodeset”,并替换为 quiet splash rw init=/bin/bash,回车
系统进入命令行模式,输入 passwd 更改 root 密码(同理,可以更改其他账户密码)
重启系统
[Ubuntu] protobuf 冲突导致编译失败
系统环境
Ubuntu 14.04
问题描述
Ubuntu 系统自带 protobuf,项目中使用高版本 protobuf(由源码编译),与系统自带的产生冲突,导致项目编译、链接失败
解决方式
彻底卸载系统自带 protobuf
xxxxxxxxxxapt-get purge --remove libprotobuf*apt-get purge --remove protobuf-compiler# 借助 whereis/find 查找 protobuf 相关库、可执行程序、头文件并删除(根据实际情况调整)rm -rf /usr/local/lib/libprotobuf* /usr/lib/libprotobuf* /usr/lib/x86_64-linux-gnu/libprotobuf* /usr/local/include/google/protobuf /usr/include/google/protobuf /usr/bin/protoc /usr/bin/X11/protoc重新源码编译、安装高版本 protobuf
[Ubuntu] error: C++ preprocessor "/lib/cpp" fails sanity check
系统环境
Ubuntu 14.04
问题描述
Ubuntu 源码编译 protobuf,执行 ./configure 配置时检查出错,原因是缺少必要的 C++ 库
解决方式
xxxxxxxxxxapt-get install build-essential g++ -y如果是 CentOS,运行如下命令即可
yum install glibc-headers gcc-c++ -y
[Ubuntu] Package libdb4.8++-dev is not available, but is referred to by another package.
系统环境
Ubuntu 14.04
问题描述
Ubuntu 无法安装 libdb4.8++-dev
解决方式
xxxxxxxxxxadd-apt-repository ppa:bitcoin/bitcoinapt-get updateapt-get install -y libdb4.8-dev libdb4.8++-dev[Ubuntu] E: Unable to correct problems, you have held broken packages.
系统环境
Ubuntu 16.04
问题描述
执行 apt-get install vim -y 出错,提示包冲突,如下所示
xxxxxxxxxxroot@ubuntu:~# apt-get install vim -yReading package lists... DoneBuilding dependency tree       Reading state information... DoneSome packages could not be installed. This may mean that you haverequested an impossible situation or if you are using the unstabledistribution that some required packages have not yet been createdor been moved out of Incoming.The following information may help to resolve the situation:
The following packages have unmet dependencies: vim : Depends: vim-common (= 2:7.4.052-1ubuntu3.1) but 2:7.4.1689-3ubuntu1.2 is to be installedE: Unable to correct problems, you have held broken packages.
解决方式
卸载冲突的包,重新执行 apt-get install vim -y 即可
xxxxxxxxxxroot@ubuntu:~# apt-get remove --purge vim-commonReading package lists... DoneBuilding dependency tree Reading state information... DoneThe following packages will be REMOVED: ubuntu-minimal* vim-common* vim-tiny*0 upgraded, 0 newly installed, 3 to remove and 2 not upgraded.After this operation, 1,520 kB disk space will be freed.Do you want to continue? [Y/n] Y(Reading database ... 177073 files and directories currently installed.)Removing ubuntu-minimal (1.361.1) ...Removing vim-tiny (2:7.4.1689-3ubuntu1.2) ...Purging configuration files for vim-tiny (2:7.4.1689-3ubuntu1.2) ...Removing vim-common (2:7.4.1689-3ubuntu1.2) ...Purging configuration files for vim-common (2:7.4.1689-3ubuntu1.2) ...Processing triggers for man-db (2.7.5-1) ...Processing triggers for mime-support (3.59ubuntu1) ...Processing triggers for hicolor-icon-theme (0.15-0ubuntu1.1) ...Processing triggers for gnome-menus (3.13.3-6ubuntu3.1) ...Processing triggers for desktop-file-utils (0.22-1ubuntu5.2) ...Processing triggers for bamfdaemon (0.5.3~bzr0+16.04.20180209-0ubuntu1) ...Rebuilding /usr/share/applications/bamf-2.index...[Ubuntu] shell 命令无法自动补全
系统环境
Ubuntu 14.04
问题描述
用户登录 shell,无法利用 tab 进行命令补全
原因分析
创建用户时未指定用户默认 shell
xxxxxxxxxx$ cat /etc/passwd|grep kevinkevin:x:1005:1005::/home/kevin因此,shell 默认成了 dash。另外,可以通过命令 which sh 进行确认。默认的 dash 无法进行命令补全。
解决方式
指定用户的默认 shell 为 bash(或其他,如 zsh),登出再登录即可生效。
[Ubuntu] "No package 'libffi' found"
系统环境
Ubuntu 14.04
问题描述
执行 pip install 时,报如上错误。
解决方式
xxxxxxxxxxapt-get install yum install libffi-devel[Ubuntu] RuntimeError: cryptography requires setuptools 18.5 or newer
系统环境
Ubuntu 14.04
问题描述
略。
解决方式
xxxxxxxxxxpip install virtualenv --upgrade[Ubuntu] /usr/lib/x86_64-linux-gnu/libstdc++.so.6: version `GLIBCXX_3.4.21' not found
系统环境
Ubuntu 14.04
问题描述
可执行程序无法运行,ldd 查看可执行程序,依赖的 libstdc++ 库版本过低。默认的 gcc 4.8(包含的 libstdc++)版本过低,需要升级到 gcc 4.9
解决方式
xxxxxxxxxxsudo add-apt-repository ppa:ubuntu-toolchain-r/testsudo apt-get updatesudo apt-get install g++-4.9[Ubuntu] files list file for package 'xxx' missing; assuming package has no files currently installed
系统环境
Ubuntu 18.04
问题描述
apt-get install 或 apt-get purge 时报错 “files list file for package 'xxx' missing; assuming package has no files currently installed”,其中 xxx 是具体的包名
解决方式
一个一个处理
xxxxxxxxxxsudo apt-get updatesudo apt-get install --reinstall xxx使用脚本批量处理
xxxxxxxxxxset -e
# Clean out /var/cache/apt/archivesapt-get clean# Fill it with all the .debs we needapt-get --reinstall -dy install $(dpkg --get-selections | grep '[[:space:]]install' | cut -f1)
DIR=$(mktemp -d -t info-XXXXXX)for deb in /var/cache/apt/archives/*.debdo # Move to working directory cd "$DIR" # Create DEBIAN directory mkdir -p DEBIAN # Extract control files dpkg-deb -e "$deb" # Extract file list, fixing up the leading ./ and turning / into /. dpkg-deb -c "$deb" | awk '{print $NF}' | cut -c2- | sed -e 's/^\/$/\/./' > DEBIAN/list # Figure out binary package name DEB=$(basename "$deb" | cut -d_ -f1) # Copy each control file into place cd DEBIAN for file in * do cp -a "$file" /var/lib/dpkg/info/"$DEB"."$file" done # Clean up cd .. rm -rf DEBIANdonermdir "$DIR"[Ubuntu] Errors were encountered while processing
系统环境
Ubuntu 18.04
问题描述
apt-get install 报错,Errors were encountered while processing
解决方式
xxxxxxxxxxcd /var/lib/dpkgsudo mv info info.baksudo mkdir infosudo apt-get update[Linux] Failed to set locale, defaulting to C
系统环境
CentOS 7.2
问题描述
连接终端,执行命令时输出上述错误信息
解决方式
安装语言包
安装中文语言包,命令
yum install glibc-langpack-zh安装英文语言包,命令
dnf install glibc-langpack-en或dnf install langpacks-en glibc-all-langpacks -y
设置默认的语言环境即可
xxxxxxxxxxecho "export LC_ALL=en_US.UTF-8" >> /etc/profile source /etc/profile[Linux] sudo command not found
系统环境
Linux
问题描述
如上
解决方式
安装 sudo 即可,例如 Ubuntu 系统
xxxxxxxxxxapt-get install sudo[Linux] sed: 1: extra characters at the end of p command
系统环境
Linux/Mac
问题描述
使用 sed 进行批量替换
xxxxxxxxxxsed -i "s/\"scan/\"scan_backend/g" `grep -ril '"scan/' pkg`解决方式
xxxxxxxxxxsed -i '' "s/\"scan/\"scan_backend/g" `grep -ril '"scan/' pkg`[Golang] package xxx: cannot download, $GOPATH not set. For more details see: go help gopath
系统环境
Linux
问题描述
运行 go get 下载出错,错误信息如上,提示未设置 GOPATH 环境变量
解决方式
xxxxxxxxxx# 根据实际工程路径修改echo "export GOPATH=$HOME/go" >> /etc/profile# 使环境变量生效soure /etc/profile[Golang] go-get=1: dial tcp i/o timeout)
系统环境
Linux
问题描述
运行 go get 下载出错,提示 i/o 超时
xxxxxxxxxxFetching <https://golang.org/x/net/html?go-get=1> https fetch failed: Get <https://golang.org/x/net/html?go-get=1>: dial tcp 216.239.37.1:443: i/o timeout package golang.org/x/net/html: unrecognized import path "golang.org/x/net/html" (https fetch: Get <https://golang.org/x/net/html?go-get=1>: dial tcp 216.239.37.1:443: i/o timeout)原因分析
因为 the fucking gfw,导致无法直接通过 go get 下载,需要 git clone 对应仓库到本地并放到对应的目录,即,完成 go get 做的工作。缺少其他包,可采用同样的方式解决。
解决方式
xxxxxxxxxx# 需要设置 GOPATH 环境变量mkdir -p $GOPATH/src/golang.org/xcd $GOPATH/src/golang.org/xgit clone https://github.com/golang/text.git[Golang] GOPATH 环境变量被覆盖
系统环境
Windows 7 Ultimate x64
问题描述
安装 golang 之后,在系统变量设置 GOPATH=D:\go,但是未生效
xxxxxxxxxx$ echo $GOPATHC:\Users\Administrator\go原因分析
安装 golang 之后,默认给用户变量添加 GOPATH=%USERPROFILE%\go,导致覆盖了系统变量 GOPATH,如下所示:
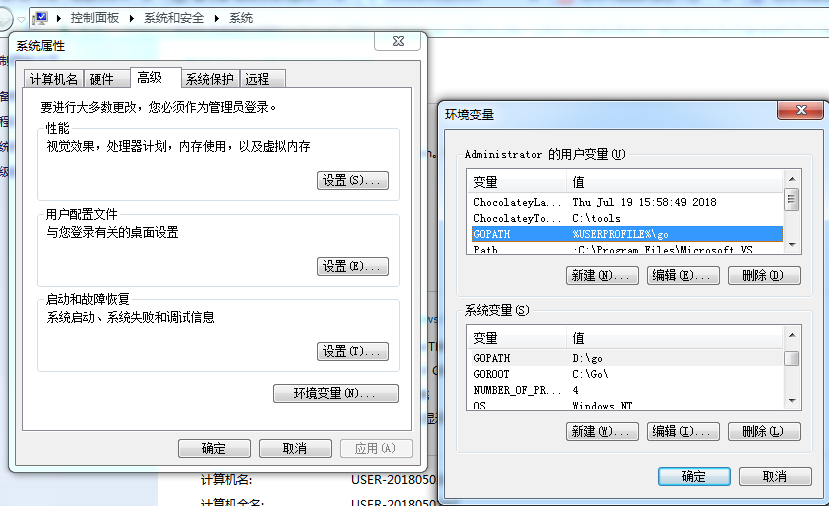
解决方式
删除用户变量 GOPATH 即可(当然,删除系统变量,然后修改用户变量 GOPATH 为目标目录也可)
[geth] unexpected directory layout
系统环境
Ubuntu 14.04
问题描述
源码编译以太坊,运行 go install ./cmd/geth 报错,详细错误如下
xxxxxxxxxxunexpected directory layout: import path: github.com/elastic/gosigar root: /root/go/src dir: /root/go/src/github.com/ethereum/go-ethereum/vendor/github.com/elastic/gosigar expand root: /root/go/src expand dir: /root/go/src/github.com/ethereum/go-ethereum/vendor/github.com/elastic/gosigar separator: /解决方式
安装缺失的库
xxxxxxxxxxgo get -u -v github.com/elastic/gosigar[geth] Block sealing failed err="waiting for transactions"
系统环境
Ubuntu 14.04/geth 1.8.13
问题描述
以太坊以开发者模式运行,启动挖矿时报错,如下所示:
xxxxxxxxxx> miner.start()INFO [07-24|20:13:55.983] Transaction pool price threshold updated price=1INFO [07-24|20:13:55.983] Starting mining operation null> INFO [07-24|20:13:55.983] Commit new mining work number=1 txs=0 uncles=0 elapsed=148.484µsWARN [07-24|20:13:55.984] Block sealing failed err="waiting for transactions"解决方式
开发者模式运行,当有交易时节点才启动挖矿,因此,创建一个交易即可触发节点的挖矿。
[geth] Please enable network time synchronisation in system settings
系统环境
Ubuntu 14.04/geth 1.8.13
问题描述
以太坊 Testnet 运行 ./geth --datadir="./testnet" --testnet console,错误信息如上所示
原因分析
节点所在机器时间未同步
解决方式
同步节点所在机器时间,参考方式如下
xxxxxxxxxxsudo apt-get updatesudo apt-get install ntpsudo service ntp start[geth] Cannot start mining without etherbase err="etherbase must be explicitly specified"
系统环境
Ubuntu 14.04/geth 1.8.13
问题描述
以太坊 Testnet 运行,开启挖矿时报错
原因分析
原因是当前环境没有账户,需要建立一个账户
解决方式
创建账户,并解锁账户,之后启动挖矿即可
xxxxxxxxxxpersonal.newAccount('123')personal.unlockAccount(eth.accounts[0])miner.start()[geth] first argument must be the account to unlock
系统环境
Windows 7 Ultimate x64/geth 1.8.13
问题描述
以太坊私有网络,在控制台尝试解锁账户时报错,如上所示
原因分析
以太坊私有网络初始无账户,对不存在的账户解锁必然出错
解决方式
首先先建立账户 personal.newAccount('password') 即可,然后尝试解锁账户
[geth] remove the blockchain and state databases
系统环境
Ubuntu 14.04/geth 1.8.13
问题描述
区块同步数据始终失败或者数据目录被部分破坏,需要情况数据重新同步
解决方式
xxxxxxxxxxroot@iZwz978rorvlg75nct99l1Z:~/eth# geth removedbRemove local database? [y/N] [geth] account unlock with HTTP access is forbidden
系统环境
CentOS 7.2/geth 1.9.8
问题描述
通过 RPC 解锁账户报错,如上所示。
解决方式
出于安全考虑,默认禁止了HTTP通道解锁账户,如果了解此风险,可以强制打开,运行加入选项 --allow-insecure-unlock 即可。
[npm] sh: 1: node: not found npm WARN This failure might be due to the use of legacy binary
系统环境
Ubuntu 14.04
问题描述
npm install 安装包的时候报错,如上所示。
原因分析
新版本的 nodejs,已经将原来 /usr/bin/node 改成 /usr/bin/nodejs,所以报如上错误。
解决方式
xxxxxxxxxxapt-get install nodejs-legacy[npm] npm WARN enoent ENOENT: no such file or directory
系统环境
Ubuntu 14.04
问题描述
npm install 安装包的时候报错,npm WARN enoent ENOENT: no such file or directory, open '<root>/node_modules/supertest/package.json'
解决方式
运行 npm init 进行初始化即可
[npm] You must install peer dependencies yourself.
系统环境
Windows 7
问题描述
通过 npm 安装依赖,安装失败,且提示如上信息
解决方式
升级 npm 即可:npm install npm -g
[npm] TypeError: this.getResolve is not a function
系统环境
Windows 7/npm 6.14.5
问题描述
执行 npn run dev 失败,信息如上
解决方式
sass-loader 版本过高,在项目 package.json 文件中 sass-loader 版本改为 7.3.1 即可
[npm] const wslToWindowsPath = async path
系统环境
CentOS 7.2/npm 3.10.10/node v6.17.1
问题描述
运行 npm run build 编译项目时,提示如下错误
xxxxxxxxxxconst wslToWindowsPath = async path => {                               ^^^^
SyntaxError: Unexpected identifier    at createScript (vm.js:56:10)    at Object.runInThisContext (vm.js:97:10)    at Module._compile (module.js:542:28)    at Object.Module._extensions..js (module.js:579:10)    at Module.load (module.js:487:32)    at tryModuleLoad (module.js:446:12)    at Function.Module._load (module.js:438:3)    at Module.require (module.js:497:17)    at require (internal/module.js:20:19)
原因分析
node 版本太低
解决方式
升级 node 到最新稳定版即可
xxxxxxxxxx# 安装 nodejs 的版本管理模块 nnpm install -g n# 安装最新稳定版,另外,安装最新版本 n latest,也可以指定版本,例如 n v7.10.0n stable# 查看已安装版本n[npm] Node Sass could not find a binding for your current environment
系统环境
CentOS 7.2
问题描述
编译时报错,如上所示
解决方案
由于升级 node,需要重新安装 saas
xxxxxxxxxxnpm rebuild node-sass[npm] Ineffective mark-compacts near heap limit Allocation failed - JavaScript heap out of memory
系统环境
CentOS 7.9/npm 8.11.0
问题描述
编译时报错,如上所示
解决方案
项目大,启动或打包会抛出内存溢出,需要扩展使用的内存。执行如下命令之后重新编译即可
xxxxxxxxxxnpm install -g increase-memory-limitincrease-memory-limit[vue] App.vue{ parser: "babylon" } is deprecated; we now treat it as { parser: "babel" }.
系统环境
Windows 7/vue 2.9.6
问题描述
npm run dev 运行报错
原因分析
prettier 版本导致
解决方式
npm install prettier@~1.12.0 -D 或者 npm install prettier@~1.12.0 --save-dev
[vue] http://eslint.org/docs/rules 错误
系统环境
Windows 7/vue 2.9.6
问题描述
npm run dev 运行报错
解决方式
vue 对语法的要求过于严格导致此类错误,理论上,应该严格遵循规则修改错误。也可以采用不太严谨的方式规避,修改 config/index.js 配置项 useEslint 为 false
xxxxxxxxxx// Use Eslint Loader?// If true, your code will be linted during bundling and// linting errors and warnings will be shown in the console.useEslint: false,[vue] !!vue-style-loader!css-loader?{“sourceMap”:true}!
系统环境
Windows 7/vue 2.9.6
问题描述
npm run dev 运行报错
原因分析
vue 文件中有如下依赖
xxxxxxxxxx<style rel="stylesheet/scss" lang="scss">解决方式
安装 scss 依赖即可:npm install node-sass sass-loader -D
[vue] router 嵌套路由在 history 模式下刷新无法渲染页面
系统环境
Windows 7/vue 2.9.6
问题描述
router 配置如下
xxxxxxxxxxconst router = new Router({
  mode: 'history',  routes: [    {      path: '/',      name: 'home',      redirect: '/api/user/login',      component: dashboard,      children: [{        path: '/api/message/history',        name: 'messageHistory',        component: messageHistory,      },      {        path: '/api/user/query',        name: 'userQuery',        component: userQuery,      },      {        path: '/api/user/logout',        name: 'userLogout',        component: userLogout,      },      {        path: '/api/token/query',        name: 'tokenQuery',        component: tokenQuery,      },      {        path: '/api/token/history',        name: 'tokenHistory',        component: tokenHistory,      },      {        path: '/api/token/recharge',        name: 'tokenRecharge',        component: tokenRecharge,      },      {        path: '/api/token/consume',        name: 'tokenConsume',        component: tokenConsume,      },    ]    },    {      path: '/api/user/login',      name: 'userLogin',      component: userLogin,    },  ]});
//……
export function resetRouter () {  const newRouter = createRouter()  router.matcher = newRouter.matcher // reset router}
对应的 nginx 配置如下
xxxxxxxxxxlocation / { # First attempt to serve request as file, then # as directory, then fall back to displaying a 404. root /opt/go/src/cms_frontend/dist; index index.html index.htm; try_files $uri $uri/ =404;}当前页面位于 http://ip:port/api/user/query,当点击浏览器或者右键刷新时,返回 404 页面
解决方式
history 方式需要服务端支持,浏览器地址栏的路径在刷新时会请求服务端,但服务端找不到文件会返回 404,所以服务端nginx 要增加重定向,将请求重新定位回 index 页面
xxxxxxxxxxlocation / { # First attempt to serve request as file, then # as directory, then fall back to displaying a 404. root /opt/go/src/cms_frontend/dist; index index.html index.htm; #try_files $uri $uri/ =404; try_files $uri $uri/ /index.html;}[vue] Cannot read property 'commit' of undefined
系统环境
Windows 7/vue 2.9.6
问题描述
Vuex 时报错提示 Cannot read property ‘commit’ of undefine
解决方式
main.js 中导入 store,如下所示
xxxxxxxxxxnew Vue({ el: '#app', router, store: store, components: { App }, template: '<App/>'})[vue] Error: Avoided redundant navigation to current location
系统环境
Windows 7/vue 2.9.6
问题描述
刷新页面出现如上错误
解决方式
在 router/index.js 添加
xxxxxxxxxxconst originalPush = Router.prototype.pushRouter.prototype.push = function push(location) { return originalPush.call(this, location).catch(err => err)}[vue] error: Unexpected console statement (no-console)
系统环境
Windows 7/vue 2.9.6
问题描述
编译出现如上错误
解决方式
package.json 中的 eslintConfig:{} 中的 “rules”:{},增加一行代码: "no-console":"off"
xxxxxxxxxx "eslintConfig": { "root": true, "env": { "node": true }, "extends": [ "plugin:vue/essential", "eslint:recommended" ], "parserOptions": { "parser": "babel-eslint" }, "rules": { "no-console": "off" } }[web3.js] Error: Error: Method eth_compileSolidity not supported.
系统环境
Ubuntu 14.04/Solc 0.20.1/node 8.11.3/npm 5.6.0
问题描述
调用 web3.js 编译合约接口时,报错,对应代码如下所示:
xxxxxxxxxxlet calc = web3.eth.compile.solidity(source);原因分析
the developers decided that making a node compile a contract like this to be out of scope. So this functionality has been deprecated. There were many reasons behind this, but the main ones are that RPC calls are beyond the responsibilities of the eth API, and node compilation like this is not sufficient. You can use an on-line compiler like Remix, or a compiler like solc to get the bytecode and go from there.
新版本 web3.js 废弃了该接口
解决方式
利用 Solc 提前编译好合约,js 代码中不依赖该接口即可
[web3.js] 监听合约事件失败
系统环境
Ubuntu 14.04/Solc 0.20.1/node 8.11.3/npm 5.6.0
问题描述
监听合约事件,但是无法捕获事件,代码如下所示
xxxxxxxxxxcontract_.Sent().watch(function(error, result) {    if (!error) {        console.log("\nCoin transfer: " + result.args.amount +            " coins were sent from " + result.args.from +            " to " + result.args.to + ".");        console.log("Sender: " + contract_.balances.call(result.args.from) +            ", Receiver: " + contract_.balances.call(result.args.to) + "\n");    }})
console.log("mint's hash: ", contract_.mint(web3.eth.accounts[0], 666, {from: web3.eth.accounts[0],gas:3000000}));console.log("minter's balance: ", contract_.balances.call(web3.eth.accounts[0]));console.log("mint's hash ", contract_.send(web3.eth.accounts[3], 99, {from: web3.eth.accounts[0],gas:3000000}));console.log("minter's balance: ", contract_.balances.call(web3.eth.accounts[0]));console.log("receiver's balance: ", contract_.balances.call(web3.eth.accounts[3]));
process.exit(0);
原因分析
由于事件监听属于回调,执行合约交易之后,立即调用 process.exit(0) 退出程序,导致监听合约事件失败。
解决方式
去掉 process.exit(0) 即可,如下所示
xxxxxxxxxxcontract_.Sent().watch(function(error, result) {    if (!error) {        console.log("\nCoin transfer: " + result.args.amount +            " coins were sent from " + result.args.from +            " to " + result.args.to + ".");        console.log("Sender: " + contract_.balances.call(result.args.from) +            ", Receiver: " + contract_.balances.call(result.args.to) + "\n");    }})
console.log("mint's hash: ", contract_.mint(web3.eth.accounts[0], 666, {from: web3.eth.accounts[0],gas:3000000}));console.log("minter's balance: ", contract_.balances.call(web3.eth.accounts[0]));console.log("mint's hash ", contract_.send(web3.eth.accounts[3], 99, {from: web3.eth.accounts[0],gas:3000000}));console.log("minter's balance: ", contract_.balances.call(web3.eth.accounts[0]));console.log("receiver's balance: ", contract_.balances.call(web3.eth.accounts[3]));
setTimeout(function() {    process.exit(0);}, 5000);
[remix-ide] 通过 Web3 Provider 连接本地节点失败
系统环境
Windows 7 Ultimate x64/geth 1.8.13
问题描述
通过浏览器(http://localhost:8080)打开 remix-ide 主页,运行环境选择本地节点时(running 菜单,运行环境选择 Web3 Provider 连接本地节点),连接本地节点失败
原因分析
本地运行 geth 节点,参数中未添加 --rpccorsdomain,导致浏览器无法访问本地节点,如 geth 帮助信息所示
xxxxxxxxxx$ ./geth.exe help|grep rpc --rpc Enable the HTTP-RPC server --rpcaddr value HTTP-RPC server listening interface (default: "localhost") --rpcport value HTTP-RPC server listening port (default: 8545) --rpcapi value API's offered over the HTTP-RPC interface --rpccorsdomain value Comma separated list of domains from which to accept cross origin requests (browser enforced) --rpcvhosts value Comma separated list of virtual hostnames from which to accept requests (server enforced). Accepts '*' wildcard. (default: "localhost")解决方式
运行 geth 节点加入 --rpccorsdomain,例如,./geth --datadir "./dev" --dev --rpc --rpccorsdomain "*" console
[julia] ERROR: UndefVarError: Pkg not defined
系统环境
Windows 7 Ultimate x64/julia 1.0.0
问题描述
julia 安装包失败,如下所示
xxxxxxxxxxjulia> Pkg.add("IJulia")ERROR: UndefVarError: Pkg not definedStacktrace: [1] top-level scope at none:0原因分析
julia 1.0.0 版本安装包方式已经不兼容旧版本
解决方式
julia 控制台输入 ] 进入包管理模式(输入 backspace 退出包管理模式),如下所示
xxxxxxxxxx(v1.0) pkg> add IJulia Resolving package versions... Updating `C:\Users\Administrator\.julia\environments\v1.0\Project.toml` [no changes] Updating `C:\Users\Administrator\.julia\environments\v1.0\Manifest.toml` [no changes][julia] ERROR: LoadError: LoadError: LoadError: UndefVarError: @printf not defined
系统环境
Windows 7 Ultimate x64/julia 1.0.0
问题描述
代码中使用 @printf,如下所示
xxxxxxxxxx "volume = %0.3f\n" vol运行时报错 ERROR: LoadError: LoadError: UndefVarError: @printf not defined
原因分析
Julia 1.0.0 之后,很多特性从基础库中移除,需要显示引用
解决方式
使用 @printf 需要显示引用 using Printf
[solidity] Internal compiler error: Stack too deep, try removing local variables.
参考资料:https://ethereum.stackexchange.com/questions/6061/error-while-compiling-stack-too-deep
系统环境
solidity 0.4.24
问题描述
solidity 函数编译报错,对应的代码如下
xxxxxxxxxxfunction getHistoryRoundInfo(uint256 _rid)        public        view        returns(uint256, uint256, uint256, uint256, uint256, uint256, address[], uint256[]){    uint256 length = round_[_rid].winners.length;    uint256[] memory numbers = new uint256[](length);    if (round_[_rid].winners.length > 0) {        for (uint256 idx = 0; idx < length; idx ++) {            numbers[idx] = round_[_rid].winnerNum[round_[_rid].winners[idx]];        }    }
    return (        uint256(round_[_rid].state),        round_[_rid].roundDeadline,        round_[_rid].claimDeadline,        round_[_rid].drawCode,        round_[_rid].pot,        round_[_rid].blockNumber,        round_[_rid].winners,        numbers    );}
原因分析
solidity 编译器限制本地变量不超过 16 个,否则报错
xxxxxxxxxxassertThrow(instructionNum <= 16, StackTooDeepException, "Stack too deep, try removing local variables.");解决方式
解决思路:1. 将部分逻辑封装成更小的函数;2. 将参数返回值组成数组;3. 减少函数返回值。例如,将返回值组成数组,达到减少本地变量的效果,如下所示
xxxxxxxxxxfunction getHistoryRoundInfo(uint256 _rid)  public  view  returns(uint256[], address[], uint256[]){    uint256 length = round_[_rid].winners.length;    uint256[] memory numbers = new uint256[](length);    if (round_[_rid].winners.length > 0) {        for (uint256 idx = 0; idx < length; idx ++) {            numbers[idx] = round_[_rid].winnerNum[round_[_rid].winners[idx]];        }    }
    uint256[] memory items = new uint256[](6);    items[0] = uint256(round_[_rid].state);    items[1] = round_[_rid].roundDeadline;    items[2] = round_[_rid].claimDeadline;    items[3] = round_[_rid].drawCode;    items[4] = round_[_rid].pot;    items[5] = round_[_rid].blockNumber;
    return (items, round_[_rid].winners, numbers);}
[remix-ide] Error: exceeds block gas limit
系统环境
Windows 7 Ultimate x64/geth 1.8.13
问题描述
remix-ide 连接以太坊私有网络调试时,执行交易报错,如上所示
原因分析
以太坊节点的 gaslimit 小于交易所需消耗的 gas,导致交易失败,可以通过 eth.getBlock("latest") 进行确认,深层次的原因如下,
创世区块指定的
gaslimit太小,导致需要消耗大量gas的交易失败以太坊私有网络运行过程,如,挖出大量空块,节点不断调低
gaslimit,导致交易失败
解决方式
创世区块指定的
gaslimit设置足够大运行以太坊私有网络节点,添加参数
--targetgaslimit '9000000000000'(该设置保证随着挖矿的进行,节点不断调高gaslimit直到接近9000000000000)
[nginx] "POST / HTTP/1.1" 499 0 "-" "-"
系统环境
Ubuntu 14.04/nginx 1.4.6
问题描述
nginx 访问日志(默认路径 /var/log/nginx/access.log)存在大量的 499 错误码信息,如下所示
xxxxxxxxxx127.0.0.1 - - [18/Sep/2018:15:50:02 +0800] "POST / HTTP/1.1" 499 0 "-" "-"原因分析
在使用 wrk 工具对 nginx 负载的多个后端服务进行性能测试时,nginx 访问日志存在大量的 499 错误码信息。
499 错误码是 nginx 扩展的 HTTP 错误码,如下定义
xxxxxxxxxx/** HTTP does notdefine the code for the case when a client closed* the connectionwhile we are processing its request so we introduce* own code to logsuch situation when a client has closed the connection* before we even tryto send the HTTP header to it*/当客户端在请求的响应返回之前主动关闭连接,nginx 记录 499 错误码
解决方式
一般情况下,需要优化后端服务,在客户端超时关闭连接之前返回响应就能避免此类问题。
[nginx] 13: Permission denied) while connecting to upstream
系统环境
CentOS 7.2/nginx 1.20.1
问题描述
前端调用 API 请求返回 502,对应 nginx 错误日志
xxxxxxxxxx2021/12/07 18:56:02 [error] 35733#35733: *2 no live upstreams while connecting to upstream, client: 119.139.198.33, server: abc.dummy.com, request: "POST /api/unauthorised/stat/info HTTP/1.1", upstream: "http://localhost/api/unauthorised/stat/info", host: "ndc.squaredsfs.com", referrer: "https://abc.dummy.com/"进一步确认
xxxxxxxxxx[root@localhost~]# cat /var/log/audit/audit.log | grep nginx | grep denied | head -n2type=AVC msg=audit(1638872587.331:3016): avc: denied { name_connect } for pid=24583 comm="nginx" dest=50001 scontext=system_u:system_r:httpd_t:s0 tcontext=system_u:object_r:ephemeral_port_t:s0 tclass=tcp_socket permissive=0type=AVC msg=audit(1638872600.104:3038): avc: denied { name_connect } for pid=24579 comm="nginx" dest=50001 scontext=system_u:system_r:httpd_t:s0 tcontext=system_u:object_r:ephemeral_port_t:s0 tclass=tcp_socket permissive=0原因分析
SELinux 安全策略引发
解决方式
xxxxxxxxxx[root@localhost~]# setsebool -P httpd_can_network_connect 1或者
xxxxxxxxxx[root@localhost~]# setsebool -P httpd_can_network_relay 1[bitcoin] non-mandatory-script-verify-flag (Signature must be zero for failed CHECK(MULTI)SIG operation) (code 64)
系统环境
Ubuntu 14.04/bitcoind v0.16.99.0
问题描述
2/3 多签交易时,对原始交易签名报错
xxxxxxxxxxroot@ubuntu:~# bitcoin-cli -testnet sendrawtransaction 020000000001016ca4682f384bd5294734abebcf99af059cd61a99836214f7c665e68214ed32530100000023220020fe2c7d8886d6dacaec530916a108ad2dd040fbf72c80ea3ddd6d4f220e7e8b3affffffff0150fc23030000000017a914debb602e1c37628d1f411918f87f1680d59e1a0f870400483045022100e17bb27cb49c91bb46dbd60c63dfb08a0f1d0d153b0ca57d5804454921797df50220020a8f79a51d7762a022443313982e8896e56609594522d61737bda06f750d4201483045022100c41206829f3ec4969f2e6e6d4d52ac6b67c5c64248aef34933d5c0baa27c04d7022075b1f4bbac089d9aaa6943c726223a31911438b9acf90884b72be097eda15f7a0169522102f396b11941706b0424499fbf679c3e5987a8d2bf5b47116ec60ceb4f71804d46210256c0ec8ee73ba5fff9b12910880c12be9ff7d15f1f1b5d64685c3bcbdeb6734d210269321ca40da82f1fb8da8932b25beb96b4a84e6af593e89ee64e4c3f867eb7b553ae00000000 error code: -26error message:non-mandatory-script-verify-flag (Signature must be zero for failed CHECK(MULTI)SIG operation) (code 64)原因分析
2/3 多签的未花费输出为 0.527 BTC
xxxxxxxxxxroot@ubuntu:~# bitcoin-cli -testnet listunspent 0 1000000 "[\"2MwgnLokB4WA9NLNd6yL36AvPHHVChDh5r3\"]"[ { "txid": "5332ed1482e665c6f7146283991ad69c05af99cfebab344729d54b382f68a46c", "vout": 1, "address": "2MwgnLokB4WA9NLNd6yL36AvPHHVChDh5r3", "label": "test account", "redeemScript": "0020fe2c7d8886d6dacaec530916a108ad2dd040fbf72c80ea3ddd6d4f220e7e8b3a", "scriptPubKey": "a91430b5e8e9151e46be789562580b0118911d875f3d87", "amount": 0.52700000, "confirmations": 619, "spendable": true, "solvable": true, "safe": true }]构造的原始交易找零金额为 0.5269 BTC
xxxxxxxxxxroot@ubuntu:~# bitcoin-cli -testnet createrawtransaction "[{\"txid\":\"5332ed1482e665c6f7146283991ad69c05af99cfebab344729d54b382f68a46c\",\"vout\":1}]" "[{\"2NDYvTxmsRmyPw612KwBGCqLNsBRQSDpjXL\":0.5269}]"02000000016ca4682f384bd5294734abebcf99af059cd61a99836214f7c665e68214ed32530100000000ffffffff0150fc23030000000017a914debb602e1c37628d1f411918f87f1680d59e1a0f8700000000但是,在给原始交易签名时,amount 未设置为未花费输出 0.527 BTC,如下所示
xxxxxxxxxxroot@ubuntu:~# bitcoin-cli -testnet signrawtransactionwithkey 02000000016ca4682f384bd5294734abebcf99af059cd61a99836214f7c665e68214ed32530100000000ffffffff0150fc23030000000017a914debb602e1c37628d1f411918f87f1680d59e1a0f8700000000 "[\"cPegPf2xaeaqYB9kqqM2gzVPPXnAmwCME2KjsAQG6gkVnbxZpTKo\", \"cQ8ZUeBy27NKafYioHp4f3isHFTFuAx65vPf6dgUgxdNSBegsW3W\"]" "[{\"txid\":\"5332ed1482e665c6f7146283991ad69c05af99cfebab344729d54b382f68a46c\", \"vout\":1, \"scriptPubKey\": \"a91430b5e8e9151e46be789562580b0118911d875f3d87\", \"redeemScript\": \"522102f396b11941706b0424499fbf679c3e5987a8d2bf5b47116ec60ceb4f71804d46210256c0ec8ee73ba5fff9b12910880c12be9ff7d15f1f1b5d64685c3bcbdeb6734d210269321ca40da82f1fb8da8932b25beb96b4a84e6af593e89ee64e4c3f867eb7b553ae\", \"amount\": 0.5269}]"{ "hex": "020000000001016ca4682f384bd5294734abebcf99af059cd61a99836214f7c665e68214ed32530100000023220020fe2c7d8886d6dacaec530916a108ad2dd040fbf72c80ea3ddd6d4f220e7e8b3affffffff0150fc23030000000017a914debb602e1c37628d1f411918f87f1680d59e1a0f870400483045022100e17bb27cb49c91bb46dbd60c63dfb08a0f1d0d153b0ca57d5804454921797df50220020a8f79a51d7762a022443313982e8896e56609594522d61737bda06f750d4201483045022100c41206829f3ec4969f2e6e6d4d52ac6b67c5c64248aef34933d5c0baa27c04d7022075b1f4bbac089d9aaa6943c726223a31911438b9acf90884b72be097eda15f7a0169522102f396b11941706b0424499fbf679c3e5987a8d2bf5b47116ec60ceb4f71804d46210256c0ec8ee73ba5fff9b12910880c12be9ff7d15f1f1b5d64685c3bcbdeb6734d210269321ca40da82f1fb8da8932b25beb96b4a84e6af593e89ee64e4c3f867eb7b553ae00000000", "complete": true}root@ubuntu:~# bitcoin-cli -testnet decoderawtransaction 020000000001016ca4682f384bd5294734abebcf99af059cd61a99836214f7c665e68214ed32530100000023220020fe2c7d8886d6dacaec530916a108ad2dd040fbf72c80ea3ddd6d4f220e7e8b3affffffff0150fc23030000000017a914debb602e1c37628d1f411918f87f1680d59e1a0f870400483045022100e17bb27cb49c91bb46dbd60c63dfb08a0f1d0d153b0ca57d5804454921797df50220020a8f79a51d7762a022443313982e8896e56609594522d61737bda06f750d4201483045022100c41206829f3ec4969f2e6e6d4d52ac6b67c5c64248aef34933d5c0baa27c04d7022075b1f4bbac089d9aaa6943c726223a31911438b9acf90884b72be097eda15f7a0169522102f396b11941706b0424499fbf679c3e5987a8d2bf5b47116ec60ceb4f71804d46210256c0ec8ee73ba5fff9b12910880c12be9ff7d15f1f1b5d64685c3bcbdeb6734d210269321ca40da82f1fb8da8932b25beb96b4a84e6af593e89ee64e4c3f867eb7b553ae00000000{ "txid": "05dfc6503286f2472246ea43cdcf3004d0553df8da2635a42eaf2c321b889a03", "hash": "549a002ececbfea510d8391f3da54cde2208388b3272a2d8ef9f70523861e011", "version": 2, "size": 374, "vsize": 182, "weight": 728, "locktime": 0, "vin": [ { "txid": "5332ed1482e665c6f7146283991ad69c05af99cfebab344729d54b382f68a46c", "vout": 1, "scriptSig": { "asm": "0020fe2c7d8886d6dacaec530916a108ad2dd040fbf72c80ea3ddd6d4f220e7e8b3a", "hex": "220020fe2c7d8886d6dacaec530916a108ad2dd040fbf72c80ea3ddd6d4f220e7e8b3a" }, "txinwitness": [ "", "3045022100e17bb27cb49c91bb46dbd60c63dfb08a0f1d0d153b0ca57d5804454921797df50220020a8f79a51d7762a022443313982e8896e56609594522d61737bda06f750d4201", "3045022100c41206829f3ec4969f2e6e6d4d52ac6b67c5c64248aef34933d5c0baa27c04d7022075b1f4bbac089d9aaa6943c726223a31911438b9acf90884b72be097eda15f7a01", "522102f396b11941706b0424499fbf679c3e5987a8d2bf5b47116ec60ceb4f71804d46210256c0ec8ee73ba5fff9b12910880c12be9ff7d15f1f1b5d64685c3bcbdeb6734d210269321ca40da82f1fb8da8932b25beb96b4a84e6af593e89ee64e4c3f867eb7b553ae" ], "sequence": 4294967295 } ], "vout": [ { "value": 0.52690000, "n": 0, "scriptPubKey": { "asm": "OP_HASH160 debb602e1c37628d1f411918f87f1680d59e1a0f OP_EQUAL", "hex": "a914debb602e1c37628d1f411918f87f1680d59e1a0f87", "reqSigs": 1, "type": "scripthash", "addresses": [ "2NDYvTxmsRmyPw612KwBGCqLNsBRQSDpjXL" ] } } ]}从而导致发送签名之后的交易报错,如下所示
xxxxxxxxxxroot@ubuntu:~# bitcoin-cli -testnet sendrawtransaction 020000000001016ca4682f384bd5294734abebcf99af059cd61a99836214f7c665e68214ed32530100000023220020fe2c7d8886d6dacaec530916a108ad2dd040fbf72c80ea3ddd6d4f220e7e8b3affffffff0150fc23030000000017a914debb602e1c37628d1f411918f87f1680d59e1a0f870400483045022100e17bb27cb49c91bb46dbd60c63dfb08a0f1d0d153b0ca57d5804454921797df50220020a8f79a51d7762a022443313982e8896e56609594522d61737bda06f750d4201483045022100c41206829f3ec4969f2e6e6d4d52ac6b67c5c64248aef34933d5c0baa27c04d7022075b1f4bbac089d9aaa6943c726223a31911438b9acf90884b72be097eda15f7a0169522102f396b11941706b0424499fbf679c3e5987a8d2bf5b47116ec60ceb4f71804d46210256c0ec8ee73ba5fff9b12910880c12be9ff7d15f1f1b5d64685c3bcbdeb6734d210269321ca40da82f1fb8da8932b25beb96b4a84e6af593e89ee64e4c3f867eb7b553ae00000000error code: -26error message:non-mandatory-script-verify-flag (Signature must be zero for failed CHECK(MULTI)SIG operation) (code 64)解决方式
在给原始交易签名时,amount 未设置为未花费输出即可(本示例中, amount 对应 0.527)
[eos] block_log_exception: Block log exception Block log was not setup properly.
系统环境
Ubuntu 18.04/nodeos 1.4.3
问题描述
nodeos 启动报错,如下所示
xxxxxxxxxxkevin@ubuntu:~$ nodeos --config-dir ~/.local/share/eosio/nodeos/configinfo 2018-11-15T07:51:03.418 thread-0 chain_plugin.cpp:333 plugin_initialize ] initializing chain pluginwarn 2018-11-15T07:51:03.418 thread-0 chain_plugin.cpp:684 plugin_initialize ] 3190000 block_log_exception: Block log exceptionBlock log was not setup properly. {} thread-0 block_log.cpp:537 extract_genesis_stateerror 2018-11-15T07:51:03.418 thread-0 main.cpp:132 main ] 3190000 block_log_exception: Block log exceptionBlock log was not setup properly. {} thread-0 block_log.cpp:537 extract_genesis_staterethrow {} thread-0 chain_plugin.cpp:684 plugin_initialize解决方式
删除 ~/.local/share/eosio/nodeos/data 目录,重新启动即可
[eos] unable to find plugin: eosio::wallet_api_plugin
系统环境
Ubuntu 18.04/nodeos 1.4.3
问题描述
nodeos 启动报错,如下所示
xxxxxxxxxxerror 2018-11-15T07:53:44.135 thread-0 main.cpp:138 main ] /root/eos/libraries/appbase/application.cpp(309): Throw in function appbase::abstract_plugin &appbase::application::get_plugin(const string &) constDynamic exception type: boost::exception_detail::clone_impl<boost::exception_detail::error_info_injector<std::runtime_error> >std::exception::what: unable to find plugin: eosio::wallet_api_plugin解决方式
新版本 nodeos 已经将钱包插件移除,因此将该配置项从 config.ini 移除即可
[eos] snapshot_exception: Snapshot exception Binary snapshot has unexpected magic number!
系统环境
Ubuntu 18.04/nodeos 2.0.3
问题描述
使用快照进行同步时出错,信息如上
解决方式
删除原有数据目录下所有文件,默认位置
~/.local/share/eosio/nodeos/data
xxxxxxxxxxroot@ubuntu:~# rm -rf ~/.local/share/eosio/nodeos/data/blocks/ ~/.local/share/eosio/nodeos/data/state/将下载好的快照文件拷贝到快照目录,默认位置
~/.local/share/eosio/nodeos/data/snapshots/
xxxxxxxxxxroot@ubuntu:~# ls ~/.local/share/eosio/nodeos/data/snapshots/snapshot-95585964.bin利用快照同步
快照同步时需要等待一段时间,依机器配置而定
xxxxxxxxxxroot@ubuntu:~# nodeos --delete-all-blocks --snapshot ~/.local/share/eosio/nodeos/data/snapshots/snapshot-95585964.bin info 2020-03-05T09:01:01.430 nodeos main.cpp:106 main ] nodeos version v2.0.3 v2.0.3-94354d2541e077349a280a3c92dff44df43e8dc6info 2020-03-05T09:01:01.430 nodeos main.cpp:107 main ] nodeos using configuration file /root/.local/share/eosio/nodeos/config/config.iniinfo 2020-03-05T09:01:01.430 nodeos main.cpp:108 main ] nodeos data directory is /root/.local/share/eosio/nodeos/datainfo 2020-03-05T09:01:01.431 nodeos controller.cpp:541 startup ] Starting initialization from snapshot, this may take a significant amount of time[eos] db storage not configured to have enough storage for the provided snapshot, please increase and retry snapshot
系统环境
Ubuntu 18.04/nodeos 2.0.3
问题描述
使用快照进行同步时出错,如下所示
xxxxxxxxxxinfo 2019-07-17T10:01:27.517 nodeos controller.cpp:2255 startup ] Starting initialization from snapshot, this may take a significant amount of timeerror 2019-07-17T10:01:34.968 nodeos controller.cpp:2261 startup ] db storage not configured to have enough storage for the provided snapshot, please increase and retry snapshoterror 2019-07-17T10:01:36.039 nodeos main.cpp:117 main ] bad alloc解决方案
内存分配失败,根据物理内存增加或调整如下配置项,以 64G 为例
配置文件默认位置:
~/.local/share/eosio/nodeos/config/config.ini
xxxxxxxxxxchain-state-db-size-mb = 65536reversible-blocks-db-size-mb = 65536[bash] 运行脚本报错 terminated
系统环境
Ubuntu 14.04
问题描述
脚本文件 xxx.sh,脚本内容如下
xxxxxxxxxx
pkill xxx
file="xxx"`date +%Y%M%d_%H%M%S`".log"echo $file运行脚本,报错如下
xxxxxxxxxxroot@ubuntu:~/WaykiChain/tps/node2# ./xxx.sh 已终止原因分析
pkill 根据进程名模糊匹配,不仅会匹配目标进程 xxx,同时会匹配到脚本自身,相当于把自身杀掉了,所以脚本运行被终止。
解决方式
简单处理,脚本名不要为
xxx.sh即可(不包含xxx,例如,a.sh)完善处理,换个实现方案,精确匹配要杀掉的进程,且不要杀掉自身即可
[vim] can not open file for writing
系统环境
CentOS 7.4/vim 7.4
问题描述
vim 打开了一个需要 root 权限才能修改的文件,保存时提示如上错误
解决方式
vim 输入命令行
xxxxxxxxxx:w !sudo tee % > /dev/null然后,输入用户密码即可
[git] 拉取 github 仓库特别慢
系统环境
Windows 7/git 2.20.1.windows.1
问题描述
git 拉取 github 仓库特别慢(无法正常拉取)
解决方式
打开站长工具 DNS 查询
选择一个 TTL 值较小的记录写入 git 配置文件(位置:git 安装目录/etc/hosts)
第 2 步中也可以写入系统 hosts 文件,但是推荐写入 git 即可,不影响系统 DNS 解析;第 2 步选择的记录效果如果不理想,可以选择另外一条记录重试
[git] gpg failed to sign the data fatal: failed to write commit object
系统环境
Windows 7/git 2.20.1.windows.1
问题描述
git 提交报错,如上所示。
解决方式
由于本地 git 设置了启用 gpg 签名,但本地 gpg 软件已经删除了原来设置的 gpg 签名对应的公私钥,导致报错。可以重新设置 gpg 签名信息,或者禁用 gpg 签名即可。禁用 gpg 签名设置如下:
git config commit.gpgsign false
[git/github] ssh: connect to host github.com port 22: Connection timed out
系统环境
windows 7/git version 2.20.1.windows.1`
问题描述
github 拉取/推送仓库失败
问题原因
Sometimes, firewalls refuse to allow SSH connections entirely. If using HTTPS cloning with credential caching is not an option, you can attempt to clone using an SSH connection made over the HTTPS port. Most firewall rules should allow this, but proxy servers may interfere.
解决方式
在 ~/.ssh/config 添加如下配置
xxxxxxxxxxHost github.com Hostname ssh.github.com Port 443[swagger] 使用 NGINX 做反向代理调试 swagger,出现端口丢失
系统环境
Nginx 1.12.1/CentOS 7
问题描述
使用 NGINX 做反向代理调整 swagger,出现端口丢失,请求自动跳转到默认 80 端口,从而导致请求无响应。
解决方式
NGINX 配置中添加转发端口,proxy_set_header Host $host:$server_port;
xxxxxxxxxxserver { listen 8081; server_name localhost; location / { include uwsgi_params; proxy_pass http://192.168.99.100:8080; proxy_set_header Host $host:$server_port; proxy_set_header X-Real-IP $remote_addr; proxy_set_header REMOTE-HOST $remote_addr; proxy_set_header X-Forwarded-For $proxy_add_x_forwarded_for; client_max_body_size 2000m; }}[gcc] passing const this argument discards qualifiers [-fpermissive]
系统环境
GCC 4.8.4/Ubuntu 14.04
问题描述
略。
解决方式
原来是编译器认为成员函数可能会修改被 const 限定的变量,把成员函数也用 const 限定一下即可。
[gcc] undefined reference to `pthread_create'
系统环境
GCC 4.8.4/Ubuntu 14.04
问题描述
程序链接时报错,如上所示
解决方式
程序中使用 pthread,所以链接加入 -lpthread 即可
[gcc] undefined reference to `std::ios_base::Init::Init()'
系统环境
x86_64-w64-mingw32-gcc 9.2.0/Windows 10
问题描述
编译 .cpp 报错,如上所示
解决方式
使用了C++对象,链接库加入 -lstdc++ 即可
[gin] logged twice each request
系统环境
go version go1.13.4 linux/amd64
问题描述
gin 服务器运行在 debug 模式时,每个请求生成了两条日志,如下所示:
xxxxxxxxxx[GIN-debug] [WARNING] Running in "debug" mode. Switch to "release" mode in production. - using env:   export GIN_MODE=release - using code:  gin.SetMode(gin.ReleaseMode)
[GIN-debug] GET    /api/util/guid            --> istp_scan/pkg/api.(*GUIDController).guid-fm (3 handlers)[GIN-debug] GET    /version                  --> main.version (3 handlers)[GIN-debug] Listening and serving HTTP on :8080[GIN] 2019/12/06 - 06:20:38 | 200 |     114.435µs | 119.139.198.142 | GET      /api/util/guid[GIN] 2019/12/06 - 06:20:38 | 200 |     131.284µs | 119.139.198.142 | GET      /api/util/guid
对应的 gin 初始化代码如下所示:
xxxxxxxxxxr := gin.Default()r.Use(gin.Logger())r.Use(gin.Recovery())解决方式
因为 gin.Default() 已经包含 r.Use(gin.Logger()) 和 r.Use(gin.Recovery())
所以直接使用 gin.Default() 或者使用如下方式即可
xxxxxxxxxxr := gin.New()r.Use(gin.Logger())r.Use(gin.Recovery())[gin] [GIN-debug] [WARNING] Headers were already written. Wanted to override status code 400 with 200
系统环境
go version go1.13.4 linux/amd64
问题描述
gin 服务器在解析请求时,JSON 绑定失败,HTTP 错误码被设置为 400,与用户代码指定的错误码不一致
原因原因
代码中使用了 c.BindJSON(&req) 去处理 JSON 绑定,查看源码
xxxxxxxxxx// BindJSON is a shortcut for c.MustBindWith(obj, binding.JSON).func (c *Context) BindJSON(obj interface{}) error { return c.MustBindWith(obj, binding.JSON)}进一步查看源码
xxxxxxxxxx// MustBindWith binds the passed struct pointer using the specified binding engine.// It will abort the request with HTTP 400 if any error occurs.// See the binding package.func (c *Context) MustBindWith(obj interface{}, b binding.Binding) error { if err := c.ShouldBindWith(obj, b); err != nil { c.AbortWithError(http.StatusBadRequest, err).SetType(ErrorTypeBind) // nolint: errcheck return err } return nil}当 JSON 绑定失败时,调用了 AbortWithError 函数设置了错误码 400,并且终止了其他中间件调用,所以此时会忽略用户代码中对错误码的设置
解决方式
根据需要,以下方案二选一即可
使用
ShouldBindJson处理 JSON 绑定
xxxxxxxxxxif err := c.ShouldBindJSON(&req); err != nil { c.JSON(http.StatusOK, gin.H{ "RequestID": util.ParseRequestID(c), "ErrorCode": util.ErrorCodeInvalidParams, "ErrorMsg": "invalid params", "Data": nil}) return}如果确认不需要调用其他 handler,重置错误码之后,调用
Abort终止调用链即可
xxxxxxxxxxif err := c.BindJSON(&req); err != nil { c.JSON(http.StatusOK, gin.H{ "RequestID": util.ParseRequestID(c), "ErrorCode": util.ErrorCodeInvalidParams, "ErrorMsg": "invalid params", "Data": nil}) c.Abort()}[python] SyntaxError: Non-ASCII character '\xe8' in file
系统环境
macOS 10.15.2/python 2.7
问题描述
Python 文件中包含中文,运行时报错,如上所示。
解决方式
Python 默认的是 ASCII 编码方式,如果出现中文会出现问题,所以需要显示的声明编码方式,如下所示:
xxxxxxxxxx#!/usr/bin/python# -*- coding:utf-8 -*-[eth] 交易被回滚 Dropped & Replaced
系统环境
略
问题描述
从以太坊区块浏览器查看,交易 0xb961e974e12b5b3b44a71caf6ee2bca0bf0335c70062d0680969655774d0d33a 的 nonce 值 9312,被交易 0xa895b47158122f05066173bb615383711d49795ac59f21efd4dc9e2c6a46d7ce 替代,即,前者对应的交易被回滚并失效,该 nonce 值被后者对应的交易使用。

进一步,确认交易 0xa895b47158122f05066173bb615383711d49795ac59f21efd4dc9e2c6a46d7ce 使用的 nonce 值也为 9312
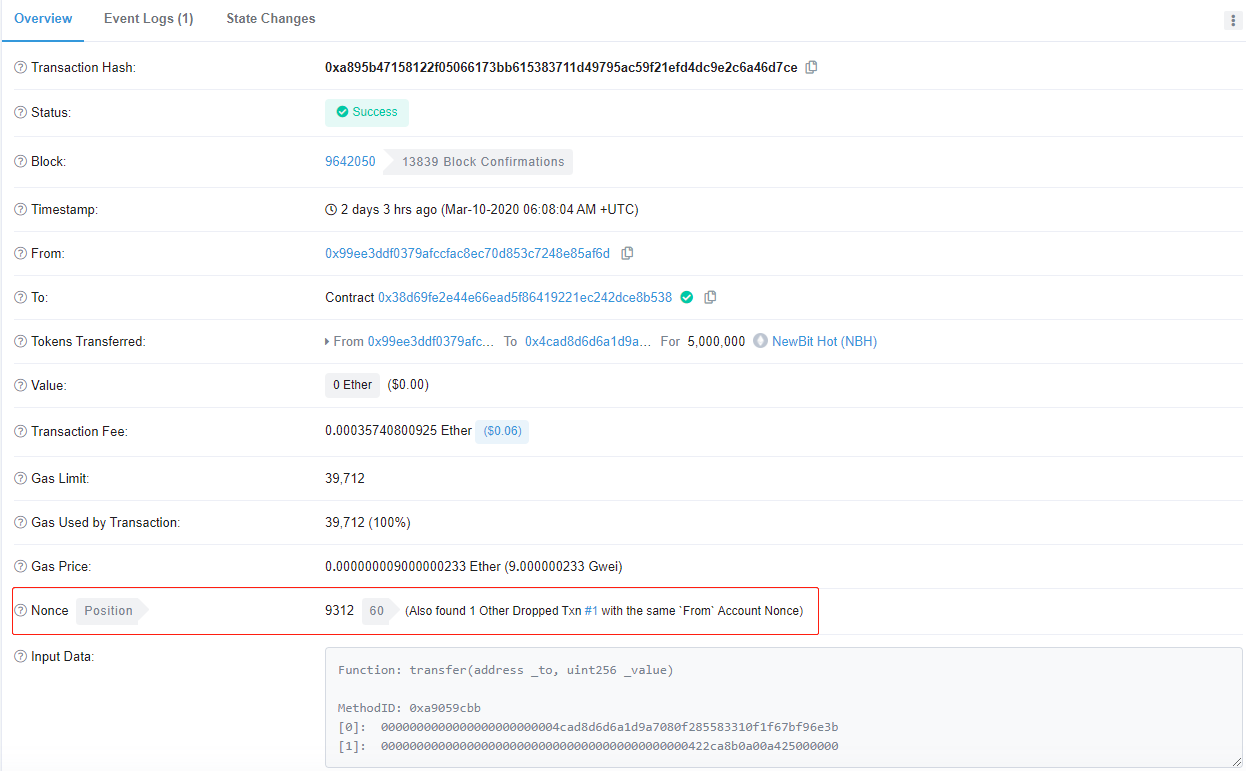
解决方式
重新创建交易即可
[net/http] panic: http: invalid pattern
系统环境
Ubuntu 18.04/golang 1.13.4
问题描述
net/http 服务器启动时报错,如上所示
问题原因
路由模式匹配出错,无效的路由。对应源码如下
xxxxxxxxxxfunc (mux *ServeMux) Handle(pattern string, handler Handler) { mux.mu.Lock() defer mux.mu.Unlock() if pattern == "" { panic("http: invalid pattern") } if handler == nil { panic("http: nil handler") } if _, exist := mux.m[pattern]; exist { panic("http: multiple registrations for " + pattern) } if mux.m == nil { mux.m = make(map[string]muxEntry) } e := muxEntry{h: handler, pattern: pattern} mux.m[pattern] = e if pattern[len(pattern)-1] == '/' { mux.es = appendSorted(mux.es, e) } if pattern[0] != '/' { mux.hosts = true }}解决方式
检查路由模式字符串是否为空,设置不为空即可
[lets encrypt] This site is not secure
系统环境
IE 浏览器
问题描述
访问网站时,浏览器提示网站不安全,证书校验错误,导致无法访问,查看详情,如下所示
xxxxxxxxxx提示错误:该网站的安全证书中的主机名与你正在尝试访问的网站不同。错误代码: DLG_FLAGS_SEC_CERT_CN_INVALID问题原因
证书主机名校验错误。实际上,由于证书只配置了不加前缀的域名 hello.com,没有同时配置 www.hello.com,导致访问 https://www.hello.com 出错
解决方式
制作证书时,同时支持多个域名(主机名),如下所示
xxxxxxxxxx/opt/cert/certbot-auto --no-self-upgrade certonly --webroot -w /usr/share/nginx/html --agree-tos --email c.r2009@163.com -d hello.com -d www.hello.com[https] block:mixed-content
系统环境
谷歌浏览器
问题描述
启用 https 网站,调用后台接口报错
问题原因
在全站启用 https 之后,遇到 http 的请求被浏览器 block 的情况,原因是浏览器不允许在 https 页面里嵌入 http 的请求,现在高版本的浏览器为了用户体验,都不会弹窗报错,只会在控制台上打印一条错误信息。
解决方式
网站使用 http(不推荐)
在全站启用 https 前提下,后台接口也启用 https 即可。
[protobuf] dealing with json omitempty tags in proto3
系统环境
proto3
问题描述
golang 中使用 protobuf 3,生成的结构体包含 omitempty 属性,导致 protobuf 结构体序列为 json 时,为空的属性被忽略。
golang 结构体定义如下
xxxxxxxxxxtype Metadata struct { FileHash string `protobuf:"bytes,1,opt,name=file_hash,json=fileHash,proto3" json:"file_hash,omitempty"` Chunks []*Chunk `protobuf:"bytes,2,rep,name=chunks,proto3" json:"chunks,omitempty"` XXX_NoUnkeyedLiteral struct{} `json:"-"` XXX_unrecognized []byte `json:"-"` XXX_sizecache int32 `json:"-"`}如果 index 为 0,那么序列化之后就会被忽略,如下
xxxxxxxxxx{ "file_hash": "4c9d8a8375bc5b86e8018e6779374bf6b22b5636efad40060fc9d36f00475767", "chunks": [ { "chunk_md5": "e9d34549dfefa2d0ad9681291f6f375a" }, { "index": 1, "chunk_md5": "e321e36d284192835cf572c203175545" }, { "index": 2, "chunk_md5": "77845cdeb9e94f9d35017abb112714b6" } ]}问题原因
protobuf 实现时使用的 json 库的默认行为为如此,可以参考如下https://godoc.org/github.com/golang/protobuf/jsonpb#Marshaler
解决方式
方法一:
修改源码,删除 omitempty 即可
https://github.com/golang/protobuf/blob/master/protoc-gen-go/generator/generator.go#L2500
xxxxxxxxxxtag := fmt.Sprintf(“protobuf:%s json:%q”, g.goTag(message, field, wiretype), jsonName+”,omitempty”)方法二:
修改编译之后生成的 *.go 中结构体的定义,删除 omitempty 即可
[golang] flag provided but not defined: -xxxxx
系统环境
go 1.12.9
问题描述
使用 flag 包时,运行时报错 flag provided but not defined: -xxxxx
问题原因
把 flag.Parse() 调用放在了获取参数之前
解决方式
获取所有参数之后再调用 flag.Parse()
[golang] WARNING: Missing 'go_package' option in "xxx.proto"
系统环境
go 1.13.4/Ubuntu 18.04
问题描述
编译 proto相关文件,警告信息如上
问题原因
proto3 的语法中缺少了 option go_package
解决方式
proto 文件添加如下定义
xxxxxxxxxxsyntax = "proto3";option go_package = ".;protocol";[redis] listening socket 127.0.0.1:6379: bind: No error
系统环境
redis 3.2.100/windows 7
问题描述
前台运行 redis-server,自动退出
问题原因
<暂不明确>
解决方式
另起一个终端,运行如下命令,然后重新运行 redis-server 即可正常启动
xxxxxxxxxx./redis-cli.exeshutdownexit[web] was loaded over https, but requested an insecure xmlhttprequest
系统环境
windows 7/google browser 89.0
问题描述
前端页面报错,提示 http/https 混合使用
问题原因
HTTPS 是 HTTP over Secure Socket Layer,以安全为目标的 HTTP 通道,所以在 HTTPS 承载的页面上不允许出现 HTTP 请求,一旦出现就是提示或报错
解决方式
从使用侧来看,可以通过 nginx 强制让 HTTP 请求转为 HTTPS
xxxxxxxxxxadd_header Content-Security-Policy "upgrade-insecure-requests;connect-src *";或者在前端页面加入
xxxxxxxxxx<meta http-equiv="Content-Security-Policy" content="upgrade-insecure-requests"/>从后端服务而言,通过代理服务器 NGINX 或者 Tomcat 将前端和后台接口都支持 HTTPS 即可
[aws/rds] Cannot modify a default parameter group. (Service: AmazonRDS; Status Code: 400; Error Code: InvalidParameterValue
系统环境
AWS RDS/MySQL
问题描述
修改 MySQL 参数组配置,例如打开 general 操作日志
问题原因
AWS 的 RDS 是不允许修改 default 参数组的。因此先要确认下当前 RDS 采用的参数组是不是 default 参数组
解决方式
参数组名称会发生更改并立即应用,但在您手动重启实例之前,参数组不会应用
从左侧的参数组菜单进入,即可新建参数组。一般我们都会从把当前在使用的参数组作为模版来复制一份新的来调整。(默认的参数组不可复制,复制按钮是灰显,我们需要重新创建一个参数组进行修改)。
选择当前在使用的参数组,Actions->Copy 即可。当前在使用的参数组为 default.mysql5.7,复制过来的新的参数组为 hello.parameter.group
在该参数组上调整相关参数,保存
然后变更 RDS 使用的参数组,使用新的参数组
[docker] Error response from daemon: missing signature key
系统环境
CentOS 7
问题描述
yum 安装 docker,拉取镜像报错
x
Error response from daemon: missing signature key问题原因
docker 版本不兼容,卸载安装最新社区版本即可
x
yum erase docker docker-client docker-client-latest docker-common docker-latest docker-latest-logrotate docker-logrotate docker-selinux docker-engine-selinux docker-engine docker-ce -yyum install -y yum-utilsyum-config-manager --add-repo http://mirrors.aliyun.com/docker-ce/linux/centos/docker-ce.repoyum install docker-ce -ysystemctl start docker